The V Spot

Rants, observations, and home decorating... from a woman with no time for a blog.


  • Email
  • Facebook
  • Instagram
  • Pinterest
  • Twitter
  • Home
    • Privacy Policy
  • All Blog Posts
  • Crafts
    • All projects
    • By Project
      • Accessories
      • Artwork
      • Before & After
      • Cheap & Easy
      • decor
      • Floral Design & Centerpieces
      • Furniture
      • garden & outdoors
      • Glass
      • no-sew
      • Upcycle – Recycle
      • Wreaths
    • By Season
      • Spring
      • Summer
      • Fall
      • Winter
    • By Materials
      • corks
      • epsom salt
      • fabric
      • Mod Podge
      • Paper
      • Spray Paint
      • Sticks
    • Round-Ups
  • Holidays
    • Halloween
      • Pumpkins
    • Thanksgiving
    • Christmas
    • Valentine’s Day
    • St. Patrick’s Day
    • Easter
    • Cinco de Mayo
    • Mother’s Day
    • 4th of July
  • Food & Drink
    • All recipes
    • Breakfast
    • Appetizers
    • Side Dish
    • Main Dish
    • Desserts
    • Drinks & Wines
    • Tables & Decor
  • Real Life
    • Family
      • Grant
      • parenting
    • Tales To Tell
    • friends
    • Keepin’ It real
    • Tips & Tricks
      • cleaning
      • Health & Beauty
      • Let me help you
      • organization
    • Just Funny
      • No Mom wants to hear…
      • Exchange of the Day
      • Snarky
      • wacky strangers
      • Big Time Fail

DIY Halloween Party Invitations (For the non-scrapbooking, non-paper crafting types out there.)

September 28, 2012 4 Comments

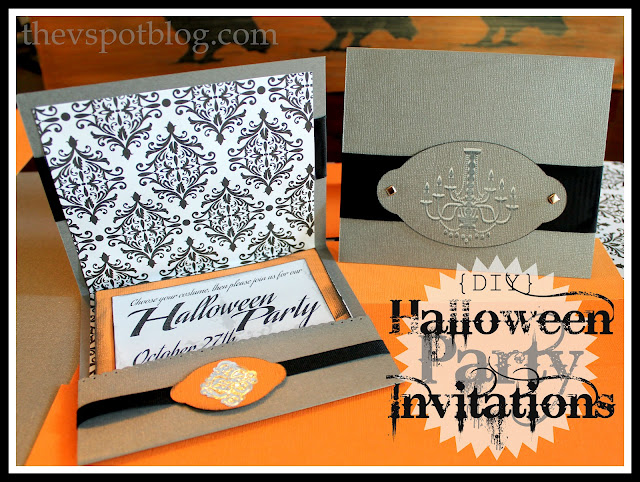
We host a Halloween Party every year, and one of the things I really enjoy doing is making the invitations.  (Here are the invitations I made last year.  Super easy.)  While I did do a “Save the Date” over Facebook at the beginning of the month, I think there’s just something special about getting an actual invitation in the mail.  Even if it’s just one item in a the middle of a dozen bills and junk mail pieces, at least it’s a fun item, right?

These are the ones I made this year:

I am not a scrap-booker, or a particularly talented paper crafts person.  However, I can measure, I can cut a straight line, and I have double sided tape and ribbons.  I am good to go, and so are you.

Here are the supplies needed for basic construction.  Makes 20 invitations.
(Of course you can substitute your own color scheme, patterns, etc.  The colors listed are for your shopping list/measuring purposes, m-kay?)

  • 10 pieces of 12 x 12 cardstock in a silvery gray
  • 10 pieces of 12 x 12 cardstock in a black & white pattern
  • 5 pieces of 12 x 12 cardstock in orange
  • 8 to 12 pieces of  letter size white cardstock
  • transparent tape
  • double sided tape
  • glue stick
  • spool of 3/8 inch black grosgrain ribbon
To dress it up a bit, you can use whatever you like and do whatever you want.
Embellishments:
  • spool of 1& 1/2 inch black satin ribbon
  • black and white stamp pads
  • chandelier stamp
  • electronic cutting machine or decorative edge scissors
  • foil stickers
Start by cutting all of your gray cardstock in half.  You should have 20 pieces, measuring 6 x 12.
Next, (if you’re using ribbon on the front of the invitation) cut a length of ribbon that is about 7″ long.
You’re going to start by taping one end to the “inside” of  the card, an inch or two from one of the ends. Wrap it around the front of the card so and tape it to the the other side.  (I run a little bit of the glue stick across the front to keep the ribbon from sliding.)
Once the ribbon is in place, it’s time for the inner, patterned piece of paper.  Cut off a 3″ strip and set aside.  Take the 12″ side of the 9 x 12 piece and measure 5 1/2 inches over and cut.  You should have 2 pieces that are 5 1/2 x 9.  Set the scraps aside for another project.  (Or if you’re me, hoard eleventy billion little scraps of paper and never do anything with them, but steadfastly refuse to throw them out.)
Put a little piece of double sided tape in the top two corners of the patterned paper, then run glue stick over the rest of the paper.  Lay it on the “inside of your invitation, making sure to cover your taped edges of ribbon.  (Because no one wants to see that.)
I cut a patterned edge at the bottom of the card.  If you don’t want to, that’s OK, or if you don’t have a decorative paper punch you can use decorative edged scissors.  Whatever you want.
This is also the point where you are going to fold the card.  From the top, measure 5″ down and create a fold.  Then fold the bottom 2″ (with the decorative edge) up.
Make sure you make a nice, crisp crease.
To create the “pocket” for the invitation, you’re just going to tape a ribbon around it.
Start with double stick tape right in the middle.  Cut a length of ribbon that’s about 12″ long.  Place one end of the ribbon on the tape, wrap it around the back of the card and adhere the other end to the front.  Add a piece of regular tape over the top to make sure it’s nice and secure.
Add your little embellishment over it to hide the seam, then put your invitation (and RSVP card) into the pocket.

To make both the little orange embellishments that went on the inside, and the larger gray embellishment on the front of the card, I used my Cricut machine.  (This was from the Classic Font Cartridge, 1.75 and 2.5 inches, respectively.)

The front shape was stamped with chandelier shaped stamp, first with a white ink, then black ink slightly off-set right over it.  I put brads through the holes on the front, and didn’t worry about the tiny holes on the smaller shape inside.

As far as the actual invitation inside, the orange cardstock was cut into 5 1/4 x 4 3/4 inch pieces.  I printed the information on white cardstock and then cut it out so that it was slightly smaller than the orange piece.  I distressed the edges of both pieces with black ink from the inkpad, then I used the glue stick to adhere the white invitation to the orange piece.  Done.

By the way, don’t be like me and forget to put any RSVP or contact info on the invitation.  If that happens, you are going to have to print up a separate piece and tuck that into the pocket too and pretend that you meant to do it that way.

I’m pretty happy with how they turned out.

By the way, you might be thinking it’s kind of weird that I have chandeliers on my Halloween invitations. I am more of a eerie/Poe kind of Halloween person than a gory Halloween person.  I am envisioning a party with chandeliers and candles everywhere and kind of spooky and Victorian/Gothic. That’s why chandeliers…
(Also?  It’s my party and I’ll do whatever I want.)

about Vivienne Wagner

Filed Under: cheap and easy, craft time, Crafts, Halloween, Paper, paper crafts, project du jour

Comments

  1. Hi I'm Shannon! says

    September 28, 2012 at 8:51 PM

    Those are just gorgeous! Love the chandy, reminds my of the Haunted Mansion. I’m sure your party will be fabulous!!

    Reply
  2. lisbonlioness says

    September 30, 2012 at 3:57 PM

    Just from how you describe your Hallowe’en personality type (and yeah, I totally think that should be an online multiple choice test!!) I’d LOVE to party with you on October 31st! Nailed it… chandeliers, top hats, Nevermore and creaky floor boards. That’s all I need!
    Love your cards, they are classy and elegant. One of my future purchases (after the sudden, unexpected windfall that I just know must happen one day) is a full kit of scrapbooking materials. I love digiscrapping, but something to stick into an envelope and mail to loved ones via snail mail would be fantastic!

    Reply

Trackbacks

  1. Easy Halloween party invitations. » The V Spot says:
    July 24, 2014 at 11:31 AM

    […] The invitations I made last year were this same basic pocket style card and insert, but last year’s had more ribbon and embellishments. Pin […]

    Reply
  2. A simple Valentine's Day mantel. - The V Spot says:
    February 8, 2016 at 7:39 PM

    […] the Halloween party invitations that I made a few months ago?  I had lots of scraps of this cool black and white paper left over. […]

    Reply

Leave a Reply Cancel reply

Your email address will not be published. Required fields are marked *

you might also like:

Make an easy scrap paper Christmas tree.
Going Batty: Making over a bare wall for Halloween.

Make cute Halloween party invitations for pennies (& without any real supplies or effort…)
How to make a Haunted Tree. (With things you already have, of course.)

Cheapy, Creepy, Halloween Party Invitations
A quick and easy DIY mat and frame project. (No tools. You just need tape!)

How to make your own DIY jar candles (using recycled jars and candle wax)
clippings, Christmas trees, branches, greenery
Simple Christmas planters. (Using Christmas tree clippings.)

Make an easy Yarn Tree… in less than 5 minutes.
glitter, pumpkin, pedestal, thankful, autumn, white, ribbons, silver, thanksgiving, decor
Easy pedestal pumpkin for Thanksgiving.

Recent Posts

  • Spooky porch decor and a Halloween Chair.
  • DIY Plaid Wine Glasses
  • Easy Sand-N-Sea Flower Pots
  • How to use an indoor chandelier outside.
  • Quesadillas made with slow cooker Carnitas. (Pork in a crock pot… nothing is easier.)
  • No Sew Project: How to recover your outdoor cushions using fabric and a glue gun.
  • Upcycle project: plain flower pot into decorative ceramic planter.
  • An easy Valentine’s Day globe.
  • Simple, winter themed decor. (Using what you already have, of course.)
  • Easy Goat Cheese Appetizer Recipe

Amazon Associates Disclosure

Vivienne Wagner is a participant in the Amazon Services LLC Associates Program, an affiliate advertising program designed to provide a means for sites to earn advertising fees by advertising and linking to amazon.com.

Popular Posts

  • Cleaning Stove Burners & Grates using Ammonia (The best...
    Comments (631) | Jul 07, 2011
  • Easy Dessert Recipe: Oreo Cheesecake Bites
    Comments (64) | Mar 04, 2014
  • How to store fresh produce – From A to Zucchini.
    Comments (111) | Jan 25, 2012
  • No Sew Project: How to recover your outdoor cushions using f...
    Comments (110) | Mar 03, 2018
  • DIY wine bottle crafts.
    Comments (10) | Aug 22, 2013
Privacy

Copyright © 2023 The V Spot · Website by Houndstooth Media Group