I’m on a faux-finishing kick at the moment. Last week I showed you how to make a faux rust effect using spray paint and salt.
Today I wanted to show you how to create the look of those chippy, weathered, shabby chic flower pots and other garden items. Have you priced them? Crazy! I am not going to pay those prices, especially when I can make them myself.
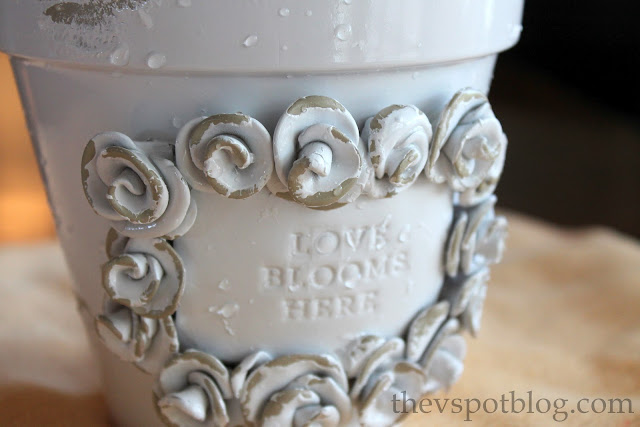
This flower pot…
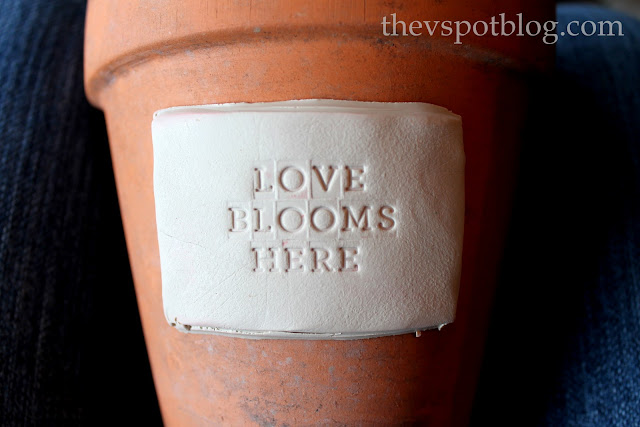
…was once a boring, plain terracotta flower pot.

Besides an old flower pot, you’ll need a good adhesive, some modeling clay, some wax and an old paintbrush and 2 colors of spray paint.
Take the modeling clay and knead it and work it until it’s pliable. Take a wad of it and flatten it out on a cutting board. I trimmed the edged of mine to make a rectangle. (Mine didn’t need to be perfect because I knew I would cover it with the clay roses.)

Next use a stamp or a toothpick to write in the clay. I used one of the Martha Stewart Stamp sets. (If it’ll work with ink, it’ll work with clay… just be sure to clean it afterwards.)
When done, carefully form it to the pot where you want it. Put it in the oven right on the pot. That way it hardens in the exact shape you want. Bake according to package directions.
Once it has hardened in the oven, glue it in place on the pot.
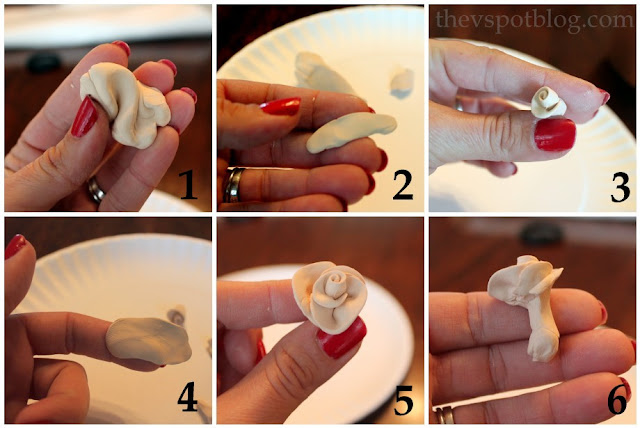
How to make the Clay Roses:
 |
| No cracks about my desperate need for a manicure, OK? |
1. Break off a piece of modeling clay and knead it until it’s nice and pliable.
2. Take a small bit of the clay and flatten it into a long, thin piece.
3. Start rolling at one end, sort of pinching at the bottom as you go along. That’s the center of your rose.
4. Pinch off another piece of clay and flatten it into a long oval shape to make more petals..
5. Begin overlapping where the last piece of clay ended, wrapping more “petals” as you see fit. Go ahead and form them into whatever shape most looks like a rose as you go along.
6. As you create more petals, you will be pinching at the bottom of your rose and will end up with a clay “stem”
Once you’ve made your rose, it’s time to Bake It.
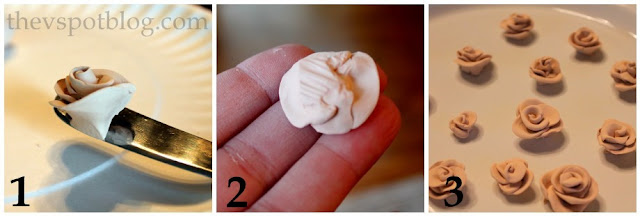
1. Cut the excess clay “stem” off of the bottom of your rose.
2. Score the bottom of the rose. The score marks help to create a stronger hold when gluing to your flower pot.
3. Put your roses on an oven safe plate and bake according to package directions.
When your roses are done, you can begin to glue them around your decorative quotation. I recommend that you turn the pot on its side and glue them that way. You will probably end up gluing one half of the pot, letting the glue dry, then rotating it to do the other half.
When finished it will look like this. I wasn’t happy with the finished product because there were gaps in some places.

To fix that problem, I made a few individual “petals” and shoved them in to cover the gaps. I then put the whole pot in the oven at a really low temperature to set the petals.

Because they were wedged in there and hardened that way, they are secure and there was no need to glue them. (If you try this you may find that yours need extra glue. Just do whatever works for you.
Because I am going to do a wax-resist effect on the pot, I needed to coat it with my base color first.
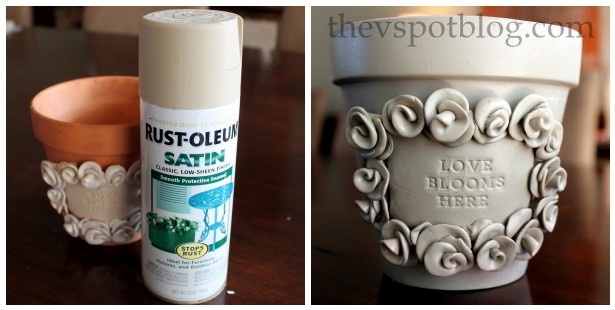 |
| Rustoleum’s Satin in Putty |
Here’s where the wax comes in. This technique is called Wax Resist and the idea is that the wax prevents the second coat of color from adhering to the pot. When you remove the wax, the base color should show through underneath.
 |
| Click photo to see a close up of the wax on the edges of the petals. |
You can take the wick and little metal dish from a tea-light and melt it in the microwave (or just burn a white candle and carefully use that melted wax.) Take an old ratty paintbrush that you won’t mind ruining, dip it in the wax and paint wax all along the edges of the petals. You can smear some in various places on the pot too.
Spray paint your top coat. I chose a gloss white.
Let the paint dry thoroughly. You may even want to wait a day for this next step. (For the purposes of making this tutorial, I rushed the process a bit and I am not as happy as i could be with the end result… Learn from my mistakes, people.)
Once the paint is dry, put a strainer over the drain in your sink, run tap water as hot as you can get it and let the water wash over the wax.
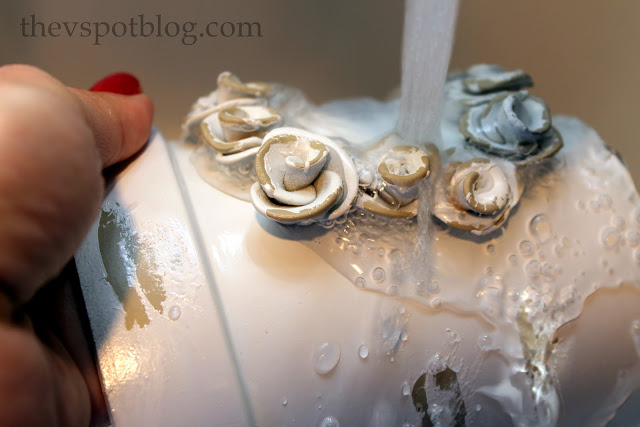
The hot water melts the wax away (which takes the top layer of paint with it) and the strainer catches the paint so it doesn’t go down the drain.
The end result looks like and old, chippy pot.
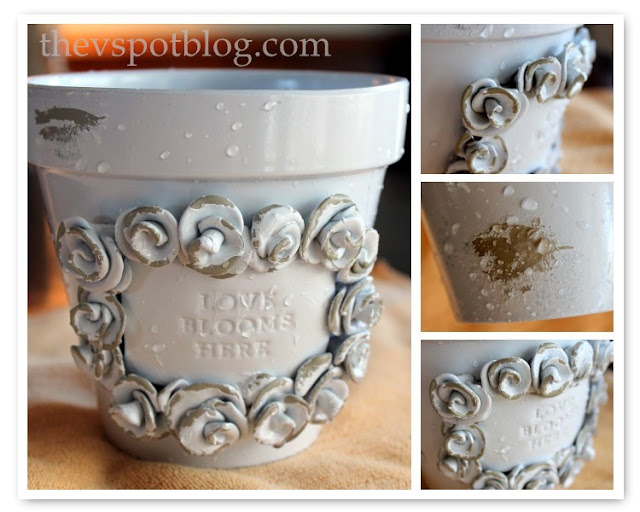
Pretty cool, huh? You could do this with just about any design and on lots of different surfaces too.
Have fun!

You never cease to amaze me! thanks for sharing..I have been wondering how to make the clay roses. You’re the best and as always…love your blog and all it has to offer!
Ta Ta
This is unbelievably amazing! Pinning, tweeting etc. etc.
SOOOO cool! Gah, Viv. You’re so crafty!
your creativity always leaves me in aw… amazing girl!! Very cute!! I love it!
So cool!
Way cool, I am certain I will be seeing this all over! I love that trick of wax and paint, but it never occurred to me to use it on a pot. Also, I have never worked with clay, I love the way it turned out. I just might try this!
Very, VERY cool! What a great idea. You’re a brilliant girl! I made faux mossy terra cotta pots with spray paint. I love what you can do with a cheap terra cotta pot and a little imagination!
Egad.
Let’s add this to the list of ” Ideas that I stole from Miss V but claim to my friends are my original ideas. “
I have a meager little party going on that I’d love for you to link this to!
This idea is fabulous! Came out very shabby chic! Pretty! With love, My
That is pretty impressive
Genius! Thank you so much for sharing 😀
Way better then cool… Seriously Viv you are BRILLIANT!
What a cool project! Love the look.
Wow! How beautiful! Love love love it Thanks for the tutorial
Hugs
SueAnn
that is toooooooooo cute want to try those roses and the little sign too tfs
xmaggiex
Oh my gosh, I LOVE this idea because it has so many applications and you could customize it for different holidays, and looks, etc. AH! You are amazing! Seriously, one of the best ideas I have seen in a long time. Thanks for sharing!
I like it better before you chipped it but that’s just my opinion. HOW DO YOU EVEN KNOW HOW TO DO THIS STUFF??
I’ve read this twice just to try to wrap my head around it. My brain waves just don’t go where yours do. It’s funny just how different we really are BUT opposites attract, right?
Really amazing and creative process! Thanks so much for sharing it with us. I saw your post over at “Inspiration Friday”.
I think this is amazing. I’m definitely pinning it for future reference.
Just fabulous! I love it and need to try this! Thanks for the inspiration!
Holly
This is beautiful! I found you on facebook and ‘liked’ you so I can follow your blog. Hope you can find my facebook too, or follow me by email. Little Bit from DecorateWithaLittleBit.com
Woohoo! A clay project. Love it, Vivienne. Keep em coming 🙂
I can’t get over how cute these are!! I love all things “shabby chic”. Totally making these for my mom and MIL for mother’s day (and one for me too!). Pinning this now. Love these!
Love this. I’ve never tried that candle wax trick but I’m excited to. 🙂
So cute! Looks like the pot I planted my paperwhites in. =) Thanks for sharing!
LUV this idea!!! I’m definitely pinning this and trying this out next week! Thanks for sharing a great tutorial! 🙂
xoxo laurie
Great tute Vivienne! Love your flowers! (pot) Sooo pretty.
thanks so much for sharing @ catch as catch can!
gail
I ABSOLUTELY LOVE THIS! This screams shabby chic. You have inspired me to try this out!
haha! My house is almost as messy! Now worries girl, we’re all human! Kim @ Sand & Sisal
I love this! Can’t wait for spring and planting flowers! Would love it if you came by and linked up to my Manic Monday Linky Party!
-Melissa
http://serendipityandspice.blogspot.com
That turned out so well! It’s beautiful. Thank you for the tutorial.
Another BFC best friend crafter I have added you to the club fictional of course another words I admire you terribly love the pots I too am liking tweeting and old fashioned not so chic these days telling by word of mouth-hey do you a sister???
very cool, thanks for sharing : )
Very cool idea. Have you tried these on containers and them planted them up and left them outside in the elements?
WOW! What a great tutorial. That pot is adorable. I’m featuring your project this weekend in the Power of Paint Party Spotlight @ Domestically Speaking. Thanks for linking up.
What a beautiful transformation of a simple flower pot! I will definitely be making this!!! Pinning it.
You are so clever. This is a great idea.
Kelly