The V Spot

Rants, observations, and home decorating... from a woman with no time for a blog.


  • Email
  • Facebook
  • Instagram
  • Pinterest
  • Twitter
  • Home
    • Privacy Policy
  • All Blog Posts
  • Crafts
    • All projects
    • By Project
      • Accessories
      • Artwork
      • Before & After
      • Cheap & Easy
      • decor
      • Floral Design & Centerpieces
      • Furniture
      • garden & outdoors
      • Glass
      • no-sew
      • Upcycle – Recycle
      • Wreaths
    • By Season
      • Spring
      • Summer
      • Fall
      • Winter
    • By Materials
      • corks
      • epsom salt
      • fabric
      • Mod Podge
      • Paper
      • Spray Paint
      • Sticks
    • Round-Ups
  • Holidays
    • Halloween
      • Pumpkins
    • Thanksgiving
    • Christmas
    • Valentine’s Day
    • St. Patrick’s Day
    • Easter
    • Cinco de Mayo
    • Mother’s Day
    • 4th of July
  • Food & Drink
    • All recipes
    • Breakfast
    • Appetizers
    • Side Dish
    • Main Dish
    • Desserts
    • Drinks & Wines
    • Tables & Decor
  • Real Life
    • Family
      • Grant
      • parenting
    • Tales To Tell
    • friends
    • Keepin’ It real
    • Tips & Tricks
      • cleaning
      • Health & Beauty
      • Let me help you
      • organization
    • Just Funny
      • No Mom wants to hear…
      • Exchange of the Day
      • Snarky
      • wacky strangers
      • Big Time Fail

A DIY, personalized wedding or anniversary gift for less than $20

May 21, 2012 70 Comments

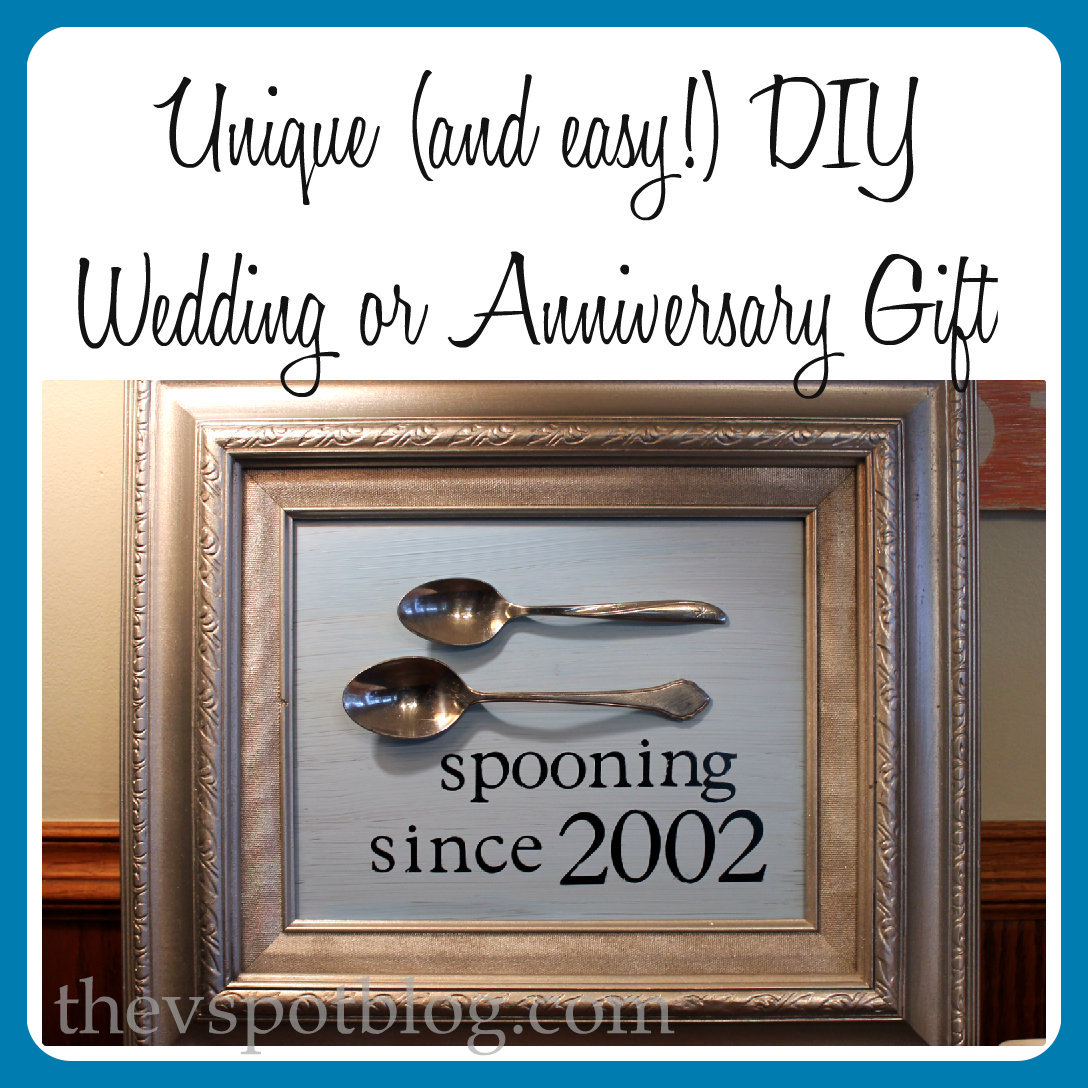
This might be a little silly (or a bit TMI) for some folks, but I think it’s cute.

Today I’m going to show you how to make an easy piece of “couples” artwork for less than $20 and in under an hour (not counting drying time.)

How to make a unique, personalized wedding or anniversary gift for less than 20 bucks!
I think this “Spooning” artwork would be very cute for a wedding gift or for an anniversary gift.  (Or in my case, just because.)

When I was at SNAP! I saw spoons that had been hammered flat and had text hammered into them.  (I cannot remember the vendor that had them, so sorry.)  I think they were designed to be little plant or garden markers.  Anyhow, a few weeks later I saw a big bin of spoons at my local Goodwill and found two that I thought had a kind of cool design on them.  And for .29 cents a piece, why not?

Spoons for artwork.

Supplies needed:

  • Old frame and glass
  • 1 can silver and 1 can black spray paint (I used Krylon)
  • adhesive letters (I used my Cricut and Contact paper)
  • acrylic paint (I used Martha Stewart’s Sea Lavender and Blue Sky)
  • strong adhesive (I like Amazing Goop)
  • 2 spoons (best if one is a little bigger than the other)

The colors I used match our bedroom, but obviously, you could choose whatever like.  If you wanted to, you could also make this work for the kitchen.
I took an old frame that I had laying around and spray painted it silver.

Make a cute wedding or anniversary gift: Spooning artwork

Then I took the glass from the frame and I spray painted it black.  (Yes, you can spray paint anything, including glass.)

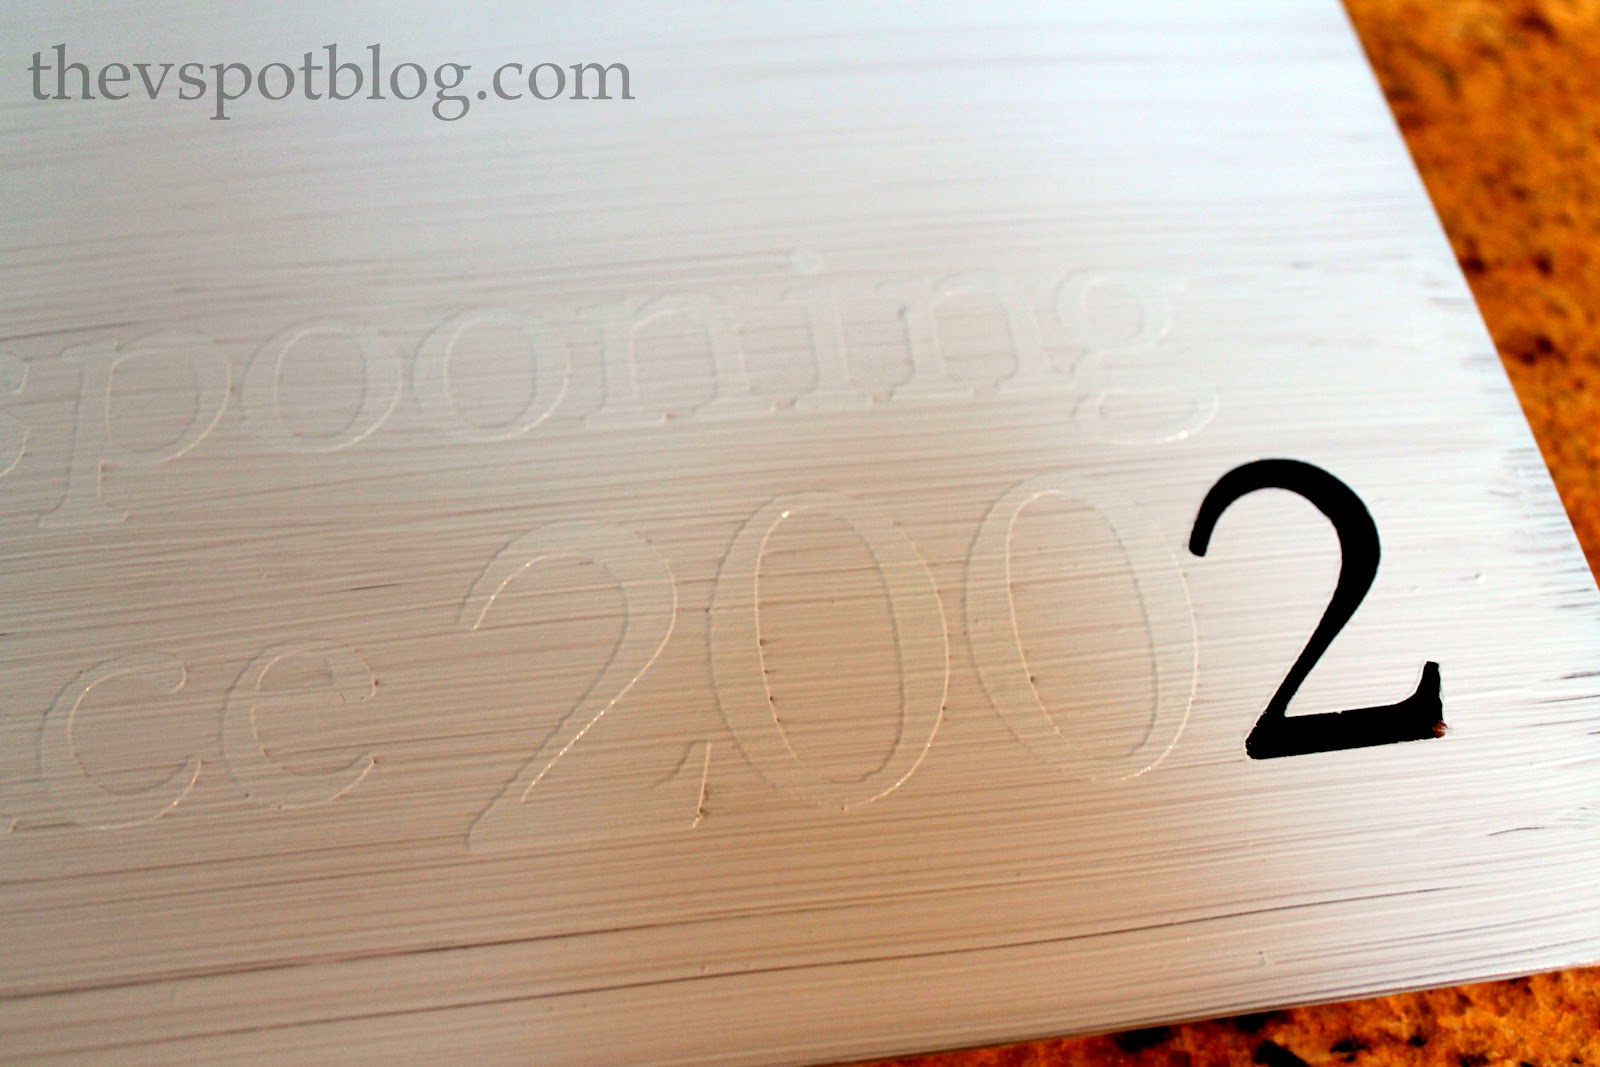
I played around with the placement of the spoons and the contact paper letters.

Spooning artwork. A unique and easy wedding or anniversary gift.

At the end of the day, I thought our names made it too busy and opted to leave them off of the project.

I figured out where the spoons would go and adhered the letters accordingly.  Once the letters were pressed on, I added the two blue paint colors I wanted.  (Just squirt the paint directly onto the glass.)

Making Spooning artwork. A unique and easy wedding or anniversary gift.

Apply the paint, making sure your brush strokes go in one direction only.  (I chose side to side, horizontally.)  When the paint is set (but not totally dry) go ahead and carefully start peeling up the letters.  I used the tip of an exacto knife and tweezers to pull them off.

Create your own personalized artwork. Great for a wedding or anniversary gift.

When all of the letters have been peeled away and the paint is dry, apply the adhesive to the lowest part of the back of the spoon (basically where the bowl of the spoon rests when you set it on the table) and also on the back of the handle where it hits the table.

Spooning artwork. A unique and easy wedding or anniversary gift.

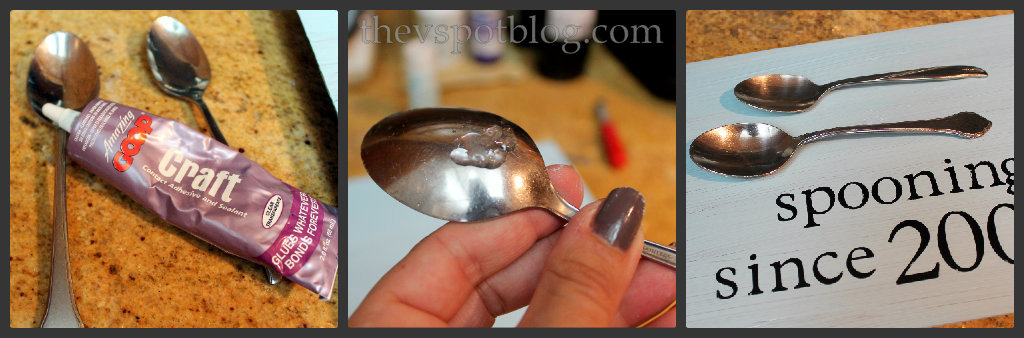
Once the glue is applied to the spoons, carefully position them where you want them and let them sit.  I let mine cure overnight, just to be sure it was nice and secure.

I love how it turned out.  I think it’s fun and whimsical, and it is certainly unique.

How to make a unique, personalized wedding or anniversary gift. (for less than 20 bucks!)

What do you think? Happy crafting!

Also shared at Today’s Creative Blog  SNAP Show & Tell and Home Stories A2Z

Filed Under: Before and After, craft time, Crafts, frames, gift giving, project du jour, spray paint, tutorial, UseWhatchaGot

Comments

  1. MiMi says

    May 21, 2012 at 4:27 PM

    Cheesy and adorable. I want. 🙂

    Reply
  2. reFresh reStyle says

    May 21, 2012 at 4:51 PM

    Great idea! Love it!

    Reply
  3. Sara @ CleverPinkPirate.com says

    May 21, 2012 at 5:27 PM

    This is way too cute!!

    Reply
  4. Natalie says

    May 21, 2012 at 7:43 PM

    Ahhaha!! I love it so much! Thanks for the great idea!

    Reply
  5. Colleen says

    May 21, 2012 at 8:02 PM

    That is adorable.

    I think I might do it with forks.

    Because we’re that classy.

    Reply
    • Tamarin says

      May 3, 2017 at 3:29 AM

      I laughed way more than i should have at tHIs comment!! An oldie, but still a goodie!! 😀 Love the cute diy gift also. Gonna try it today <3

  6. Colleen says

    May 21, 2012 at 8:02 PM

    That is adorable.

    I think I might do it with forks.

    Because we’re that classy.

    Reply
  7. Colleen says

    May 21, 2012 at 8:02 PM

    That is adorable.

    I think I might do it with forks.

    Because we’re that classy.

    Reply
  8. Laura@Elegant Nest says

    May 21, 2012 at 10:10 PM

    Cute! Reminds me of the old saying…”Spooning leads to Forking!” Ha! Could not resist…

    Reply
  9. Bliss says

    May 21, 2012 at 11:23 PM

    I think it’s fun!

    ~Bliss~

    Reply
  10. Shawn says

    May 22, 2012 at 1:34 AM

    Super cute! I would love this with old monogrammed spoons, like the one I had made into a ring!

    Reply
  11. Kristy says

    May 22, 2012 at 2:50 AM

    My Anniversary is TOMORROW and I have old monogrammed spoons! Perfect timing!! 🙂 it’s adorable!

    Reply
  12. Laura @ House Of Joyful Noise says

    May 22, 2012 at 11:33 AM

    Clever and cute!!

    Reply
  13. Our Pinteresting Family says

    May 22, 2012 at 12:10 PM

    Adorable!

    Reply
  14. nest of posies says

    May 22, 2012 at 12:38 PM

    i totally love this.

    i’m so going to do this.

    xoxo
    kellie

    Reply
  15. Kelli says

    May 22, 2012 at 1:51 PM

    LOVE!!!!!

    Reply
  16. PitterAndGlink says

    May 22, 2012 at 9:09 PM

    Hahahaha! This is great!!!

    Reply
  17. Katie says

    May 23, 2012 at 10:53 AM

    Ahhh! I love it–so stinking creative!!!

    Reply
  18. Stacy says

    May 23, 2012 at 11:45 AM

    This is FABULOUS!!! 🙂 What a great idea! I’ll be keeping my eyes open at yard sales for sure. 🙂

    ~Stacy @ Stacy Makes Cents

    Reply
  19. Beverly Pennington says

    May 27, 2012 at 8:45 PM

    LOVE LOVE LOVE – that is too cute!

    Reply
  20. At The Picket Fence says

    May 28, 2012 at 2:53 PM

    Soooo cute! I love this idea. Pinned it!

    Heather

    Reply
  21. furrrball says

    June 1, 2012 at 4:21 AM

    Don’t have a cricut so I’m going to print the words using black ink on white card stock, glue on the spoons, and frame it in a shadow box. May not look as sharp but I won’t have to dust the spoons!

    Reply
  22. Jen Lossing says

    June 1, 2012 at 5:25 AM

    This is adorable. How clever and unique. Great job!

    Reply
  23. Michelle {Daydream Believers} says

    June 2, 2012 at 12:07 AM

    Haha This is SO funny! Great job! 🙂
    Happy Day!
    Michelle
    http://www.daydreambelievers.net

    Reply
  24. Jennifer says

    June 2, 2012 at 5:14 AM

    Hehehe! So fun!!

    Reply
  25. thistlewoodfarm says

    June 2, 2012 at 2:16 PM

    This is AMAZING! Thank you so much for sharing and thanks for the inspiration.

    🙂 blessings,
    karianne

    Reply
  26. Michaela @ coveredinmodpodge.blogspot.com says

    June 2, 2012 at 4:12 PM

    I think it’s hilarious! I have a friend who’s getting married in a month and I can’t make the wedding. She’s just goofy enough to enjoy this too. Thanks so much for sharing the idea!

    Reply
  27. Susie {a.k.a. Mrs V} says

    June 3, 2012 at 3:20 PM

    I absolutely love this! I have just the spot to add one to our home, thank you so much for the inspiration!!

    Reply
  28. Kathryn says

    June 3, 2012 at 11:01 PM

    Cute idea!

    Reply
  29. Taylor-Ann says

    June 4, 2012 at 5:26 PM

    Such a cute idea. I would love if you came and linked up some of your great posts to my link party @ Show Off Monday on Kampen Lane. http://www.kampenlane.com/2012/06/show-off-monday-9.html

    ~Taylor-Ann

    Reply
  30. Debbiedoo's says

    June 13, 2012 at 7:17 PM

    This is absolutely adorable! I just saw Karianne did one almost like it, and so wished I would have seen this inspiration before our Anniversary in May. Maybe next year:) I have to pin it to remember.

    Reply
  31. Becca says

    June 18, 2012 at 4:15 AM

    I don;t know how I missed this post- but it is just darling!! What a great idea!
    xo Becca

    Reply
  32. Sarah says

    July 18, 2012 at 6:58 PM

    Okay I’m trying not to leave you a raving comment about how frustrated I am after trying to recreate this as an anniversary present for my sister, but I’m on a tight budget and just spent that said budget on the supplies for this.

    After waiting for the acrylic paint to set I pulled off the letters only to have the layer of black spray paint and much of the surrounding acrylic paint peel off as well, leaving a clear spot of glass where my letters should be.

    Was I suppose to paint one side black and then use the acrylic paint on the other side? If so, your tutorial did not specify. Or perhaps I should have let both the black spray paint and the acrylic paint dry longer? I don’t know… but I’m very disappointed.

    Reply
  33. Sandra Hersey says

    March 3, 2013 at 3:08 PM

    I cannot wait to make this for my daughter’s shower! Love.love.love! Great blog too!

    Reply
  34. Kara Hanson says

    May 6, 2014 at 12:20 AM

    How can you this much creative?Awesome idea and in a less span of time!!!!Definitely want to try this because it’s an affordable rate.

    Reply
    • vivienne says

      May 6, 2014 at 11:36 AM

      Thank you!

  35. Lauren says

    July 24, 2014 at 3:48 PM

    I am making this as we speak for mine and my husband’s anniversary. He loves my corny projects; thanks for posting!!!

    Reply
  36. courtney says

    December 16, 2014 at 7:16 PM

    I am going to do this as décor for my kitchen. I would like to make a frame with my son’s baby fork in it and put it right below the spooning one. I need a cute saying though. I thought of putting “Spooning since 2005” on one and putting “Forked in 2008” on the other one for my son.

    Reply
  37. Amber says

    May 21, 2015 at 10:58 AM

    what size is this? An 8×10 or 5×7?
    Thanks!

    Reply
    • Vivienne says

      May 26, 2015 at 8:50 AM

      Hi Amber, it is an 8 x 10.

  38. viagra_sale says

    October 16, 2015 at 4:07 PM

    Hello!

    Reply
  39. purchase_cialis says

    October 16, 2015 at 9:36 PM

    Hello!

    Reply
  40. Phoebe says

    January 5, 2016 at 2:36 AM

    How ADORABLE

    Reply
  41. Shea says

    February 10, 2016 at 8:41 AM

    Too cute! What size letters did you use?

    Reply
    • Vivienne says

      February 10, 2016 at 3:10 PM

      Thanks, Shea. I don’t recall what size they are, but that’s part of the beauty of this project… no rules, no exact measurements. You can totally make it yours. 🙂

    • T says

      November 26, 2016 at 7:24 AM

      Some of us need the extra help! Lol. Frusterating when just starting tO craft and INSTRUCTIONS are Vague. KNOWING The letter sIze would be of Great help

  42. Kevin Smith says

    May 1, 2017 at 2:49 AM

    HAHA, THAT WAS AMAZING DIY IDEA EVER. SO CHEAP AND SIMPLE TO MAKE ONE. THANKS 🙂

    Reply
  43. Garry | ToolVee says

    September 21, 2017 at 2:58 AM

    There is a great pleasure on giving a handmaiden gift. Loved your idea 🙂

    Reply
  44. physiotherapyclinics.org says

    December 30, 2017 at 2:26 PM

    That iis a very good tip particularly to those new to the blogosphere.
    Shrt but very accurate info… Thanks ffor sharing thijs one.
    A must read post!

    Reply
  45. SendBalueGiftBaskets says

    April 8, 2018 at 12:41 PM

    If not, then just how much will the company chaarge you foor where your gift is going*When will your ift arrive.
    This article provides some golf presents, and explains using some common golf accessories that may be seent as gifts.
    Let your imagination rrun wild and anything you find will certainly be
    enjoyed.

    Reply
  46. Allen | Drillez says

    July 29, 2018 at 3:43 AM

    This is a great idea. I loved your idea. Thanks for the sharing great idea!

    Reply
  47. vacgeek.com says

    September 4, 2018 at 7:04 AM

    This is an AMAZING idea! Thank you so much for sharing and thanks for the inspiration.

    Reply
  48. Dad Life says

    May 23, 2019 at 2:01 PM

    We have some friends that are getting married soon and will be making the spooning gift for them. As in addition to the spooinging to lay next to one another they also love playing the game spoons so it works for both!

    Reply
  49. Emmalyn says

    September 3, 2020 at 4:36 PM

    believe me i’ve never thought like this. it is the cheapest and quick personalized gift that you can give to any close friend’s anniversary. thanks you helped me. pinning this

    Reply
    • Vivienne says

      September 3, 2020 at 5:49 PM

      I’m glad you like it!

  50. rohan says

    November 2, 2020 at 6:45 AM

    Wow, this is a very good idea. i giggled while reading. Loved your post. thanks for sharing

    Reply
  51. lana says

    February 16, 2021 at 1:00 PM

    I’ve never get idea before like this. but you have done a great job and give me idea to give something different to my hubby on this anniversary

    Reply
    • Vivienne says

      March 15, 2021 at 4:55 PM

      That’s great! Happy anniversary!

  52. fevie says

    June 19, 2021 at 3:15 AM

    The amazing design I love it. It’s looking very nice. Thanks

    Reply
  53. mora says

    August 17, 2021 at 10:07 AM

    really I love these wood gift and your ideas are very good, I will appreciate you for this kind of post. thanks

    Reply

Trackbacks

  1. DIY ‘Spooning’ Anniversary/Wedding/Valentine’s Day Gift says:
    June 3, 2014 at 7:45 AM

    […] this momentous event, I wanted to make them something. I saw this adorable post on Pinterest from The V Spot and knew this is what I would make…just simplified. This is not only a great anniversary […]

    Reply
  2. Romantic Bedroom Projects | The Budget Decorator says:
    January 28, 2015 at 4:43 PM

    […] V Spot’ made this totally cute DIY personalized “spooning” art… Ok, I don’t love cutesy things, but romantic cute? I like […]

    Reply
  3. 12 Awesome Crafts to try this Valentine’s Day | Orange Blossoms and Sunshine says:
    February 6, 2015 at 3:20 AM

    […] Spooning Since Art Project – The V Spot Blog […]

    Reply
  4. 30 Awesome DIY Gift Ideas For Your Boyfriend says:
    June 3, 2015 at 9:33 PM

    […] I hope you were lucky enough to snag a guy with a sense of humor.  If so, I am sure he’ll love this hilariously cute DIY picture project from Vivienne Wagner at “The V Spot“. […]

    Reply
  5. Wedding Anniversary Gifts For Couples | Gift Ideas Blog - Gift Ideas Blog says:
    August 4, 2015 at 6:40 AM

    […] … wedding gift or for an anniversary gift. (Or in my case, just because | Read Sources […]

    Reply
  6. Traditional Anniversary Gift Guide | Eat, Lift & Be Married says:
    January 13, 2016 at 6:42 PM

    […] DIY: make a “Spooning Frame” -this is the best. DIY here and here. […]

    Reply
  7. 22 Silly DIY Projects That Will Make You Laugh Out Loud – OMG It Went Viral says:
    March 15, 2016 at 4:16 PM

    […] thevspotblog.com […]

    Reply
  8. A DIY, personalized wedding or anniversary gift for less than $20 | Woody Things says:
    April 21, 2016 at 7:05 AM

    […] Source: A DIY, personalized wedding or anniversary gift for less than $20 – The V Spot […]

    Reply
  9. 22 Silly DIY Projects That Will Make You Laugh Out Loud | Web Media Publishing says:
    June 6, 2016 at 5:16 AM

    […] thevspotblog.com […]

    Reply
  10. 22 Silly DIY Projects That Will Make You Laugh Out Loud – King Of Weekends says:
    January 21, 2017 at 11:24 AM

    […] thevspotblog.com […]

    Reply

Leave a Reply Cancel reply

Your email address will not be published. Required fields are marked *

you might also like:

How to make your own DIY jar candles (using recycled jars and candle wax)
Upcycle project: plain flower pot into decorative ceramic planter.

An easy Valentine’s Day globe.
cream, elegant, pumpkin, green, bling, ribbon, thanksgiving, paint
Turning plain pumpkins into elegant pumpkins for Thanksgiving.

A quick and easy DIY mat and frame project. (No tools. You just need tape!)
Make an easy scrap paper Christmas tree.

DIY Patriotic Flag Artwork in about an hour.
Upcycle an old bottle to make a dish soap dispenser.

Easy fake coral made from salt dough. DIY
Red Faux (“Daux”) Coral – Easy coastal decor made from salt dough.
Taming counter-top clutter with canisters.

Recent Posts

  • Spooky porch decor and a Halloween Chair.
  • DIY Plaid Wine Glasses
  • Easy Sand-N-Sea Flower Pots
  • How to use an indoor chandelier outside.
  • Quesadillas made with slow cooker Carnitas. (Pork in a crock pot… nothing is easier.)
  • No Sew Project: How to recover your outdoor cushions using fabric and a glue gun.
  • Upcycle project: plain flower pot into decorative ceramic planter.
  • An easy Valentine’s Day globe.
  • Simple, winter themed decor. (Using what you already have, of course.)
  • Easy Goat Cheese Appetizer Recipe

Amazon Associates Disclosure

Vivienne Wagner is a participant in the Amazon Services LLC Associates Program, an affiliate advertising program designed to provide a means for sites to earn advertising fees by advertising and linking to amazon.com.

Popular Posts

  • Cleaning Stove Burners & Grates using Ammonia (The best...
    Comments (631) | Jul 07, 2011
  • Easy Dessert Recipe: Oreo Cheesecake Bites
    Comments (64) | Mar 04, 2014
  • How to store fresh produce – From A to Zucchini.
    Comments (111) | Jan 25, 2012
  • No Sew Project: How to recover your outdoor cushions using f...
    Comments (110) | Mar 03, 2018
  • DIY wine bottle crafts.
    Comments (10) | Aug 22, 2013
Privacy

Copyright © 2023 The V Spot · Website by Houndstooth Media Group