The V Spot

Rants, observations, and home decorating... from a woman with no time for a blog.


  • Email
  • Facebook
  • Instagram
  • Pinterest
  • Twitter
  • Home
    • Privacy Policy
  • All Blog Posts
  • Crafts
    • All projects
    • By Project
      • Accessories
      • Artwork
      • Before & After
      • Cheap & Easy
      • decor
      • Floral Design & Centerpieces
      • Furniture
      • garden & outdoors
      • Glass
      • no-sew
      • Upcycle – Recycle
      • Wreaths
    • By Season
      • Spring
      • Summer
      • Fall
      • Winter
    • By Materials
      • corks
      • epsom salt
      • fabric
      • Mod Podge
      • Paper
      • Spray Paint
      • Sticks
    • Round-Ups
  • Holidays
    • Halloween
      • Pumpkins
    • Thanksgiving
    • Christmas
    • Valentine’s Day
    • St. Patrick’s Day
    • Easter
    • Cinco de Mayo
    • Mother’s Day
    • 4th of July
  • Food & Drink
    • All recipes
    • Breakfast
    • Appetizers
    • Side Dish
    • Main Dish
    • Desserts
    • Drinks & Wines
    • Tables & Decor
  • Real Life
    • Family
      • Grant
      • parenting
    • Tales To Tell
    • friends
    • Keepin’ It real
    • Tips & Tricks
      • cleaning
      • Health & Beauty
      • Let me help you
      • organization
    • Just Funny
      • No Mom wants to hear…
      • Exchange of the Day
      • Snarky
      • wacky strangers
      • Big Time Fail

DIY Ombre subway art for Mother’s Day.

April 24, 2012 28 Comments

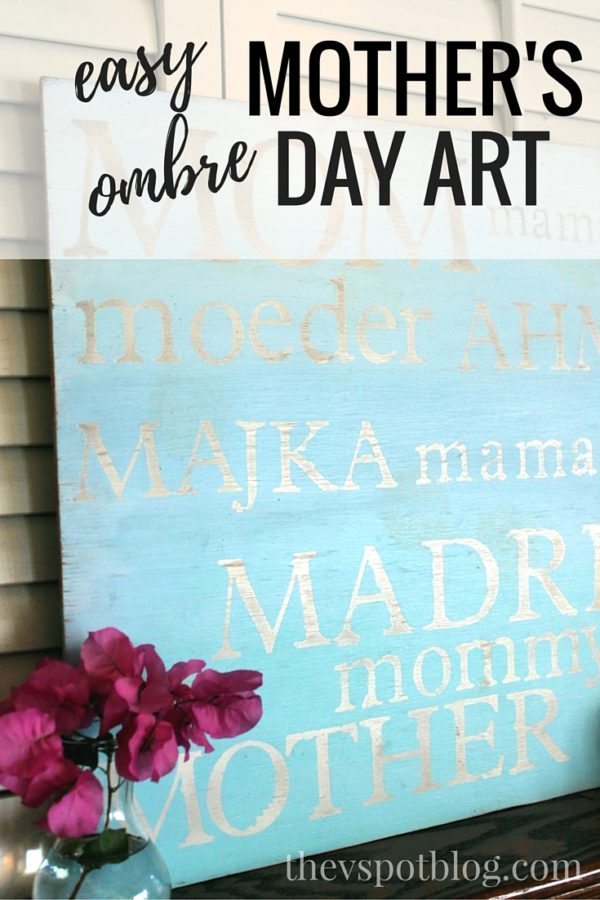
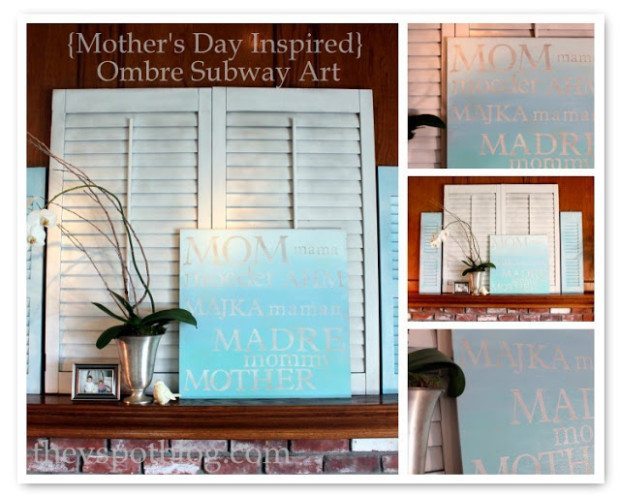
Mother’s Day is just around the corner, so when Plaid Crafts sent me a whole box of Martha Stewart Craft Supplies and asked me to create a Mother’s Day project, I jumped at the chance. I decided to make some Mom-inspired, typographic subway art.
Easy to make Ombre typographic Artwork for Mother's Day

(This post contains affiliate links)
Supplies needed:
  • a 1/4″ plywood board. (mine is 24 x 24 inches)
  • white spray paint (it doesn’t really matter what brand for this project, you just need a good base.)
  • vinyl letters (I used Contact Paper and my Cricut, but you can use pre-cut adhesive letters)
  • 3 shades of Martha Stewart Satin Paint (I used Sea Lavender, Blue Sky and Surf)
  • An exacto knife
  • a sanding block or hand sander
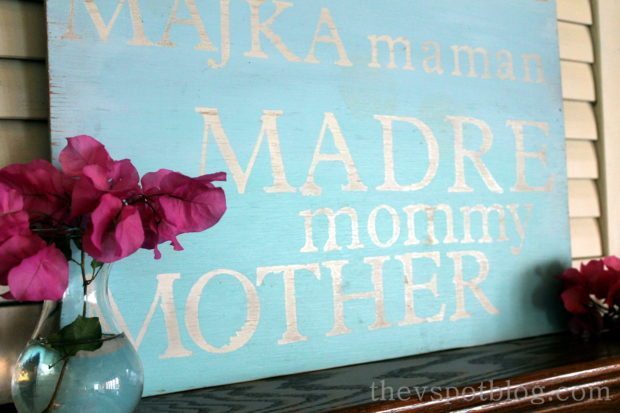
I painted my plywood board with white spray paint.  While it dried, I looked up the word “mother” in different languages and began to cut them out using my Cricut.
cricut, electronic cutting tool, mother's day, art work
I got a general idea of where I wanted the letters to go, then started adhering them to the board.
stencils, art, adhesives, vinyl, artwork
I chose 3 graduated shades of blue and divided the board into thirds and put a big bloop of paint where I wanted the color to change.  (Bloop is a technical craft term. It means to squeeze an amount of paint in a haphazard style…)
artwork, painting, ombre, gift
Starting with the lightest color first, I began painting the top third of the board, then worked my way down to the darkest color, blending as I went along.
Create an ombre effect by painting on typographic artwork
Don’t you judge my paintbrush.  We have a lot of history together and I love her.
To be completely honest, about this point I tried to add stenciled roses to the back ground. Total craft fail… it looked awful, so I painted over them and pretended it never happened.
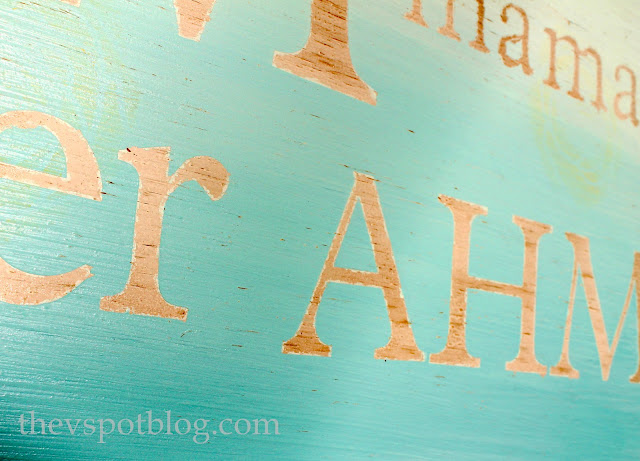
While the paint is still a bit tacky, begin peeling off the letters.
Let the board dry thoroughly, then sand it to create a distressed look.

I am pretty happy with how it turned out!

Typographic DIY art work for Mother's Day

subway art, ombre, mother, languages, turquoise, distressed, mantel, shutters

There were so many wonderful goodies in the Martha Stewart Line to choose from and play with that I know I will be making more projects very soon! Be sure to check out Plaid Crafts online and to follow them here:

  • Twitter: http://twitter.com/plaidcrafts (@plaidcrafts)
  • Facebook: http://facebook.com/InspiredByPlaid
  • Pinterest: http://pinterest.com/plaidcrafts
Find my disclosure Here


Filed Under: artwork, craft time, Crafts, distressed, Mother's Day, tutorial

Comments

  1. Beverly {Flamingo Toes} says

    April 24, 2012 at 4:45 PM

    This is so sweet Viv!! I love the ombre and the way the wood shows through in the letters!

    Reply
  2. Michele {The Scrap Shoppe} says

    April 24, 2012 at 7:10 PM

    Loving the ombre! And the bare wood in peeking through. Cute idea!!

    Reply
  3. At The Picket Fence says

    April 24, 2012 at 7:47 PM

    That is so cool and it looks fantastic Vivienne! 🙂
    Vanessa

    Reply
  4. Emmy says

    April 24, 2012 at 7:50 PM

    That did turn out cute! I like the color choice and how it is shaded.

    Reply
  5. jennykate77 says

    April 24, 2012 at 8:02 PM

    I’m ombre crazy right now! LOL. I want it on my hair…so why not some subway art! 😉

    I kinda like it with the bare wood showing through, but the white-washed look is really cute too!

    Reply
  6. Connie Weiss says

    April 24, 2012 at 8:16 PM

    I love it!

    How do you pronounce Ombre?

    Reply
  7. Richella says

    April 24, 2012 at 8:59 PM

    This is REALLY cool, Viv! It must have been great fun to get that box of goodies–and you put them to good use! Who wouldn’t want to get this for Mother’s Day?

    Reply
  8. Kim Wilson says

    April 24, 2012 at 9:59 PM

    What a special gift that would be! I love the color choices too!

    Reply
  9. Amy Anderson says

    April 24, 2012 at 11:40 PM

    The blue is great (well, my fave color :D) – and I too love how the wood background shows through. Perfect touch!

    Reply
  10. Shawn says

    April 25, 2012 at 12:27 AM

    I keep saying I’m going to make one for every season/occasion…you know how many I have done right?

    Love ths one!

    Reply
  11. Natalie Dixon says

    April 25, 2012 at 1:35 AM

    Love it! I’m such a fan of reverse stenciling and the ombre effect is superb! Great job!

    Reply
  12. Amanda @ Serenity Now says

    April 25, 2012 at 1:43 AM

    Viv, this is beautiful! I love the ombre effect. 🙂

    Reply
  13. jrmahon says

    April 25, 2012 at 2:16 AM

    You are SO imaginative and talented, I would never have thought of doing that!

    Reply
  14. Creative Raisins says

    April 25, 2012 at 5:19 AM

    Such a nice sign I love the ombré effect

    Reply
  15. SueAnn Lommler says

    April 25, 2012 at 9:54 AM

    Love this…the colors are fabulous!!
    Hugs
    SueAnn

    Reply
  16. Alma says

    April 25, 2012 at 5:47 PM

    Great project! Love the ombre look. 🙂

    Reply
  17. Rhoda @ Southern Hospitality says

    April 25, 2012 at 6:54 PM

    Very cute, Viv! My project went up today too. So great to meet you at SNAP, it was a whirlwind of fun, wish I could have hung out with more of you home girls too. Not enough time to get with everyone.

    Reply
  18. Katie's Cucina says

    April 26, 2012 at 1:55 PM

    I love your mothers day ombre art! And glad to see a fellow cricut user out there! 🙂

    Reply
  19. Amy Fountain says

    April 27, 2012 at 4:01 AM

    this is truly a special project! Lovely!

    Reply
  20. Taylor says

    April 27, 2012 at 6:06 AM

    I love this!! What infinite possibilities! 🙂 I would love for you to share this over at my linky, Unveil Your Genius…
    http://taylornorris.blogspot.com/2012/04/unveil-your-genius-link-party-8.html

    Happy Friday!

    Reply
  21. Kim @ Too Much Time says

    April 27, 2012 at 11:24 PM

    This is cutie! I just need someone to buy me a cricuit-hee hee. The blues are fantastic and I could paint the words on myself-I am old fashioned (and cheap) like that. Get your but over to my link party this weekend if you have a sec:)
    xxx Kim

    Reply
  22. Sue@creativetryals.blogspot.com says

    April 28, 2012 at 12:26 AM

    I love making signs – I have got to try this ombre technique. Thanks for sharing. Saw you on TT&J

    Reply
  23. Laurel @ Ducks in a Row says

    April 30, 2012 at 10:37 PM

    Love love love this – I love the color and especially the wood showing through! Thanks – stopping by from Craft-o-maniac!

    Reply
  24. Vanessa Barker says

    May 1, 2012 at 4:52 AM

    Love this one! I’d love if you’d come link up at my Tutorial Tuesday over at Our Thrifty Ideas that just went up. http://www.ourthriftyideas.com/2012/04/tutorial-tuesday-5.html
    ReplyDelete

    Reply
  25. Taylor says

    May 4, 2012 at 5:20 AM

    I featured your project in my Unveil Your Genius Link Party! Go grab a featured button: http://taylornorris.blogspot.com/p/unveil-your-genius.html

    🙂 Thanks for linking up, Vivienne! I hope you’ll link up again soon! New link party starts every Thursday!

    Reply
  26. Sierra Mama says

    June 8, 2012 at 9:29 PM

    How do you adhere the letters to the board? I don’t have a cricut so I was going to find a friend that may have one OR just purchase the letters.

    Reply
  27. Vivienne @ the V Spot says

    June 8, 2012 at 9:32 PM

    Sierra Mama, I used letters made out of contact paper. Just peel off the backing and stick to the board.

    Reply
  28. Sierra Mama says

    June 11, 2012 at 4:26 PM

    Thank you!

    Reply

Leave a Reply Cancel reply

Your email address will not be published. Required fields are marked *

you might also like:

Ombre Owl Artwork (from Dollar Store Halloween decor)
DIY Patriotic Flag Artwork in about an hour.

Wedding idea - make a faux pallet wooden heart
Faux Pallet-Wood project | DIY Wedding decor – a pallet wood heart.
Guest Post: Vintage Flower ‘Pot’

A quick and easy DIY mat and frame project. (No tools. You just need tape!)
Faux Foil Wrapped Chocolate Eggs

An easy spring craft: golden eggs in peat pot “baskets”
A cute DIY garden flag… just in time for Valentine’s Day!

When Pigs Fly: a cute Dollar Store piggy bank.
How to make your own DIY jar candles (using recycled jars and candle wax)

Recent Posts

  • Spooky porch decor and a Halloween Chair.
  • DIY Plaid Wine Glasses
  • Easy Sand-N-Sea Flower Pots
  • How to use an indoor chandelier outside.
  • Quesadillas made with slow cooker Carnitas. (Pork in a crock pot… nothing is easier.)
  • No Sew Project: How to recover your outdoor cushions using fabric and a glue gun.
  • Upcycle project: plain flower pot into decorative ceramic planter.
  • An easy Valentine’s Day globe.
  • Simple, winter themed decor. (Using what you already have, of course.)
  • Easy Goat Cheese Appetizer Recipe

Amazon Associates Disclosure

Vivienne Wagner is a participant in the Amazon Services LLC Associates Program, an affiliate advertising program designed to provide a means for sites to earn advertising fees by advertising and linking to amazon.com.

Popular Posts

  • Cleaning Stove Burners & Grates using Ammonia (The best...
    Comments (631) | Jul 07, 2011
  • Easy Dessert Recipe: Oreo Cheesecake Bites
    Comments (64) | Mar 04, 2014
  • How to store fresh produce – From A to Zucchini.
    Comments (111) | Jan 25, 2012
  • No Sew Project: How to recover your outdoor cushions using f...
    Comments (110) | Mar 03, 2018
  • DIY wine bottle crafts.
    Comments (10) | Aug 22, 2013
Privacy

Copyright © 2023 The V Spot · Website by Houndstooth Media Group