The V Spot

Rants, observations, and home decorating... from a woman with no time for a blog.


  • Email
  • Facebook
  • Instagram
  • Pinterest
  • Twitter
  • Home
    • Privacy Policy
  • All Blog Posts
  • Crafts
    • All projects
    • By Project
      • Accessories
      • Artwork
      • Before & After
      • Cheap & Easy
      • decor
      • Floral Design & Centerpieces
      • Furniture
      • garden & outdoors
      • Glass
      • no-sew
      • Upcycle – Recycle
      • Wreaths
    • By Season
      • Spring
      • Summer
      • Fall
      • Winter
    • By Materials
      • corks
      • epsom salt
      • fabric
      • Mod Podge
      • Paper
      • Spray Paint
      • Sticks
    • Round-Ups
  • Holidays
    • Halloween
      • Pumpkins
    • Thanksgiving
    • Christmas
    • Valentine’s Day
    • St. Patrick’s Day
    • Easter
    • Cinco de Mayo
    • Mother’s Day
    • 4th of July
  • Food & Drink
    • All recipes
    • Breakfast
    • Appetizers
    • Side Dish
    • Main Dish
    • Desserts
    • Drinks & Wines
    • Tables & Decor
  • Real Life
    • Family
      • Grant
      • parenting
    • Tales To Tell
    • friends
    • Keepin’ It real
    • Tips & Tricks
      • cleaning
      • Health & Beauty
      • Let me help you
      • organization
    • Just Funny
      • No Mom wants to hear…
      • Exchange of the Day
      • Snarky
      • wacky strangers
      • Big Time Fail

Ombre Owl Artwork (from Dollar Store Halloween decor)

September 17, 2012 17 Comments

I love “distressed” art projects.  They’re so forgiving.  If it isn’t perfect, or you really mess something up…. that’s ok.  I meant to do that.  That being the case, I really enjoy this type of project.  Here’s my latest:
Ombre Owl Artwork, using Halloween silhouettes from the Dollar Store.

This was really quite easy to do.
Supplies needed:

  • Owl silhouette cut outs from your local Dollar Store
  • Wooden board  (I used a 24″ x 24″ piece of 1/2″ plywood)
  • Spray adhesive (I recommend Martha Stewart Stencil Adhesive Spray)
  • Black spray paint
  • At least 3 colors of acrylic paint in the same color family
  • 1″ paint brush
  • Gold acrylic paint

The owl cut-outs come 15 to a pack and had two different designs.  I played around with placement and got a general idea where I wanted them.  I sprayed the board black* and when completely dry, I sprayed the back of each paper owl with the stencil spray adhesive and firmly pressed into place. I don’t measure, I just eyeball where I want the owls to be.  Remember… it’s distressed.  It doesn’t have to be perfect.  (*Yes, you can use black acrylic paint instead of spray paint, but in my experience you run the risk of pulling up some of the paint when you remove the stencil.  Spray paint doesn’t do that.)

Now lets paint our ombre effect.

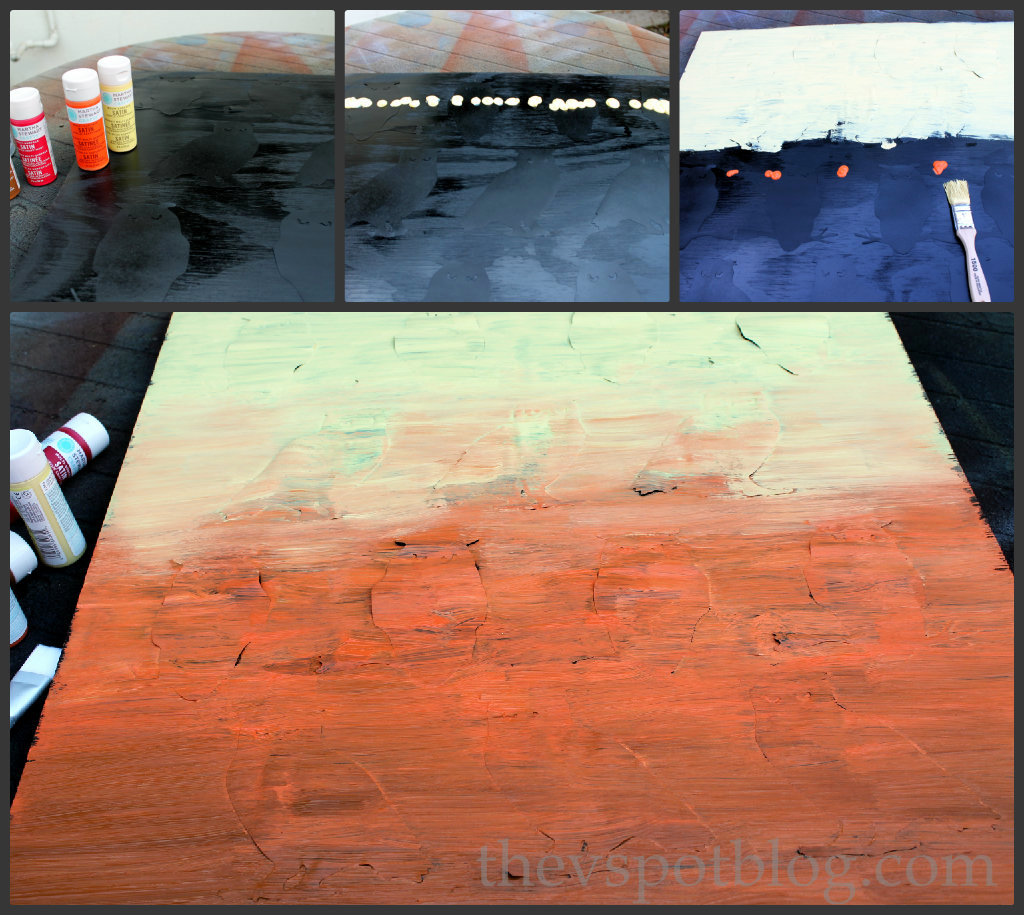
I always start with the lightest color and work my way up to the darkest, using the same brush and just blending as I go.

One thing to keep in mind.  These owls are paper.  When paper gets wet it starts to warp, so you’ll want to move fairly quickly.  Try not to have the brush strokes go on to the owls as much as come off of the owls.
Like this:

If you had the paint pulling towards the owl you risk the paint bleeding under it.  It’s not a perfect seal and you want to take care when applying the paint to minimize that risk.

You’ll notice that the paper owls will start to warp once the paint soaks in to them.  That makes it easier to peel the paper back off.  (Since the stencil adhesive is designed to be repositionable, that helps too.)  Peel off all of the owls and let it dry thoroughly.

Next?  Sand the crap out of it.

You want the black paint to show through in places.  Sand, sand, sand.  Then sand some more.  If you don’t have a hand sander, you can pick up a cheap one for about $10.  Every craft supply closet should have one.

Wipe it down with a slightly damp cloth to get all of the dust off of it, then water down some gold paint to make a wash.

Applying this watered down gold paint in a light coat creates a bit of a sheen, but it also adds to the distressed “old” look by muting the colors a bit.

I’m very happy with how this turned out.  $1 for the owls, $3 for the board and I had everything else on hand.  Yay me for keeping it under $5!

The Dollar Store had spider cut outs too.  (I’m just sayin’…)

about Vivienne Wagner

Filed Under: artwork, Autumn, Crafts, decor, distressed, Fall, Halloween, Holidays, tutorial

Comments

  1. Jill @ Create.Craft.Love. says

    September 17, 2012 at 12:45 PM

    LOVE this! It looks like an setting of the sun on a spooky evening. So cool!

    Reply
  2. Artsy VaVa says

    September 17, 2012 at 1:02 PM

    What a great, inexpensive piece of artwork!

    Reply
  3. Lisa@Pickles and Cheese says

    September 17, 2012 at 1:14 PM

    LOVE THIS! Thanks for the great how-to. So creative and I love projects like this. Thanks!

    Reply
  4. Kisses Aren't Contracts says

    September 17, 2012 at 2:22 PM

    SO creative!

    xoxo Shauna

    kissesandcontreacts.blogspot.com

    Reply
  5. Wanda @ Just Vintage says

    September 17, 2012 at 2:52 PM

    Such a fun project! I’ve pinned it into my Halloween folder and am going to try to find the owl stencils. Thanks for sharing!

    Reply
  6. Kati @ Obscured Flair- says

    September 17, 2012 at 6:18 PM

    I just saw this on Pinterest! I wanna try the spiders!

    Reply
  7. Barking Dog Shoes says

    September 17, 2012 at 9:12 PM

    What a hoot! I love owls to obsession. Great idea.

    Reply
  8. Bliss says

    September 17, 2012 at 11:11 PM

    Well I’d like to say something different than everyone else, but love it just about covers it. I love it! Pinned it.

    ~Bliss~

    Reply
  9. Cynthia says

    September 17, 2012 at 11:22 PM

    Cauuuute! You nailed it! Looks like way more than $4. art!

    Reply
  10. Eclectically Vintage says

    September 17, 2012 at 11:30 PM

    I have those owl silhouettes – they are the best! This is the best project ever! Pinning it!
    Kelly

    Reply
  11. Laura at Ms. Smartie Pants says

    September 18, 2012 at 12:33 AM

    very cool idea!

    Reply
  12. Shawn says

    September 18, 2012 at 2:39 AM

    $3 for the wood? I just bought a piece for the sign I made for the guest bedroom and paid $33. Now, I did buy a nice piece of pre-sanded pine but $3? Clearly I’m shopping at the wrong store!

    I love this and may have to add it to my Halloween collection!

    Reply
  13. Korrie@RedHenHome says

    September 18, 2012 at 4:24 AM

    This is SO cute!!

    Reply
  14. Amanda @ Serenity Now says

    September 18, 2012 at 4:04 PM

    This is such a cool piece!!! Looks like something you’d buy in the store (that’s a compliment–looks professional) Very cool, Viv. 🙂

    Reply
  15. Jennifer @ Delightfully Noted says

    September 20, 2012 at 11:19 PM

    How cool! Just saw those owls at the Dollar Store today.

    Reply
  16. Christina at I Gotta Create! says

    September 21, 2012 at 1:10 AM

    I am in love with your owl art! So graphic and just perfect for the season. Pinning!

    <3 Christina at I Gotta Create!
    Wildly Original linky party is open.

    Reply

Trackbacks

  1. 24 Owl Crafts | About Family Crafts says:
    July 16, 2014 at 2:50 PM

    […] Ombre Owl Artwork @ The V Spot You can use the techniques here to make your own owl picture. […]

    Reply

Leave a Reply Cancel reply

Your email address will not be published. Required fields are marked *

you might also like:

If Edgar Allan Poe had been given some contact paper & a Cricut… (DIY Halloween Artwork)
twigs, sticks, branches, black pot, pumpkin, Halloween, porch, decorations
Black twig and pumpkin Halloween porch decor.

Upcycle: easy DIY faux hammered metal planters (with spider web topiaries.)
Turn Dollar Store beverage napkins into easy Halloween hurricanes.

My Halloween wreath….all it’s missing is a whip.
pumpkin, craft, zebra stripes, duck tape, duct tape, Halloween, fall, autumn, diy
A Zebra Striped Pumpkin. (More fun pumpkin crafts.)

punk pumpkin, black, leather, studs, studded, safety pins, Halloween
Make a leather studded punk Pumpkin for Halloween. (“Mom…? Why did you make an S&M pumpkin…?”)
How to make a Haunted Tree. (With things you already have, of course.)

Cheapy, Creepy, Halloween Party Invitations
Make an Outdoor Rustic Chandelier – an easy DIY

Recent Posts

  • Spooky porch decor and a Halloween Chair.
  • DIY Plaid Wine Glasses
  • Easy Sand-N-Sea Flower Pots
  • How to use an indoor chandelier outside.
  • Quesadillas made with slow cooker Carnitas. (Pork in a crock pot… nothing is easier.)
  • No Sew Project: How to recover your outdoor cushions using fabric and a glue gun.
  • Upcycle project: plain flower pot into decorative ceramic planter.
  • An easy Valentine’s Day globe.
  • Simple, winter themed decor. (Using what you already have, of course.)
  • Easy Goat Cheese Appetizer Recipe

Amazon Associates Disclosure

Vivienne Wagner is a participant in the Amazon Services LLC Associates Program, an affiliate advertising program designed to provide a means for sites to earn advertising fees by advertising and linking to amazon.com.

Popular Posts

  • Cleaning Stove Burners & Grates using Ammonia (The best...
    Comments (631) | Jul 07, 2011
  • Easy Dessert Recipe: Oreo Cheesecake Bites
    Comments (64) | Mar 04, 2014
  • How to store fresh produce – From A to Zucchini.
    Comments (111) | Jan 25, 2012
  • No Sew Project: How to recover your outdoor cushions using f...
    Comments (110) | Mar 03, 2018
  • DIY wine bottle crafts.
    Comments (10) | Aug 22, 2013
Privacy

Copyright © 2023 The V Spot · Website by Houndstooth Media Group