The V Spot

Rants, observations, and home decorating... from a woman with no time for a blog.


  • Email
  • Facebook
  • Instagram
  • Pinterest
  • Twitter
  • Home
    • Privacy Policy
  • All Blog Posts
  • Crafts
    • All projects
    • By Project
      • Accessories
      • Artwork
      • Before & After
      • Cheap & Easy
      • decor
      • Floral Design & Centerpieces
      • Furniture
      • garden & outdoors
      • Glass
      • no-sew
      • Upcycle – Recycle
      • Wreaths
    • By Season
      • Spring
      • Summer
      • Fall
      • Winter
    • By Materials
      • corks
      • epsom salt
      • fabric
      • Mod Podge
      • Paper
      • Spray Paint
      • Sticks
    • Round-Ups
  • Holidays
    • Halloween
      • Pumpkins
    • Thanksgiving
    • Christmas
    • Valentine’s Day
    • St. Patrick’s Day
    • Easter
    • Cinco de Mayo
    • Mother’s Day
    • 4th of July
  • Food & Drink
    • All recipes
    • Breakfast
    • Appetizers
    • Side Dish
    • Main Dish
    • Desserts
    • Drinks & Wines
    • Tables & Decor
  • Real Life
    • Family
      • Grant
      • parenting
    • Tales To Tell
    • friends
    • Keepin’ It real
    • Tips & Tricks
      • cleaning
      • Health & Beauty
      • Let me help you
      • organization
    • Just Funny
      • No Mom wants to hear…
      • Exchange of the Day
      • Snarky
      • wacky strangers
      • Big Time Fail

So many possibilities with this burlap wreath! A guest post from Jen at Scissors & Spatulas.

July 20, 2011 7 Comments

Burlap.  We all love it, right?  Jen at Scissors and Spatulas made an adorable burlap wreath and she has been kind enough to come on over and share the tutorial.  Not only is this wreath super cute, it can be modified for any season or occasion.
Hey y’all! I’m Jen and I’m from good ole SC!
I’m also a mom, a wife, a housekeeper, a cook, a decorator, a crafter and a blogger. My blog is a collection of everything that I enjoy from DIY projects, home decor, crafts and recipes to fun activities for the kids and our own family experiences. Hence my blog name: Scissors & Spatulas: And Everything in Between! When you visit my site, you never know what you’re gonna get!

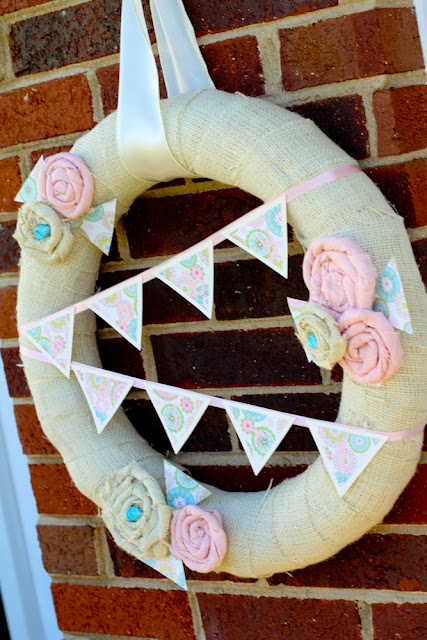
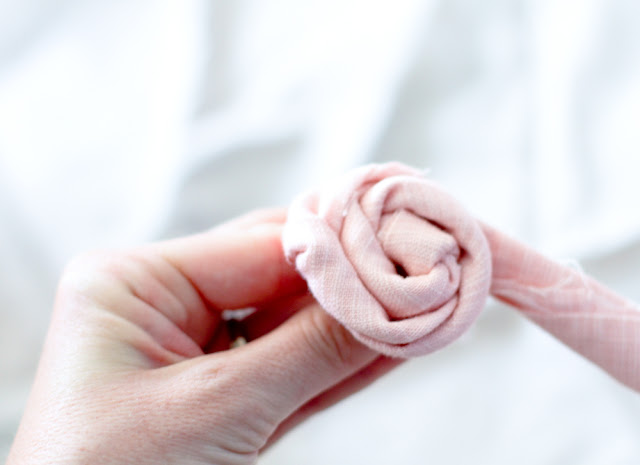
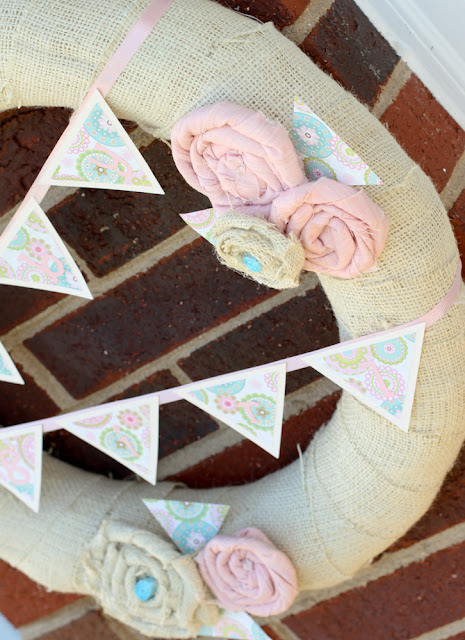
Vivienne and I have been blog friends for some time now and I’m thrilled to be here guest posting for her! Today I’m going to share with you an east DIY burlap wreath I made for a friend’s baby shower. No friends with a bun in the oven? Don’t go away yet. . . this wreath can be changed to suit any holiday or occasion.

So my friend was having her first baby, a girl, but she wasn’t sharing the name. I helped throw a shower for her and I was in charge of decor and favors. I looked at a pre-made banner while out shopping but ,me being me, was up for the challenge of a DIY banner! But then I got to thinking, “If I’m going to put the effort into making this banner, why not make something she can use again?” And so I decided to make a wreath instead. This way she could hang it on her door when the baby arrives.

So I made my weekly trip to Hobbly Lobby and walked the entire store and came home with burlap, pink linen, a hay wreath, scrapbook paper, and ribbon.
This is what I did with it. . .
Easy burlap wreath
{The pennant says “baby girl.” Remember, we didn’t know the name}
Here is how I did it. . .
Make an easy burlap wreath
I cut the burlap into strips about 2-3 inches thick.
Make an easy burlap wreath.
I wrapped the burlap strips around the wreath using hot glue to secure the fabric on the back side of the wreath.
Making an easy burlap wreath.
I used my Cricut to cut two different size triangles and letters for the banner. {I used the Basic Shapes cartridge for the triangles and the Cuttin’ Up font cartridge.}
Making a paper pennant for a burlap wreath
I layered the cut pieces {large ivory triangle, smaller print triangle then letters} and used  an adhesive pen to stick them together. These are my pennants which read “baby girl.”
I measured and cut two pieces of grosgrain ribbon slightly larger than the diameter of the wreath. I stretched the ribbons across the wreath and wrapped the excess ribbon around the backside.
I secured the ribbons with hot glue on the back side of the wreath.
Put a pennant on a burlap wreath.  Sweet!
I then used a hot glue gun to attach the pennants to the ribbon.
Easy fabric roses.
Next I made some rosettes out of burlap and pink linen. I started by cutting the fabric into three inch strips. Then I twisted the fabric somewhat tightly and began wrapping around and around in a spiral fashion, securing with hot glue on the under side every other circle.
Here is a finished rosette. I tucked the end of the fabric on the back side and secured with hot glue.
Fabric rosettes.
For the center of the burlap flowers, I rolled thin blue silk ribbon tightly and secured the end with hot glue.
Make an easy burlap wreath for any occasion.
I placed the flowers around the wreath and added some triangles from the scrapbook paper to mimic the pennants.
And here it is! The baby girl pennant burlap wreath. Again, change the colors and words to make this wreath suit any occasion!

I want to thank Vivienne again for having me! I hope y’all enjoyed my tutorial and I hope you’ll stop by to browse around my blog! Remember, you’ll get a little bit of everything at Scissors & Spatulas: And Everything in Between!

Thanks Jen! I think this wreath is adorable and I’m so glad you shared it with us!  Please go over and visit Scissors & Spatulas!  You will definitely be inspired!

Filed Under: burlap, Crafts, decor, fabric, guest blogger, Paper, Spring, tutorial, Wreaths

Comments

  1. Johanson Family says

    July 20, 2011 at 2:16 PM

    this is so cute!! I have put the silouette on my wish list– but love all the wonderful things people are making with the cricut!!!
    Love this tutorial!

    Reply
  2. MiMi says

    July 20, 2011 at 5:09 PM

    CUUUUUUTE!

    Reply
  3. Maddie Kertay- The Domestic Anarchist says

    July 20, 2011 at 6:32 PM

    Afreakin-dorable.. even if it is burlap which makes me sneeze like crazy!!

    Maddie, crazy asmatic crafter

    Reply
  4. Maridith @ Strictly Homemade says

    July 20, 2011 at 7:44 PM

    That is so pretty. I do not like making flower wreaths but this I can do. Thanks for the inspiration!

    Reply
  5. M.O.T.B says

    July 20, 2011 at 9:05 PM

    Love the burlap!!!!

    Reply
  6. Erika says

    July 20, 2011 at 11:59 PM

    Love this and your blog! I’m now totally obsessed 🙂

    Reply
  7. Gigi Baby says

    September 5, 2011 at 3:18 AM

    This is really cute for spring and easter! Have you ever done a Christmas Tree wreath using a wire hanger sandwich baggies a red christmas bow and lights?

    Reply

Leave a Reply to Maddie Kertay- The Domestic Anarchist Cancel reply

Your email address will not be published. Required fields are marked *

you might also like:

My Top 10 DIY Projects for 2013
Faux Foil Wrapped Chocolate Eggs

A cute DIY garden flag… just in time for Valentine’s Day!
ruffled pilow diy - an easy sewing project.
The cutest ruffled pillow ev-AH! A tutorial from Maggie at Midwestern {Sewing} Girl

No-sew curtain panels.
How do you like your eggs? (A faux Robin’s egg tutorial.)

How to make a Haunted Tree. (With things you already have, of course.)
Re-cover your outdoor cushions using fabric and a glue gun - no-sew project
No Sew Project: How to recover your outdoor cushions using fabric and a glue gun.

Easy 10 Minute Fall Wreath
DIY Budget Gallery Wall
DIY Gallery Wall on a Budget

Recent Posts

  • Spooky porch decor and a Halloween Chair.
  • DIY Plaid Wine Glasses
  • Easy Sand-N-Sea Flower Pots
  • How to use an indoor chandelier outside.
  • Quesadillas made with slow cooker Carnitas. (Pork in a crock pot… nothing is easier.)
  • No Sew Project: How to recover your outdoor cushions using fabric and a glue gun.
  • Upcycle project: plain flower pot into decorative ceramic planter.
  • An easy Valentine’s Day globe.
  • Simple, winter themed decor. (Using what you already have, of course.)
  • Easy Goat Cheese Appetizer Recipe

Amazon Associates Disclosure

Vivienne Wagner is a participant in the Amazon Services LLC Associates Program, an affiliate advertising program designed to provide a means for sites to earn advertising fees by advertising and linking to amazon.com.

Popular Posts

  • Cleaning Stove Burners & Grates using Ammonia (The best...
    Comments (632) | Jul 07, 2011
  • Easy Dessert Recipe: Oreo Cheesecake Bites
    Comments (65) | Mar 04, 2014
  • How to store fresh produce – From A to Zucchini.
    Comments (115) | Jan 25, 2012
  • No Sew Project: How to recover your outdoor cushions using f...
    Comments (106) | Mar 03, 2018
  • DIY wine bottle crafts.
    Comments (10) | Aug 22, 2013
Privacy

Copyright © 2026 The V Spot · Website by Houndstooth Media Group