The V Spot

Rants, observations, and home decorating... from a woman with no time for a blog.


  • Email
  • Facebook
  • Instagram
  • Pinterest
  • Twitter
  • Home
    • Privacy Policy
  • All Blog Posts
  • Crafts
    • All projects
    • By Project
      • Accessories
      • Artwork
      • Before & After
      • Cheap & Easy
      • decor
      • Floral Design & Centerpieces
      • Furniture
      • garden & outdoors
      • Glass
      • no-sew
      • Upcycle – Recycle
      • Wreaths
    • By Season
      • Spring
      • Summer
      • Fall
      • Winter
    • By Materials
      • corks
      • epsom salt
      • fabric
      • Mod Podge
      • Paper
      • Spray Paint
      • Sticks
    • Round-Ups
  • Holidays
    • Halloween
      • Pumpkins
    • Thanksgiving
    • Christmas
    • Valentine’s Day
    • St. Patrick’s Day
    • Easter
    • Cinco de Mayo
    • Mother’s Day
    • 4th of July
  • Food & Drink
    • All recipes
    • Breakfast
    • Appetizers
    • Side Dish
    • Main Dish
    • Desserts
    • Drinks & Wines
    • Tables & Decor
  • Real Life
    • Family
      • Grant
      • parenting
    • Tales To Tell
    • friends
    • Keepin’ It real
    • Tips & Tricks
      • cleaning
      • Health & Beauty
      • Let me help you
      • organization
    • Just Funny
      • No Mom wants to hear…
      • Exchange of the Day
      • Snarky
      • wacky strangers
      • Big Time Fail

DIY Christmas artwork in under an hour.

December 16, 2011 20 Comments

I love subway art and typography.  Lately I’ve become a regular Art Institute of Five Minute Projects and our scrap woodpile has become my supply source.  I had been wanting to make some nativity themed artwork and put some focus on the real  reason we celebrate Christmas.

I saw a great piece of artwork from Red Letter Words that reads “true love was born in a stable.”  I thought it was a beautiful phrase and totally reminded me of 1 John 4:19 which basically says that we are capable of love because God loved us first.  I wanted to do a version of that phrase, but incorporate a Star of Bethlehem kind of design instead of the heart that the original version has.

This is what I came up with.

If you’ve been here before, you’re probably familiar with the technique I used to make it.  I did it for my spring art work, last year’s Christmas art work, and most recently, my Edgar Allan Poe Raven art work.
In case you missed those tutorials, here’s how I did it:

1. I took an old piece of scrap wood that was hanging out near the woodpile.  I spray painted it red, then cut out Contact Paper letters using my Cricut machine.  I stuck them where I wanted them.
2. I took a metallic champagne colored spray paint and sprayed over the top of the whole thing.
3. When dry, I took Frog Tape (which has an uh-mazing crisp line when you remove it, by they way) and free-handed (free-taped?) a star design in the middle of the piece.  I taped it over the Contact paper letters.
4. I taped newspaper over the rest of the piece to protect it from over-spray and sprayed the star area with Kryon’s Metallic Gold.

When I peeled everything away, this is what I was left with.

I’m happy with how it turned out.  I love that the star is distinct and clear, but the metallic tones are subtle and don’t take the focus off of the words.

By the way, I couldn’t find any eye-hooks or a picture hanger, so I improvised with two little screws:

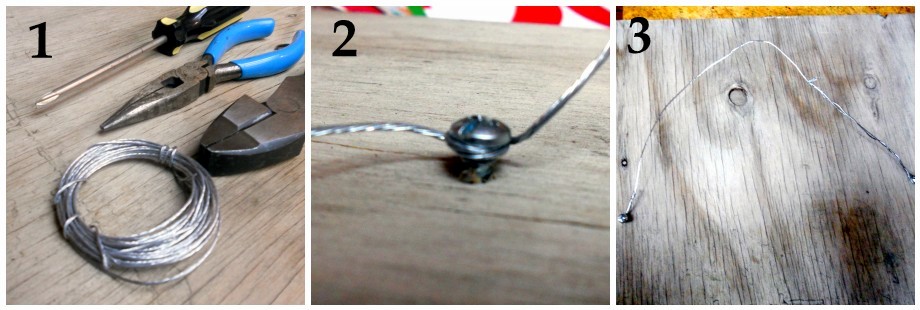
1. Gather needle nose pliers, wire cutters, a screwdriver and 2 little screws.
2. Sink the screws about halfway into the back of your piece of wood.  make sure they are evenly spaced off of the center… they will hold the wire for hanging your art.  Take a length of wire and wrap it around the screw.  Twist with the pliers.
3. Hang on the wall.

I love that this was free and basically took about an hour to make (not including drying time for the paint.)  However, if you like it but don’t think you have the time or energy to do one yourself, I highly suggest you go over and buy one from Red Letter Words.  Pick up one for yourself and maybe an extra for a gift… because we could all use a little more Christ in our Christmas these days.

I am grateful for the reminder to focus on why we celebrate, and to do more than dream up ways to decorate for the celebration.

Filed Under: artwork, Christmas, Crafts, Faith, spray paint, tutorial

Comments

  1. Richella says

    December 16, 2011 at 4:32 PM

    Oh, gosh, Vivienne–this is wonderful! The artwork–especially the star–the reference to I John, your words, everything. God bless you for using your influence for such good. I am inspired by you on so many levels!

    Reply
  2. Jaime says

    December 16, 2011 at 4:45 PM

    That’s gorgeous! Way to go mama!

    Reply
  3. Kelli says

    December 16, 2011 at 4:59 PM

    This is perfect…it’s beautiful AND shows the true meaning of Christmas.

    Reply
  4. Jen | Something Turquoise says

    December 16, 2011 at 5:29 PM

    Vivienne! I love it! I will definitely be trying this!

    Reply
  5. Crystal says

    December 16, 2011 at 5:38 PM

    I LOVE this, Viv! Everything about it is just perfect! I love the technique you used. I may just have to make one for next year (since I still haven’t finished shopping or putting up the decor I already have this year:))!

    Reply
  6. Ashley @ A {Blonde's} DIY Life says

    December 16, 2011 at 8:27 PM

    Love this! It’s gorgeous!
    I’d be thrilled if you linked this up to my new party!
    http://ablondesdiylife.blogspot.com/2011/12/come-party-with-blonde-features.html
    Merry Christmas!!

    Reply
  7. Rhissanna says

    December 16, 2011 at 9:21 PM

    Lovely and best of all QUICK!!!

    Reply
  8. MiMi says

    December 17, 2011 at 12:06 AM

    Awesome!!
    Just one more thing you’ll have to figure out how to ship to me. 😉

    Reply
  9. Maridith @ Strictly Homemade says

    December 17, 2011 at 3:06 AM

    Beautiful job. Great tutorial. I have often wondered how people get the multi layers on their boards.

    Also, does contact paper really cut nicely on the Cricut? I have a silhouette and have often wondered if contact paper would work.

    Reply
  10. Impulsive Addict says

    December 17, 2011 at 3:30 AM

    Ok, I went to the site but I like yours WAAAY better. Can’t I just order from you? I’ll take 2. And no worries….it doesn’t need to be here by next weekend. I’ll use one as a gift for a certain MIL in January.

    Kthanks. *Loves*

    Reply
  11. Jennifer says

    December 17, 2011 at 5:22 AM

    WOW! What a statement! Love it!
    Jen

    Reply
  12. SueAnn says

    December 17, 2011 at 3:03 PM

    Wowzers! This sign is fabulous! I live it!
    Hugs
    SueAnn

    Reply
  13. Emmy says

    December 17, 2011 at 6:42 PM

    So so beautiful!! Love it! And I think I could totally do that!

    Reply
  14. Katie says

    December 18, 2011 at 9:45 PM

    This is beautiful!

    Reply
  15. Richella says

    December 19, 2011 at 8:39 PM

    Thank you so much for linking this to the party! It really is stunningly beautiful–and you make it sound so easy! This is going on my list to do before next Christmas!

    Reply
  16. Chatty Chics says

    December 20, 2011 at 12:32 AM

    Amazing! I LOVE it. Absolutely love it. Thank you for the tutorial!
    Melody
    chattychics.com
    PS I’m starting a Linky party on Wednesday. Please come share this one! I’m giving out $5 Starbucks cards. Does that entice you? 🙂 hee hee

    Reply
  17. Strawberries and Sweet Love says

    December 20, 2011 at 3:02 AM

    Very cute and easy!

    Reply
  18. Jennifer says

    December 21, 2011 at 4:12 AM

    Because I just can’t get enough of this, I’m featuring it on S&S Friday! 🙂
    Jen

    Reply
  19. Tanya@takesix says

    December 22, 2011 at 11:08 PM

    I LOVE it!! I think you have made it look very easy…not sure I could pull it of as nicely as you have! Blessings to you this Christmas!

    Reply

Trackbacks

  1. DIY 3-D Painted Plate says:
    November 14, 2016 at 6:04 PM

    […] change up my Christmas colors every year.  Last year was red and gold, and I made this artwork to use as […]

    Reply

Leave a Reply Cancel reply

Your email address will not be published. Required fields are marked *

you might also like:

DIY Patriotic Flag Artwork in about an hour.
icy, frosty, branches, frosted branches, frost, winter, white
Make your own frosted, icy branches.

If Edgar Allan Poe had been given some contact paper & a Cricut… (DIY Halloween Artwork)
Upcycle project: plain flower pot into decorative ceramic planter.

Quirky Christmas decor: a winter chair makeover with paint and epsom salt!
Let It Snow: DIY Glitter Christmas Sled

Pottery Barn Inspired Painted Holly Pillow
plate, platter, decorative, silver, Christmas, holiday, frosty
Make a decorative winter platter.

Make an easy scrap paper Christmas tree.
Holiday decorating using your own photos.

Recent Posts

  • Spooky porch decor and a Halloween Chair.
  • DIY Plaid Wine Glasses
  • Easy Sand-N-Sea Flower Pots
  • How to use an indoor chandelier outside.
  • Quesadillas made with slow cooker Carnitas. (Pork in a crock pot… nothing is easier.)
  • No Sew Project: How to recover your outdoor cushions using fabric and a glue gun.
  • Upcycle project: plain flower pot into decorative ceramic planter.
  • An easy Valentine’s Day globe.
  • Simple, winter themed decor. (Using what you already have, of course.)
  • Easy Goat Cheese Appetizer Recipe

Amazon Associates Disclosure

Vivienne Wagner is a participant in the Amazon Services LLC Associates Program, an affiliate advertising program designed to provide a means for sites to earn advertising fees by advertising and linking to amazon.com.

Popular Posts

  • Cleaning Stove Burners & Grates using Ammonia (The best...
    Comments (631) | Jul 07, 2011
  • Easy Dessert Recipe: Oreo Cheesecake Bites
    Comments (64) | Mar 04, 2014
  • How to store fresh produce – From A to Zucchini.
    Comments (111) | Jan 25, 2012
  • No Sew Project: How to recover your outdoor cushions using f...
    Comments (110) | Mar 03, 2018
  • DIY wine bottle crafts.
    Comments (10) | Aug 22, 2013
Privacy

Copyright © 2023 The V Spot · Website by Houndstooth Media Group