The V Spot

Rants, observations, and home decorating... from a woman with no time for a blog.


  • Email
  • Facebook
  • Instagram
  • Pinterest
  • Twitter
  • Home
    • Privacy Policy
  • All Blog Posts
  • Crafts
    • All projects
    • By Project
      • Accessories
      • Artwork
      • Before & After
      • Cheap & Easy
      • decor
      • Floral Design & Centerpieces
      • Furniture
      • garden & outdoors
      • Glass
      • no-sew
      • Upcycle – Recycle
      • Wreaths
    • By Season
      • Spring
      • Summer
      • Fall
      • Winter
    • By Materials
      • corks
      • epsom salt
      • fabric
      • Mod Podge
      • Paper
      • Spray Paint
      • Sticks
    • Round-Ups
  • Holidays
    • Halloween
      • Pumpkins
    • Thanksgiving
    • Christmas
    • Valentine’s Day
    • St. Patrick’s Day
    • Easter
    • Cinco de Mayo
    • Mother’s Day
    • 4th of July
  • Food & Drink
    • All recipes
    • Breakfast
    • Appetizers
    • Side Dish
    • Main Dish
    • Desserts
    • Drinks & Wines
    • Tables & Decor
  • Real Life
    • Family
      • Grant
      • parenting
    • Tales To Tell
    • friends
    • Keepin’ It real
    • Tips & Tricks
      • cleaning
      • Health & Beauty
      • Let me help you
      • organization
    • Just Funny
      • No Mom wants to hear…
      • Exchange of the Day
      • Snarky
      • wacky strangers
      • Big Time Fail

Make easy Christmas garlands & wreaths without time, money or talent. Seriously.

December 21, 2011 10 Comments

Yesterday I shared how to hide everyday artwork by just covering it with fabric and adding a wreath.

Today I’m almost embarrassed to show you this stupid-easy way to turn the fake, plastic greenery into something that looks totally real.  For free.  It’s fast, easy and literally anyone can do it.

When it’s fake, you know it.

When it’s fake, it can look skimpy.

How do you fix these so they look real and lush?
For free?
Without needing a lot of time or talent?

With these.  Pine clippings.

Go to your local Christmas tree lot and ask them for the clippings.  They will give you all that you want.  We get real trees and Handsome Hubby always saves me the clippings from the bottom of the tree (there are always a few branches that need to be trimmed to get the tree into the stand) but I always end up needing more, so I hit my local tree lots too.

Take your free greenery and clip small pieces off.

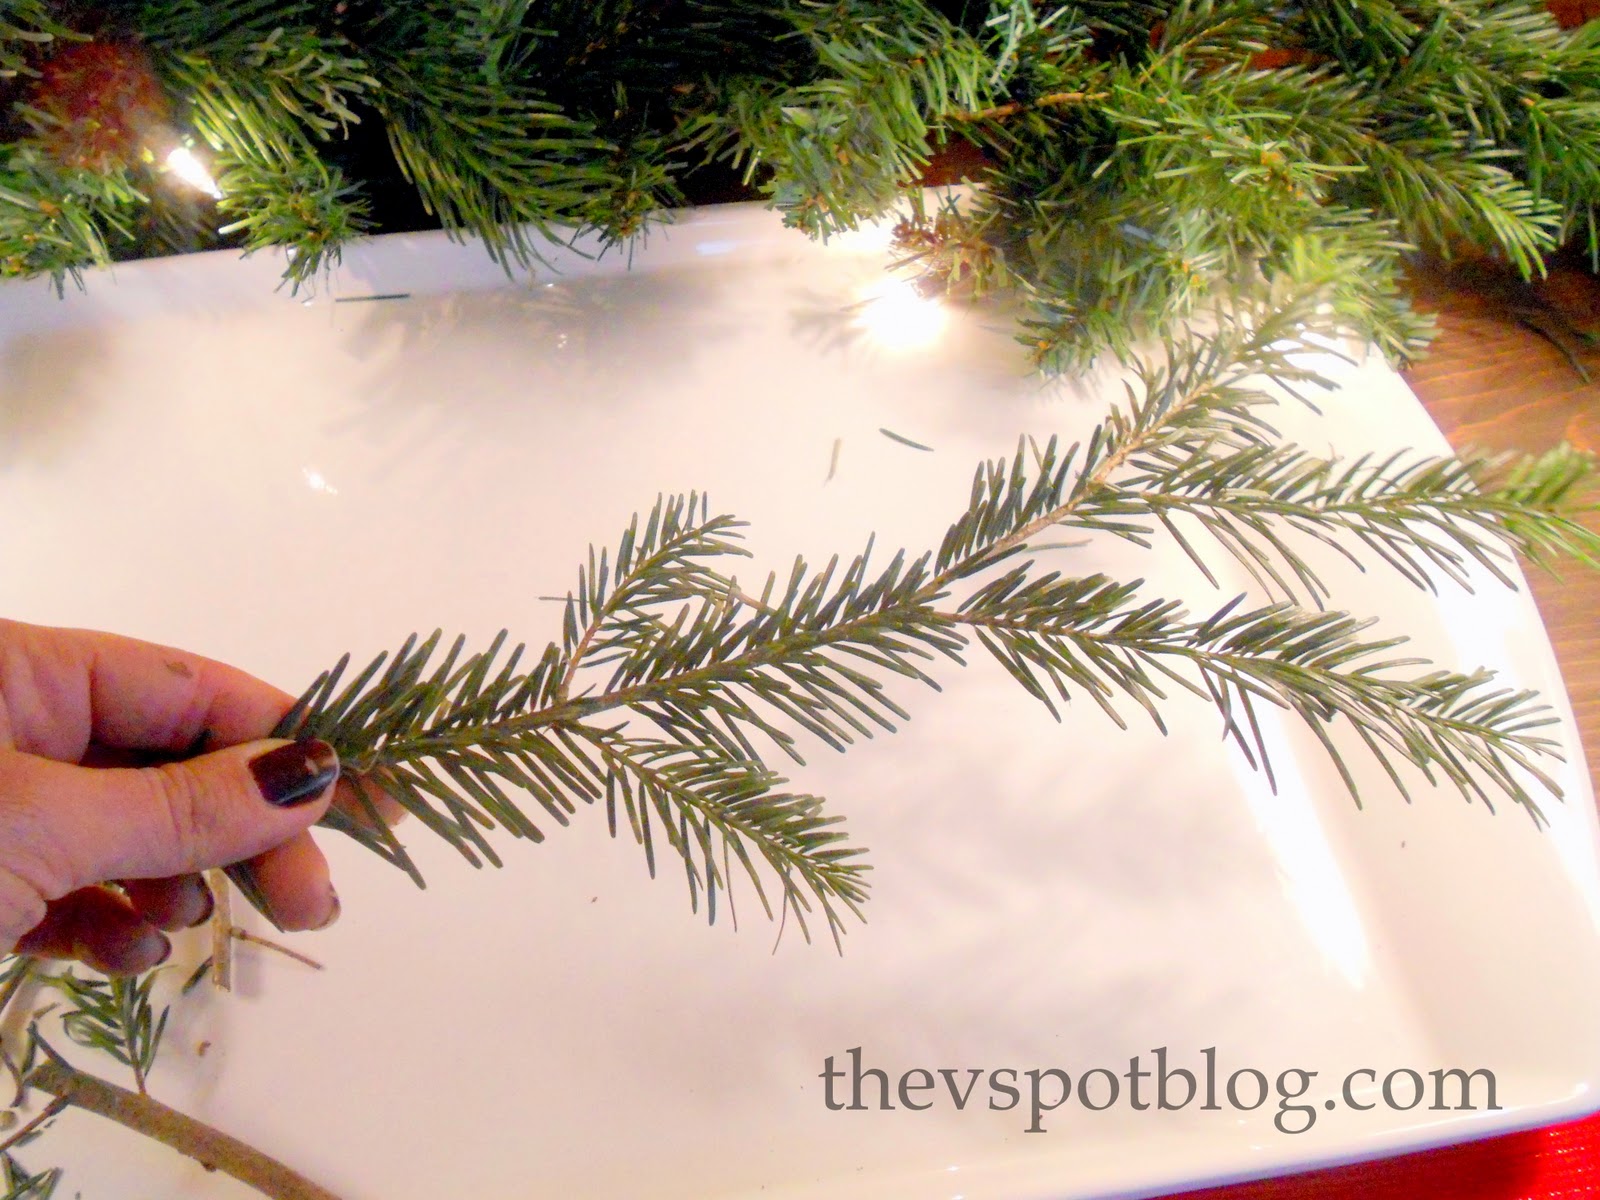
That was the free part.
Here’s the easy part: take those little pieces of real (free!) greenery and start tucking it into your garlands and wreaths.  There is no need to wire it in or secure it in any way.  Just by poking the end of the pine clipping into the fake stuff, it’s like they interlock and stay in there securely.  (When it’s time to put everything away, the real stuff is easy to pull out of the garlands and wreaths.)

Whether you’re adding them to a garland or a wreath, make sure they are all tucked in going the same direction.

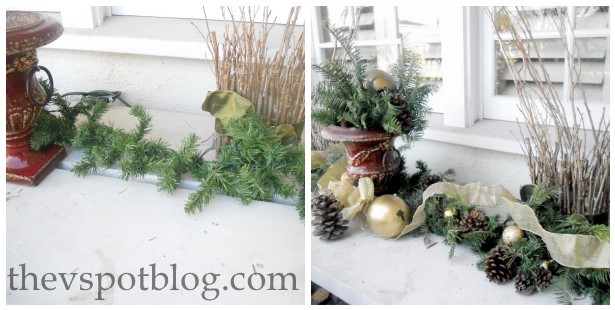
1. The fake, skimpy garland.
2. Start adding in the real clippings.
3. Unless you’re looking closely, you can’t tell it isn’t all real greenery.

The wreaths above the garland were also fake and had the real greenery tucked into them.

Do they dry out?  Yep.  But they stay green and pretty, so you will only know they are dried out if you go and touch them.  (So, um, don’t touch them, K?)

I add clippings to vases around the house and tuck them into bowls along with ornaments and pine cones.
These clippings allow me to have this beautiful greenery all over the house, and doesn’t cost me much time or any money.
That’s always a gift.

******UPDATED to address the anonymous comment below: Yes, clean-up will require you to vacuum up a few pine needles, but I personally think that 10 minutes of vacuuming is worth a month of December beauty in my home.*******

Pin It

Filed Under: cheap and easy, Christmas, Crafts, decor, Free, UseWhatchaGot, winter

Comments

  1. Anonymous says

    December 21, 2011 at 1:46 PM

    Love the look of it, but really… one will have to clean until summer to get rid of all the needles that will fall as they dry.

    Reply
  2. Colleen says

    December 21, 2011 at 3:21 PM

    That is a great idea. I’m going to have to try this out. Um, if I ever get around to decorating . . .

    Maybe next year 😉

    Reply
  3. Jessica @ O. Alouette says

    December 21, 2011 at 3:27 PM

    Genius idea! Love the wreaths.

    Reply
  4. THIS IS ME....ONLINE says

    December 21, 2011 at 5:04 PM

    That’s a GREAT idea! Wish I had thought of it. Bonus: your house smells amazing!

    Reply
  5. Maggie @ Midwestern {Sewing} Girl says

    December 21, 2011 at 6:34 PM

    smarty pants…love this idea!
    Merry Christmas, sweet girl!

    Reply
  6. MiMi says

    December 21, 2011 at 7:05 PM

    I KNEW that’s what you did to make em look real! 🙂

    Reply
  7. Emmy says

    December 21, 2011 at 7:10 PM

    Oh tricky tricky!! What a great idea. We have a tree farm right around the corner- might have to head over there… well might way next year to do this since Christmas is this Sunday!! What!!

    Reply
  8. Screaming Sardine says

    December 21, 2011 at 8:24 PM

    Great idea!! Love that it’s free and that it really makes all the fake stuff look so lush and real. Bet it smells a bit like pine, too.

    Cheers,
    Tracy Screaming Sardine

    Reply
  9. Elz says

    December 22, 2011 at 3:56 AM

    My friend does this too. I think it’s a great idea. A perfect way to add some real beauty without tons of effort.

    Reply
  10. Good Time Charlie says

    December 22, 2011 at 6:04 AM

    This is a great idea. I always save the clippings from the tree and get the clippings from the Tree Store (Home Depot) when we are there. I put them in vases and a Maple Bucket that hangs on my door, but what a great idea to tuck into the fake stuff! Definitely doing this next year.

    Reply

Leave a Reply Cancel reply

Your email address will not be published. Required fields are marked *

you might also like:

clippings, Christmas trees, branches, greenery
Simple Christmas planters. (Using Christmas tree clippings.)
Make an easy scrap paper Christmas tree.

Make an easy Yarn Tree… in less than 5 minutes.
Holiday decorating using your own photos.

Simple, winter themed decor. (Using what you already have, of course.)
cream, elegant, pumpkin, green, bling, ribbon, thanksgiving, paint
Turning plain pumpkins into elegant pumpkins for Thanksgiving.

Last minute Christmas decorations in no time flat.
Quirky Christmas decor: a winter chair makeover with paint and epsom salt!

White and Gold Rustic Holiday Mantel Decor
Let It Snow: DIY Glitter Christmas Sled

Recent Posts

  • Spooky porch decor and a Halloween Chair.
  • DIY Plaid Wine Glasses
  • Easy Sand-N-Sea Flower Pots
  • How to use an indoor chandelier outside.
  • Quesadillas made with slow cooker Carnitas. (Pork in a crock pot… nothing is easier.)
  • No Sew Project: How to recover your outdoor cushions using fabric and a glue gun.
  • Upcycle project: plain flower pot into decorative ceramic planter.
  • An easy Valentine’s Day globe.
  • Simple, winter themed decor. (Using what you already have, of course.)
  • Easy Goat Cheese Appetizer Recipe

Amazon Associates Disclosure

Vivienne Wagner is a participant in the Amazon Services LLC Associates Program, an affiliate advertising program designed to provide a means for sites to earn advertising fees by advertising and linking to amazon.com.

Popular Posts

  • Cleaning Stove Burners & Grates using Ammonia (The best...
    Comments (621) | Jul 07, 2011
  • Easy Dessert Recipe: Oreo Cheesecake Bites
    Comments (66) | Mar 04, 2014
  • How to store fresh produce – From A to Zucchini.
    Comments (112) | Jan 25, 2012
  • No Sew Project: How to recover your outdoor cushions using f...
    Comments (106) | Mar 03, 2018
  • DIY wine bottle crafts.
    Comments (10) | Aug 22, 2013
Privacy

Copyright © 2023 The V Spot · Website by Houndstooth Media Group