The V Spot

Rants, observations, and home decorating... from a woman with no time for a blog.


  • Email
  • Facebook
  • Instagram
  • Pinterest
  • Twitter
  • Home
    • Privacy Policy
  • All Blog Posts
  • Crafts
    • All projects
    • By Project
      • Accessories
      • Artwork
      • Before & After
      • Cheap & Easy
      • decor
      • Floral Design & Centerpieces
      • Furniture
      • garden & outdoors
      • Glass
      • no-sew
      • Upcycle – Recycle
      • Wreaths
    • By Season
      • Spring
      • Summer
      • Fall
      • Winter
    • By Materials
      • corks
      • epsom salt
      • fabric
      • Mod Podge
      • Paper
      • Spray Paint
      • Sticks
    • Round-Ups
  • Holidays
    • Halloween
      • Pumpkins
    • Thanksgiving
    • Christmas
    • Valentine’s Day
    • St. Patrick’s Day
    • Easter
    • Cinco de Mayo
    • Mother’s Day
    • 4th of July
  • Food & Drink
    • All recipes
    • Breakfast
    • Appetizers
    • Side Dish
    • Main Dish
    • Desserts
    • Drinks & Wines
    • Tables & Decor
  • Real Life
    • Family
      • Grant
      • parenting
    • Tales To Tell
    • friends
    • Keepin’ It real
    • Tips & Tricks
      • cleaning
      • Health & Beauty
      • Let me help you
      • organization
    • Just Funny
      • No Mom wants to hear…
      • Exchange of the Day
      • Snarky
      • wacky strangers
      • Big Time Fail

Create a faux-rust effect using spray paint and salt.

February 3, 2012 37 Comments

Yep.  Spray paint and salt can give you an instant weathered iron effect.  You can create a faux rust effect using these ingredients.
Faux rust technique using spray paint and salt
As I am still sick, today I thought I’d share how to create a chipped, rusted paint effect.  (When I am feeling better I will show you on an actual project, but for now, just the technique.)
 It’s pretty simple.  Model Railroad guys use this to add a weathered, rusted effect to their trains.  Here’s what you’ll need:

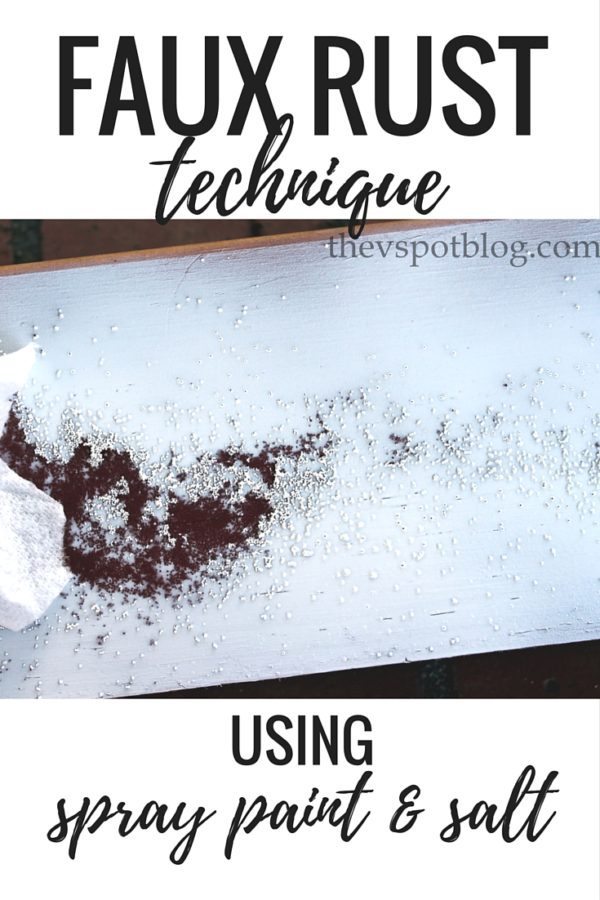
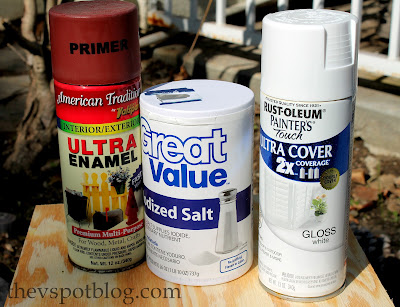
A dark color in rust or charcoal, salt and your top color.  I used regular salt for this, but you could use rock salt or epsom salt as well.
Spray your darker base color and let dry.  (I didn’t do it for the sake of this tutorial, but I would recommend using a combo of rust with a bit of charcoal here and there for the base coat…)
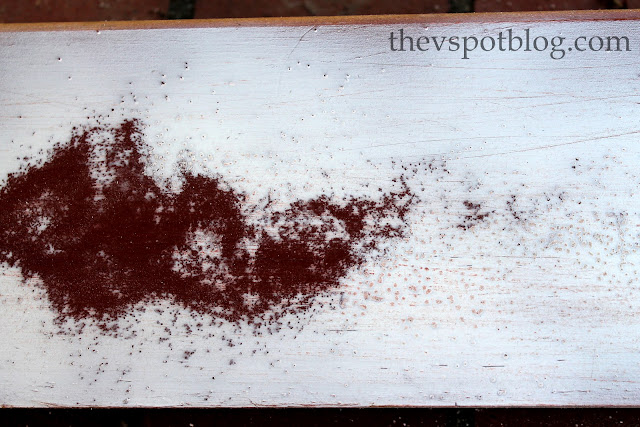
Sprinkle the top with salt in the random places you want to create the chipped and weathered look.

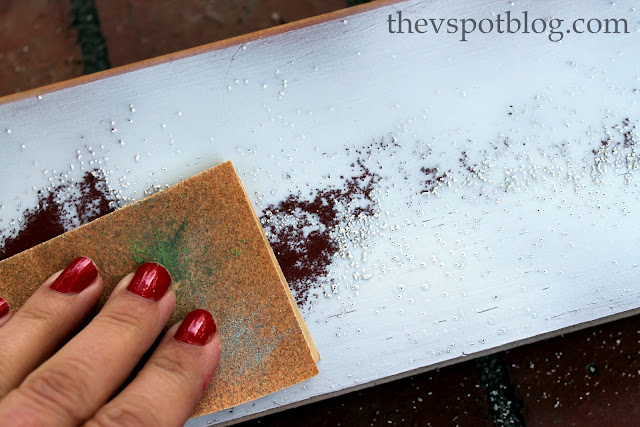
Carefully, carefully spray short bursts or your top coat.  You have to use a light hand for this or you might blow the salt away with the force of the spray.

Let the paint dry, then knock/brush off the salt with a rag or a dry paintbrush.

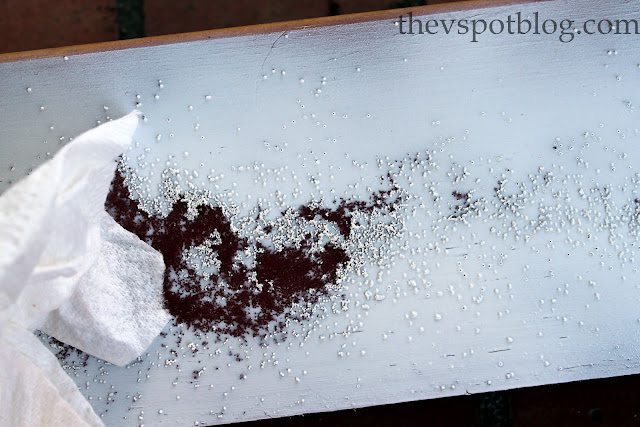
You can leave it as is or you can lightly sand it.

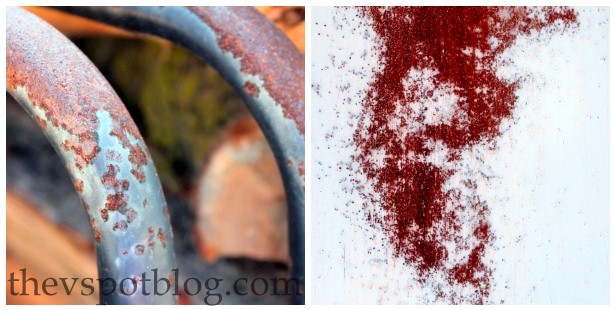
This technique has lots of possibilities… making wooden signs look like they are rusted tin… adding to wooden frames to make them look like they’re iron…

I plan to take a basic terra-cotta flower pot and make it look like a chippy iron pot.

There you go.  Easy peasy, shabby chic.


Pin It

Filed Under: cheap and easy, Crafts, distressed, epsom salt, faux finish, spray paint, tutorial

Comments

  1. Emmy says

    February 3, 2012 at 11:47 PM

    Holy cow that is amazing!!

    Reply
  2. ~ Laura says

    February 4, 2012 at 12:00 AM

    Seriously amazing!!!!!!

    Get better soon!!! 🙂

    Reply
  3. Heidi says

    February 4, 2012 at 12:13 AM

    Ooh what a great tip! I can’t wait to see your faux iron chippy terra cotta pot!

    Reply
  4. MiMi says

    February 4, 2012 at 12:26 AM

    Oh that’s cool!

    Reply
  5. MiMi says

    February 4, 2012 at 12:26 AM

    And get better!

    Reply
  6. Kelsie From Our Country Home says

    February 4, 2012 at 12:52 AM

    Love it…I can think of a million places I could use this 🙂

    Blessings Kelsie

    Reply
  7. Uncle Jayson says

    February 4, 2012 at 12:58 AM

    What a cool idea. 🙂

    Reply
  8. Good Time Charlie says

    February 4, 2012 at 1:09 AM

    This is something I definitely plan to try! How cool is this? Hope you feel better!

    Reply
  9. Rachel {BubblyNatureCreations.com} says

    February 4, 2012 at 4:52 AM

    how neat!! thanks for the trick!

    Reply
  10. Jennifer Leible says

    February 4, 2012 at 5:18 AM

    Wow! This is fantastic! I can’t wait to find a project to try it on! Thanks!

    Reply
  11. Inge's Blog says

    February 4, 2012 at 8:54 AM

    Thanks for sharing! I hope I can find the needed stuff here in Europe!

    Reply
  12. Johnnie says

    February 4, 2012 at 12:54 PM

    So cool! You should submit this to Power of Paint.

    Reply
  13. Impulsive Addict says

    February 4, 2012 at 8:07 PM

    Easy peasy for SOME people but not everyone.

    What’s the matter? I hope you feel better soon! At least you’re still playing WWF!

    Reply
  14. Xazmin says

    February 5, 2012 at 2:57 AM

    That is so cool Vivienne, I love it!

    And I am so sorry you’re sick – boo! I hope you feel better soon!

    Getting excited for your visit in a couple of months!

    Reply
  15. Beverly {Flamingo Toes} says

    February 6, 2012 at 4:42 AM

    Viv you are amazing! This is one of the coolest distressing techniques I’ve seen! I love the way it turned out.
    Hope you are feeling better!!

    Reply
  16. Katie says

    February 6, 2012 at 1:03 PM

    Love this new technique!!! Thanks for sharing!

    Reply
  17. K-Sue says

    February 6, 2012 at 4:15 PM

    Pinned it. Gotta try it out. I’ve got spray paint and salt and pots and little things…

    Reply
  18. Jennifer Creviston says

    February 7, 2012 at 2:27 AM

    Oh, amazing!!! I am so glad I have learned this! 🙂

    Reply
  19. Myya says

    February 7, 2012 at 5:29 AM

    Very cool! Hope you are feeling better.

    Reply
  20. SaraJk says

    February 7, 2012 at 8:12 PM

    This is so smart. Thanks for sharing!

    Reply
  21. Rachel says

    February 10, 2012 at 2:42 PM

    What a neat idea!

    Reply
  22. Kim @ Too Much Time says

    February 11, 2012 at 1:27 AM

    Oh Vivienne! I should have known this was you getting all scientific and crazy with the salt and paint!I would love for you to come link it up at my party going on right now!
    http://too-much-time.com/2012/02/get-schooled-saturday-9.html

    Reply
  23. gail says

    February 11, 2012 at 2:47 AM

    super tute AGAIN! 🙂
    love this idea. thanks for sharing.
    gail
    ps catching you next week.

    Reply
  24. aimee says

    February 11, 2012 at 9:32 AM

    Amazing i cant wait to try this xxx

    Reply
  25. Deidre says

    February 15, 2012 at 4:19 PM

    Such an Awesome tip!! Kuddos to you! Thanks a million. Deidre~ http://simplysimplisticated4.blogspot.com

    Reply
  26. High Street Cottage says

    February 16, 2012 at 9:42 PM

    I love it, what a great tip! I recently posted the recipe my Hubby uses for diy chalk paint, this is something I’ll share with him. Thanks so much!

    Reply
  27. Korrie@RedHenHome says

    February 17, 2012 at 1:36 AM

    I love it! Today I was spray painting outside and water dripped on my board while I was painting. I thought, “hey that looks pretty cool; I might have to do this on purpose sometime!” But salt?? I never woulda thunk!

    Reply
  28. Candy says

    February 20, 2012 at 5:57 PM

    Okay, gotta try this. I love the look. Thanks so much for sharing. Im new to blogland, only 3 weeks in so COME FOLLOW ME. I’ve just become your newest follower.

    Reply
  29. Sheila says

    February 24, 2012 at 5:16 PM

    Gee… that’s exactly the tip I’ve been looking for… I’m from Brazil, and here these terracota vases are so expensive. I was just trying to find out how to make them look rusty. Great tip, wonderful blog!!!
    Sheila
    http://www.dedentropracasa.blogspot.com

    Reply
  30. Todaydownload.com says

    April 12, 2012 at 12:18 PM

    This site interest me a lot because of your good insight about the topic. its informative with lots of ideas
    Todaydownload
    ViewSyntax.com

    Reply
  31. Jeff says

    October 23, 2012 at 5:34 PM

    You can lightly mist your surface to help the salt stick. This is especially useful if you are not working with a flat surface. I am a model railway guy and use the teqnique all the time. Love the crossover of information!

    Reply
  32. Jeff says

    October 23, 2012 at 5:34 PM

    You can lightly mist your surface to help the salt stick. This is especially useful if you are not working with a flat surface. I am a model railway guy and use the teqnique all the time. Love the crossover of information!

    Reply
  33. mary says

    March 1, 2017 at 8:54 AM

    I know exactly what I’m going to try this on!!!!

    Reply
  34. Lloyd's Landscaping says

    December 6, 2017 at 1:24 PM

    Hi there, Great tips by the way and thank you.
    I did have a question though. I’m hoping you can answer it for me since you seem
    to be pretty knowledgeable about gardening. How can I make a
    raised-bed vegetable garden (lots of land, economical, deer)?

    If you had some insight I would greatly appreciate it.

    Reply
  35. Sally Elias says

    January 5, 2018 at 7:11 PM

    LOve this!’ Im always looking for New and interesting new tEchniqUEs

    Reply
  36. Annie says

    April 19, 2018 at 5:49 AM

    Do you have to use spray paint or can you use other tYpes of paint?

    Reply
    • Vivienne says

      April 23, 2018 at 11:50 AM

      It really does need to be spray paint.

Leave a Reply to Inge's Blog Cancel reply

Your email address will not be published. Required fields are marked *

you might also like:

Faking the look of trendy pottery pieces. An easy DIY.
New Faux Bois Technique: Bad Quality Spray Paint & Serendipity

Fifty shades of pumpkin. No-carve pumpkin ideas.
DIY Patriotic Flag Artwork in about an hour.

icy, frosty, branches, frosted branches, frost, winter, white
Make your own frosted, icy branches.
Make weathered, shabby chic flower pots using spray paint & candle wax.

punk pumpkin, black, leather, studs, studded, safety pins, Halloween
Make a leather studded punk Pumpkin for Halloween. (“Mom…? Why did you make an S&M pumpkin…?”)
Salt-Dough DIY Starfish
Coastal Craft: easy DIY starfish made from salt dough.

Easy fake coral made from salt dough. DIY
Red Faux (“Daux”) Coral – Easy coastal decor made from salt dough.
Taming counter-top clutter with canisters.

Recent Posts

  • Spooky porch decor and a Halloween Chair.
  • DIY Plaid Wine Glasses
  • Easy Sand-N-Sea Flower Pots
  • How to use an indoor chandelier outside.
  • Quesadillas made with slow cooker Carnitas. (Pork in a crock pot… nothing is easier.)
  • No Sew Project: How to recover your outdoor cushions using fabric and a glue gun.
  • Upcycle project: plain flower pot into decorative ceramic planter.
  • An easy Valentine’s Day globe.
  • Simple, winter themed decor. (Using what you already have, of course.)
  • Easy Goat Cheese Appetizer Recipe

Amazon Associates Disclosure

Vivienne Wagner is a participant in the Amazon Services LLC Associates Program, an affiliate advertising program designed to provide a means for sites to earn advertising fees by advertising and linking to amazon.com.

Popular Posts

  • Cleaning Stove Burners & Grates using Ammonia (The best...
    Comments (623) | Jul 07, 2011
  • Easy Dessert Recipe: Oreo Cheesecake Bites
    Comments (64) | Mar 04, 2014
  • How to store fresh produce – From A to Zucchini.
    Comments (112) | Jan 25, 2012
  • No Sew Project: How to recover your outdoor cushions using f...
    Comments (106) | Mar 03, 2018
  • DIY wine bottle crafts.
    Comments (10) | Aug 22, 2013
Privacy

Copyright © 2023 The V Spot · Website by Houndstooth Media Group