I love any opportunity to entertain family and friends, and I especially love being able to create a beautiful space on our patio in order to host dinners and brunches. Because we have a big family but a small dining room, creating an outdoor dining room is a fun (but challenging) project and I try to change things up every Thanksgiving.

Easy DIY Rustic Outdoor Chandelier
This year I decided to create a rustic outdoor chandelier. (Actually, my grand plan was to make five of them and hang them over the length of the 16′ table, but I ran out of time, so I will only be making two.)
What’s great about this DIY chandelier is that you can easily make it from items found in the garden center at the hardware store. The base of this chandy is a tomato cage and the wood strips are made from cedar fence boards.
Because there are different sizes of tomato cages, some of these measurements will need to be approximated for your project.
This post contains affiliate links.
To make 1 chandelier you will need:
- circular tomato cage
- 2 to 3 cedar fence boards (approx 5′ x 6″ x .5″)
- 18 gauge wire (copper or colored – approx 25 feet)
- a length of chain for hanging
- wood stain or wood tint (I recommend water based)
- gold paint or glaze (I used Martha Stewart, but any brand will work)
- plug-in hanging light fixture
- Various tools: wire cutters, chop saw, table saw, and drill
To get started, you’ll want to cut the stakes off of the bottom of the tomato cage. You can make it a 3 tier or a 2 tier chandelier. Decide which you’d like and use the wire cutters to clip off the unwanted portion of the tomato cage.
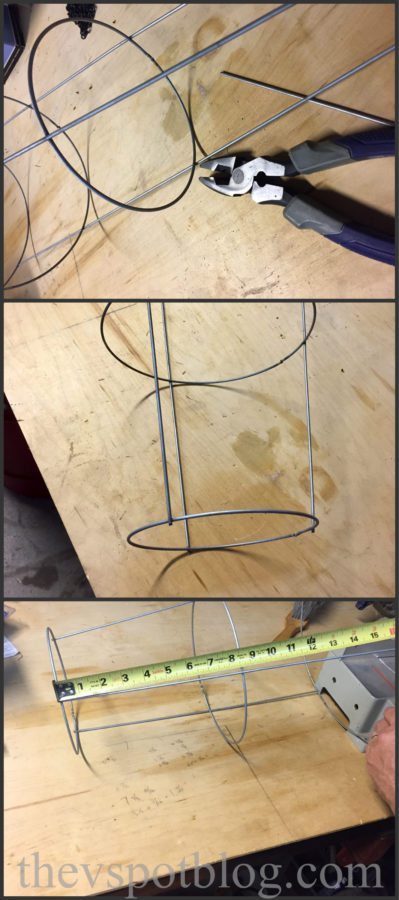
Once you’ve cut the stakes off of the tomato cage, you’ll want to measure the distance between the tiers, as that will determine the length you need to cut your board. You will want to make sure that the length of your wooden strips will be long enough to cover the top of the tier below it. (Note: I spray painted my tomato cages black, but you could paint them any color or leave them as is. No rules here.)
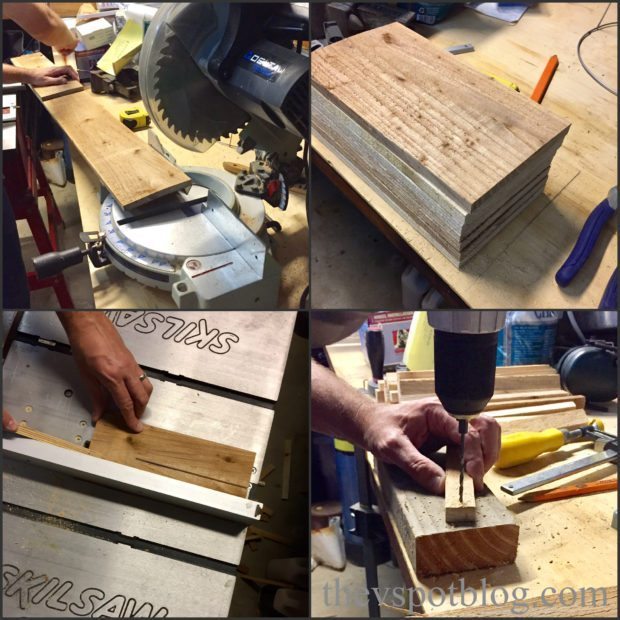
Use a chop saw to cut the boards to the proper length, then use a table saw to rip the cut boards down into 1 to 1.5 inch wide strips. Drill a hole into the end of each strip. (I convinced Handsome Hubby to do this for me, but it really is easy enough to do for anyone.)
Once your all of your wood strips have a hole drilled in them, you’re ready to stain them if you’d like. I think one of the quickest and easiest ways to get a little color on them is to use a water based stain or tint and stain them in a bucket. Simply fill a small bucket about half way full with water and mix in a generous amount of tint or stain. (1 part stain to 6 parts water…?) Just eyeball it.
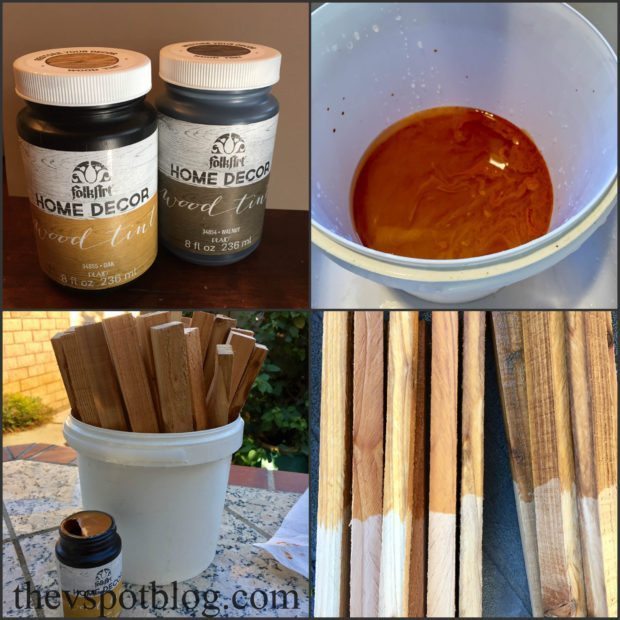
Fit as many wooden strips into the bucket as you can. The mass of the strips will raise the water level in the bucket. Let sit for several minutes, then take the strips out, flip them over and place back in the bucket so that the unexposed ends get a little time soaking in the tinted solution. Set them flat to dry.
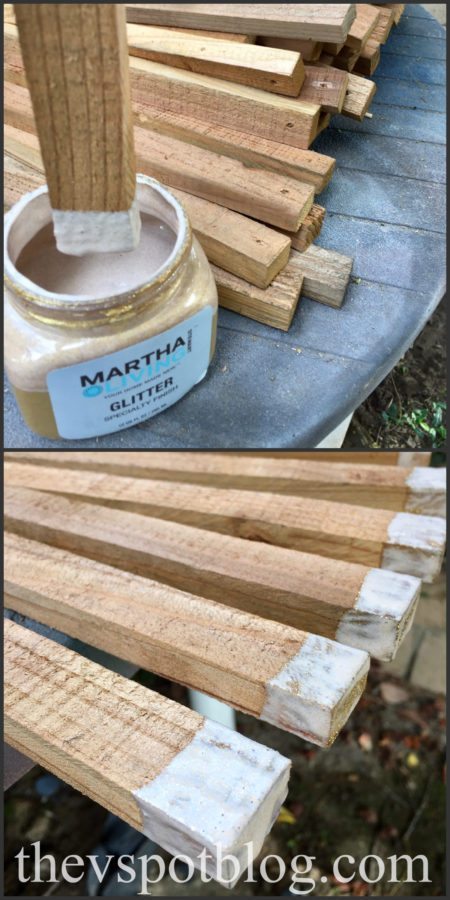
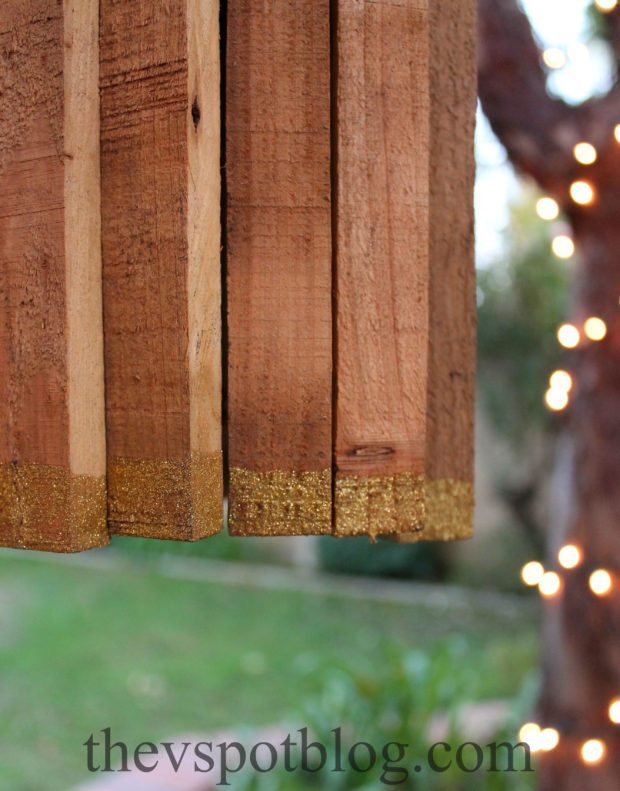
I wanted to add a little shimmer and glam to some of the rustic wood pieces, so I thought a little gold glittery paint was in order. I used Martha Stewart’s and dipped, but you could use any technique or paint to do this. I only wanted the gold dipped strips of wood on one of the tiers, so I left the majority of the wooden strips alone.
Once the gold paint dries, you are ready to start assembling the chandelier. I attached a length of chain to each side of the top tier of the tomato cage and hung it from a hook to make it easier to attach the wood strips.
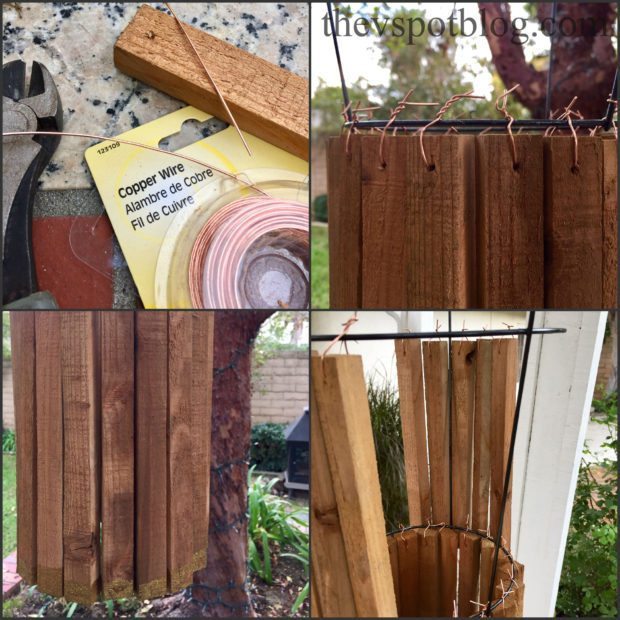
Snip little sections of wire that are long enough for you to work with. Thread the pieces through the drilled hole in the wooden strip and twist on to the bottom rung of the tier. They are not going to show, so don’t worry too much about whether or not they are perfect and uniform. You may need to straighten the wood strip in order for it to hang just right. Twist the strip until it hangs the way you want it to. Do not twist the wires securing the strips too tightly. You want the strips to hang from the wire… gravity is your friend once the chandy is hanging up.
I chose to have the gold dipped wooden strips on the bottom tier of the chandelier. Once the bottom tier was filled with the gold strips, I moved up to the next tier and started adding strips there. You definitely want to work from the bottom up. This allows you to add the wooden strips much more easily. In an effort to keep the tier balanced while adding the wooden pieces, try not to add them all on one side, working around. Instead, add on opposite sides from each other, one at a time.
Continue adding wood strips until you finish the top tier. Tuck the loose wire ends down towards the center of the chandelier, as they will show.
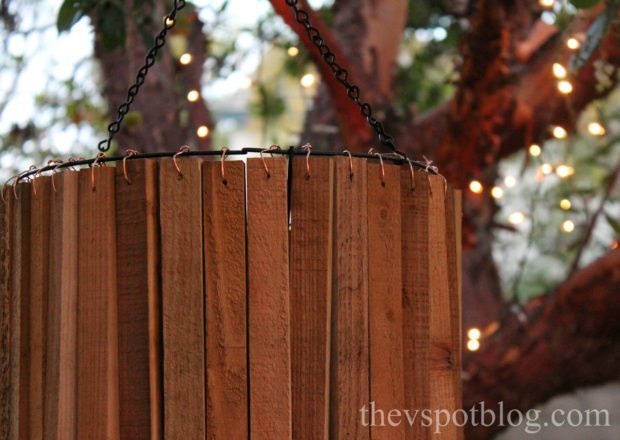
Hang your beautiful DIY Rustic chandelier outside. I hung this one in a tree, then took these light bulb extension cord style fixtures and threaded it along a tree branch so that it dropped down right into the center of the chandy.
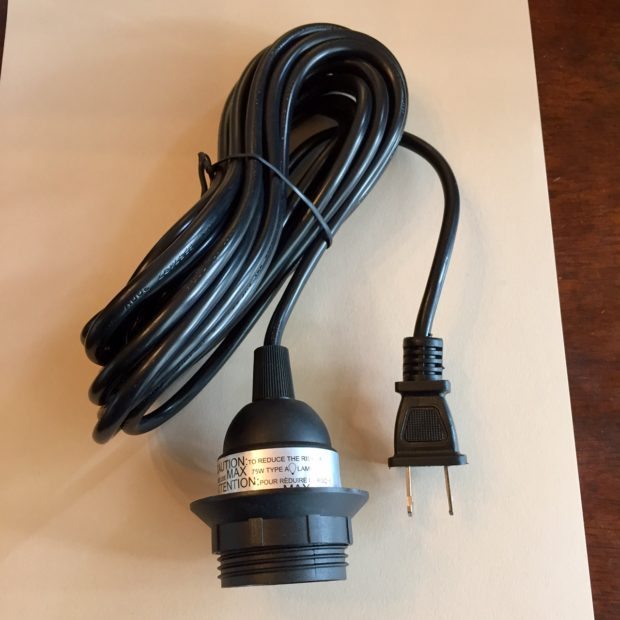
This plug in light fixture makes creating a DIY chandelier easy-peasy!
No need to attach the light to the chandelier… just hang it separately.

Even though I made this with the idea of creating a centerpiece for my Thanksgiving table, this is a great project to leave up year round. Build them in different sizes and with different finishes and hang them in a cluster in trees… glitter the ends and use them in outdoor Christmas decor. There’s so much that can be done with this project, and it all starts with a tomato cage. Happy building!

This is soooooo genius!! I love it! I will have to scout out good placement but i want this in my life!
~Sheila
Making the Most of Every Day
Thank you, Sheila! 🙂
I love your GENIUS ways euth tomato holders.
I love it!! How would you modify (if at all) for indoors? Sorry about the caps- not sure why theyre on or how to get them off
Hi Janelle,
Yes, you could very easily modify this for indoors. In fact, it is easier to find a pendant light kit than it is to find the extension cord style socket I use in the post! 🙂
Wow that is so cool! And I just had a new deck built and just happened to have two fence boards left over; and already have the tomato cages on hand. Thank you so much for sharing.
Do you think it would work to make it wirh paint sticks?
Yes, absolutely! And easier because you don’t need to rip down the boards.
About how much overlap did you have between tiers? A couple of inches? I’m using paint sticks and wondering if i can get away with not cutting them down.
I guess that would depend on the tomato cage that you use.
Thank you for this amazing idea! I’ve been searching for an affOrdable chandelier to hang in our 2-story foyer, and I think a variation of your tomato cage creation is going to be stunning!
this looks like such fun, can’t wait to make one!
Loved the chandy ideas from the moment i saw it! Soooo i went ahead and made it yesterday. I do recomend using cedar instead of pine like i did since that’s what i had in hand since it’s very heavy. Other than that its easy and beautiful! Thank you soo much for this idea!
-patricia