The V Spot

Rants, observations, and home decorating... from a woman with no time for a blog.


  • Email
  • Facebook
  • Instagram
  • Pinterest
  • Twitter
  • Home
    • Privacy Policy
  • All Blog Posts
  • Crafts
    • All projects
    • By Project
      • Accessories
      • Artwork
      • Before & After
      • Cheap & Easy
      • decor
      • Floral Design & Centerpieces
      • Furniture
      • garden & outdoors
      • Glass
      • no-sew
      • Upcycle – Recycle
      • Wreaths
    • By Season
      • Spring
      • Summer
      • Fall
      • Winter
    • By Materials
      • corks
      • epsom salt
      • fabric
      • Mod Podge
      • Paper
      • Spray Paint
      • Sticks
    • Round-Ups
  • Holidays
    • Halloween
      • Pumpkins
    • Thanksgiving
    • Christmas
    • Valentine’s Day
    • St. Patrick’s Day
    • Easter
    • Cinco de Mayo
    • Mother’s Day
    • 4th of July
  • Food & Drink
    • All recipes
    • Breakfast
    • Appetizers
    • Side Dish
    • Main Dish
    • Desserts
    • Drinks & Wines
    • Tables & Decor
  • Real Life
    • Family
      • Grant
      • parenting
    • Tales To Tell
    • friends
    • Keepin’ It real
    • Tips & Tricks
      • cleaning
      • Health & Beauty
      • Let me help you
      • organization
    • Just Funny
      • No Mom wants to hear…
      • Exchange of the Day
      • Snarky
      • wacky strangers
      • Big Time Fail

Make a ribbon covered globe for Halloween.

September 6, 2012 24 Comments

Last year I snapped up a cool old globe for 50 cents at a yard sale and I used chalkboard paint to make a Scary Places Halloween Globe.   Well, it’s been sitting in the garage since last Halloween and I’ve been thinking about how to change it up for this year without ruining the chalkboard paint.

The answer?  Ribbons.

I got lots of coordinating ribbon and just added strip after strip to the globe until I liked how it looked.
Here’s what you’ll need:

  • an old globe
  • various coordinating ribbon
  • scissors
  • double sided adhesive (I used Aleene’s Tacky Dot Roll which, I love.)
  • glue gun
  • fabric flower or leaf embellishments
  • black stamp
Because I don’t want to ruin the globe itself, I opted to adhere the bottom layer of ribbons to the globe with double sided adhesive so I could take it off again.

I love the little tacky dots because I can get them onto the ribbon with one hand.  Press the ribbon to the dot and it comes right up.  Stick one end of the ribbon to the top of the globe and pull it tight, wrapping it down to the bottom of the globe.  Space them in a fairly even manner.

When the top of the globe is covered with the fabric from the ribbon, that’s the time to fire up your glue gun.  Put a dab of hot glue on the end of a length of ribbon and glue it to the ribbon “base” that is stuck on with the sticky dots.

Add another dab of glue to the other end of the ribbon and pull it down firmly across the globe and secure it to the bottom.  You want to pull the ribbons tight across the globe so that they will lay flat.

Something to note: you will be pulling the ribbon from the top point on the globe down to the bottom point on the globe.  It’s held in there at an angle, so the best way to keep the ribbon fairly straight is to go from point A to point B.

Keep adding layers of ribbon until the whole globe is covered.  I found the best way to do this was to do one kind of ribbon at a time and just keep turning the globe in order to evenly space them.

So then what to do with the raw edges on the top…?  I tried wrapping ribbon around it.  Um, no.  I tried to do a little fringe of ribbons… wasn’t really feeling it.  Tried to cut out a black circle to “cap it off”.  Major fail.

Then I remembered these little silver leaves I bought for no other reason than that they were on clearance for 22 cents.

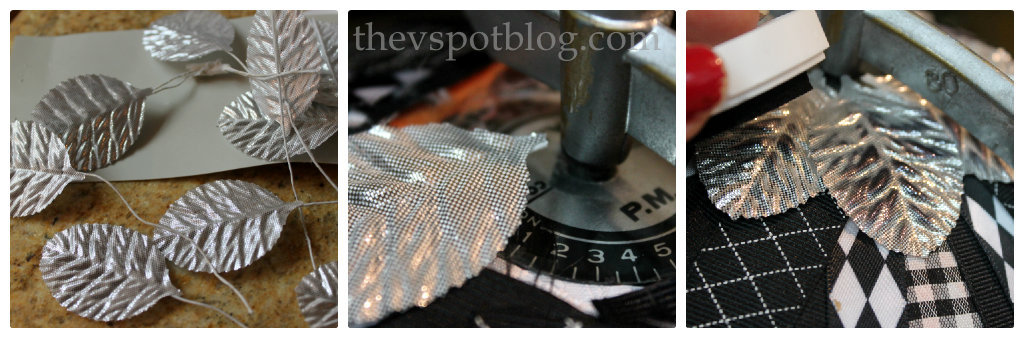
I dug into my stash and hot glued them, overlapping in a circle.  A thinking girl would have thought to rub them with a black stamp before gluing them onto the globe, but apparently I am not a thinking girl.

I’m pretty happy with how it turned out.

I’m so excited for Halloween!  (And I’m also excited that when Halloween is over, I can easily pull off all of this ribbon and still have a globe AND good sized lengths of ribbon for other projects.)
Win, win, win.

Linking this to Home Stories A 2 Z

Filed Under: Autumn, craft time, Crafts, fabric, Fall, Halloween, project du jour

Comments

  1. ~PJ says

    September 6, 2012 at 2:11 PM

    Saweeeet! Now for some reason when I read globe in the title I was thinking snow globe not world globe… So the mental picture I was preparing myself for was MUCH different! Lol.

    Reply
  2. Vanessa says

    September 6, 2012 at 2:41 PM

    Hi, Vivienne

    This is lovely! What a great idea too.

    Vanessa

    Reply
  3. Molly says

    September 6, 2012 at 2:49 PM

    I just saw this on Pinterest, and just had to stop by because I LOVE it! Oh my gosh, I just saw a globe at Goodwill yesterday, I’m seriously going back today to pick it up so I can make one of these. Well done!
    I’d like to invite you to come link up your Fall projects at my monthly themed party called SPARK if you’d like-
    http://www.justalittlecreativity.com/2012/09/its-fall-yall-september-spark-party.html
    I really hope to see you there, this project is too cool not to share 🙂
    -Molly

    Reply
  4. Janette Johanson says

    September 6, 2012 at 8:21 PM

    You really should start selling the things you make! I am always so amazed and I know it probably seems to simple to you to whip these up but I think you have a great eye for it!
    CUTE! Now I need a globe!

    Reply
  5. Bliss says

    September 6, 2012 at 10:15 PM

    That is cute. Do not add feathers!

    ~Bliss~

    Reply
  6. Good Time Charlie says

    September 7, 2012 at 12:17 AM

    I love this project, and this was so NOT a craft fail. I agree with Bliss, put the feathers down ma’am.

    Reply
  7. Michele {The Scrap Shoppe} says

    September 7, 2012 at 1:46 AM

    Love it, Viv!! And I LOVE that its not permanent! That’s my kind of project. 😉

    Reply
  8. Tonna @ Navy Wifey Peters/USS Crafty says

    September 7, 2012 at 3:20 AM

    Fab-u-lous! This is a really cool idea, and I LOVE the ribbon you used and the silver leaves are awesome, too! lovely globe! awesome job!

    Reply
  9. Johnnie says

    September 7, 2012 at 10:48 AM

    I dig it, Vivienne! You can change it out for all the holidays too. Sweet.

    Reply
  10. tvdinnerpro says

    September 7, 2012 at 1:14 PM

    AWESOME idea! I love it! xoxo (Malia)

    Reply
  11. Mary Beth says

    September 7, 2012 at 1:30 PM

    I love what you did with this globe. Talk about thinking outside of the box (or orb as the case may be) ~ kudos!

    Reply
  12. Nicole {WonkyWonderful} says

    September 7, 2012 at 4:17 PM

    I love how this project turned out! Super cute & unique decoration. I have an old globe I bought at a yard sale (one of my more questionable purchases) – I need to figure out what the heck I’m going to do with mine 🙂

    Reply
  13. Amy* says

    September 7, 2012 at 8:30 PM

    This is so cool! First of all you had me at chalk board painted globe but I love the idea to temporarily change it up with the seasons. The ribbons are so elegantly festive and I absolutely LOVE how you finished it off with the silver leaves at the top.

    Amy*

    Reply
  14. Bonnie and Trish @ Uncommon says

    September 10, 2012 at 10:57 AM

    Ok…absolutely LOVE this! The ribbons are precious and those 22 cent leaves at the top are perfect!!!! Incredibly creative!! 🙂

    Reply
  15. K Coake says

    September 11, 2012 at 1:14 AM

    What a great idea! I love the ribbons and the leaves on top finish it of perfectly.

    Reply
  16. Meghan says

    September 11, 2012 at 1:22 AM

    This is totally awesome!!!!!!!

    Reply
  17. Judy says

    September 11, 2012 at 12:46 PM

    That is a super creative idea. I love the ribbon on the globe and I love that it’s temporary so you can change it out with the seasons. I would love for you to link up to my Fall into Fall party that opens at 8pm EST tonight. Hope to see you there.

    Reply
  18. Laura / The Shed blog, by Pet Scribbles says

    September 11, 2012 at 5:41 PM

    You are rockin’ the pumpkins this year! This globe/pumpkin is fantastic!

    Reply
  19. Chelsea @ two twenty one says

    September 12, 2012 at 4:00 AM

    I tell ya, you’re one smart cookie. Such a great idea! I’m excited to see what other cool things you come up with for Halloween!

    Reply
  20. Lisa Hall says

    September 14, 2012 at 2:40 AM

    Such a cute idea and great deco for Halloween!

    Reply

Trackbacks

  1. A Black and Gold Christmas: Holiday House tour - The V Spot says:
    December 23, 2014 at 12:41 PM

    […] also love this wreath, made with bits of ribbon leftover from this project and roses made from coffee filters, which I spray painted […]

    Reply
  2. An easy Valentine's Day globe. - The V Spot says:
    January 7, 2016 at 12:19 PM

    […] A few years ago I picked this globe up at a yard sale for about 50 cents.   My first re-do was my Scary Places Halloween Chalkboard globe…  After that, I covered it with ribbons… […]

    Reply
  3. Strawberries Blog says:
    April 13, 2017 at 11:44 AM

    Chocolate Bliss Box With Get Well Ribbon

    […] hem onto the ribbon with one hand.  Press the ribbon to the dot and it comes ri […]

    Reply
  4. An easy Valentine's Day globe. | The V Spot says:
    February 10, 2018 at 3:34 PM

    […] A few years ago I picked this globe up at a yard sale for about 50 cents.   My first re-do was my Scary Places Halloween Chalkboard globe…  After that, I covered it with ribbons… […]

    Reply

Leave a Reply Cancel reply

Your email address will not be published. Required fields are marked *

you might also like:

glitter, pumpkin, pedestal, thankful, autumn, white, ribbons, silver, thanksgiving, decor
Easy pedestal pumpkin for Thanksgiving.
Tree Bark Candle Holders: An easy DIY project

Upcycle: easy DIY faux hammered metal planters (with spider web topiaries.)
Easy Damask Pumpkin using trashed craft supplies.

Going Batty: Making over a bare wall for Halloween.
Easy chain covered pumpkins for Halloween.

Make a Houndstooth Pumpkin from Duck Tape
More Pumpkin foolishness…. Necktie Pumpkins

My Halloween wreath….all it’s missing is a whip.
crow, pumpkins, fall, arrangement
Pumpkin Round Up: 10 pumpkin ideas

Recent Posts

  • Spooky porch decor and a Halloween Chair.
  • DIY Plaid Wine Glasses
  • Easy Sand-N-Sea Flower Pots
  • How to use an indoor chandelier outside.
  • Quesadillas made with slow cooker Carnitas. (Pork in a crock pot… nothing is easier.)
  • No Sew Project: How to recover your outdoor cushions using fabric and a glue gun.
  • Upcycle project: plain flower pot into decorative ceramic planter.
  • An easy Valentine’s Day globe.
  • Simple, winter themed decor. (Using what you already have, of course.)
  • Easy Goat Cheese Appetizer Recipe

Amazon Associates Disclosure

Vivienne Wagner is a participant in the Amazon Services LLC Associates Program, an affiliate advertising program designed to provide a means for sites to earn advertising fees by advertising and linking to amazon.com.

Popular Posts

  • Cleaning Stove Burners & Grates using Ammonia (The best...
    Comments (631) | Jul 07, 2011
  • Easy Dessert Recipe: Oreo Cheesecake Bites
    Comments (64) | Mar 04, 2014
  • How to store fresh produce – From A to Zucchini.
    Comments (111) | Jan 25, 2012
  • No Sew Project: How to recover your outdoor cushions using f...
    Comments (109) | Mar 03, 2018
  • DIY wine bottle crafts.
    Comments (10) | Aug 22, 2013
Privacy

Copyright © 2023 The V Spot · Website by Houndstooth Media Group