I love fresh flowers. I love Hydrangeas. I will even tolerate dried flowers…. as long as they’re Hydrangeas.
Here’s an easy way to dry them, and it’s amazing how long they will keep!
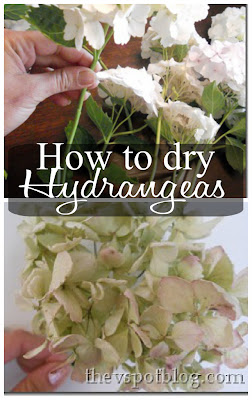
First, find yourself a Hydrangea bush. If your neighbors have one and you don’t… make friends with your neighbors.

Go ahead and clip the flowers that have opened up.

Strip the leaves off of the stem.

Now you’re ready to dry your Hydrangeas. It’s super difficult. Are you ready…?
Put them in water. That’s it.
If you try to dry a Hydrangea without leaving the stems in water, it will look like this.

However, if you simply put the stems in water and let the stems slowly suck up the water, it will look like this when it’s done drying.

Which do you like better?
This one?  or this one?
For whatever reason, if the flower dries slowly, still slurping up a little water as it dries, it seems to retain its shape and color. For years.
This arrangement right here…?

I’ve had this urn of dried Hydrangeas for about 2 years now. They are white ones from my yard and as they dry, they take on a greeenish hue. I prefer lighter colored Hydrangeas when drying them, but that’s just personal preference.
Using an empty jar or vase, I fill it with water then put the shortest stems along the edge of the vase…

…then stick the longer stems in the middle. I want the arrangement to look full while it’s drying, but I don’t want the blooms to be smushed. (That’s a technical floral designer term: smushed)
Just make sure that all of the stems are well covered by water.

In this case, I pop the jar into a pretty vase and I will leave it just like this. When the full jar of water is empty, chances are that the flowers are dried and ready to be used. (If they are NOT dried, keep adding water until they are.)

This will sit, just like this, for a week or so. Then I’ll have dried Hydrangeas. Easy peasy.

Awesome! My hydrangeas are just starting to bloom now, so I will try this soon. Thanks for the info! Have a great weekend, Mary :O)
Sadly I don’t know anyone or have neighbors that are growing hydrangeas. Maybe I could go make friends with a total stranger 🙂
Very pretty!
I love this! I did this awhile back and gave the dried hydrangeas to my sister to decorate her room when she was redoing it and two and a half years later they still look beautiful! I was thinking about doing this for my place the other day! Thanks for the extra boost of encouragement to actually getting around to it!
I’ve been following you for a little while now and have really enjoyed it!:)
Kaitlin
Notsosimplehousewife.blogspot.com
I never realized that my laziness is what contributed to my perfectly dried hydrangea’s!!
I never remember to empty the water and they end up sitting there forever! LOL
Can I act like I knew what I was doing??
I think you can act like that yes! He he!!
Beautiful! I bought some pink and blue ones for my gender reveal party and they are just gorgeous flowers!! I can’t believe how much water they need and I think that’s why most of my flowers die– I’m so lazy about watering– but I have kept these alive.. Always love your posts…
So basically once they’re dry you can leave em like that. Right? Cuz I’m the queen of letting flowers die and then dumping them out a week too late.
Great tutorial! I dried my “Blushing Bride” hydrangeas a couple years ago and I still bring them back out for the autumn season. 🙂
xoxo laurie
Great tutorial! I dried my “Blushing Bride” hydrangeas a couple years ago and I still bring them back out for the autumn season. 🙂
xoxo laurie
Hi Vivienne,
I’m visiting from the French Country Cottage and am so glad to have run across this post! I have access to two hydrangea bushes, which are both beginning to bloom now, and I wanted to dry some of the flowers this year. Only problem was that I didn’t know what to do! Now I do, thanks to you. 🙂
Erin
Carolina Country Living
I love hydrangeas! My mom has some dried ones that she has had forever, but I always assumed she bought them somewhere…maybe she dried them herself it it’s that easy:) Now to find a friend who has a hydrangea plant!
I just posted on my hydrangeas and now I know what to do with them when I clip them, thank you so much for this tip! Glad to have found you.
Is there anything lovelier than a hydrangea?
I too love hydrangeas!! I will definitely bookmark this tip!! Water well and wait. Love it!
Hugs
SueAnn
I had no idea!!
I had light yellow hydrangeas in my wedding bouquet. Love them!
Hydrangeas are my faves, and I had no idea they dried so beautifully. Thanks!
You know I”m loving this post, hydrangeas are so wonderful! 🙂 Thanks for that great tutorial.
Thanks for the tutorial. These are so expensive to buy but I hadn’t tried drying my own!
I love hydrangeas and would love to have some tips on how to grow them so that I would have some to dry!! I keep killing mine
Years ago, my mom and her friend went out at night and swiped some hydrangeas from some poor unsuspecting home owner. She and her friend would tee-hee over their loot whenever they got together. Their dried hydrangeas lasted for years. I do not own a hydrangea bush, so I may have to take a page out of my mom’s book. Don’t worry. I’ll make sure it’s nice and dark before I go out.
Thanks for the tips on how to dry my soon-to-be-acquired hydrangea arrangement.
You must have read my mind, because I was just wondering how to dry my hydrangeas. Unfortunately, mine are probably almost done for this year, but wait until next year! I’m going to have huge dried bouquets (I hope).
Thanks for the tute and tips. I have always loved the look of dried hydrangeas but had no idea how to go about it.
LOL!! Know what’s so incredibly funny? I always display my hydrangeas with water at first but FORGET about them. And yeah, they always dried and I always felt, “Man, they still look good so I’m not throwing them out!”
Little did I know that by being lazy, I actually did a good thing. Awesome. 🙂 GREAT tip!
Shared on FJI Facebook for SNS 83. 🙂
https://www.facebook.com/pages/Funky-Junk-Interiors/175378011140#!/photo.php?fbid=10150258571896141&set=a.192514281140.164586.175378011140&type=1&theater
Donna
http://funkyjunkinteriors.blogspot.com/
Beautiful! These are my mom’s favorite flowers, so this is great to know
That is how to do it. I discovered this by accident many years ago. And those hydrangeas are still in good shape.
This is great! I love hydrangeas, but don’t like buying them all the time. I’m definitely going to try this!
Loving this tip Viv! I absolutely LOVE dried hydrangeas! I do place mine in water and love them everywhere in the house – but I am going to leave them now until they are fabulously dried too! Thanks for sharing this at FNF! 🙂
I’ve always wanted to do this, thanks for the tips. Thanks for linking this up to Wicked Awesome Wednesday!
Hydrangeas are probably the only dried flower I like. Yours are gorgeous! Thanks for sharing how you do it!
I love hydrangeas too! Mine didn’t bloom very much last year. I should have moved it over the fall/winter. 🙁
love your dried ones!
gail
Gosh, who knew…? not me! I’ll try that this year. I like your so much better! Thanks for sharing the inspiration at VIF! xo Debra
Holy smokes! It’s like magic! You’re brilliant! Thanks for the post!
ooh I am gonna try this, thanks
Who would’ve thought? Can’t wait to try it, thanks for linking it up!
I wish I would have known this for my wedding bouquet! It was full of hydrangeas! Thanks for sharing. 🙂
I love hydrangeas! Wish I would have known this after my wedding!
Jen
Thanks, I just posted this blog post on my blog. Wanted to let you know I love this hint and gave you credit for such a great hint!
Thanks so much for this tip! AND I DO have a neighbor who has bushes and bushes of these and every year asks if I want them! I did dry them hanging one year and was not happy with how they dried (now I know why!) so this year I will gladly take what they offer!
Lovely. I have never done anything like this before, and I have an empty vase I have been wanting to display. Thanks!
wow now that easy and the results are sooooo beautiful but too bad i cant find these flowers very easily hear in my area :(but i will keep my eyes open if i find some then i know what to do 🙂 erum from arts crafts n hobbies
Wow – i never knew how…i tried to hang them upside down thinking that was the trick, but nope! Thank you for sharing. hope you link this post to Cottage Flora Thursday’s so more folks can see how to do this!?! xoox, tracie
This is a great post! You should link it up for Fresh-Cut Friday! 🙂
~Liz
Well how simple was that!
I will have to dry some this summer.
Your Hydrangeas are so beautiful!
Thanks for sharing.
Thank you so much for your great tips and hints!
Trudy
They are my favorite and I never knew until now how to dry them properly! Thanks for the tips!
Thanks!!! Last year I planted 6 hydrangeas; this year, I’ve planted 7 more! That’s right 13 hydrangeas! Now, not all of them are blooming quite yet, but boy oh boy will it be pretty! I can’t wait to have the house full of blooms. Plus I bought re-bloomers, so I have to cut to encourage new growth! Yippee!!
~Mikey @ Shabby French Cottage
http://www.shabbyfrenchcottage.com
What a fantastic tip, I have always wondered hwo they do that!
Carlee
http://www.ladybirdln.com
I just clipped some hydrangeas from the people I babysit for yesterday. I love hydrangeas. I’m so happy I can dry them!
I love this! Thank you so much for sharing! Now I just need some hydrangeas. –connie, measuredbytheheart.com
Vivienne I adore hydrangeas and would never have known this. I probably would have hung them upside down to dry, Ha!
Be sure to enter my awesome $250 Giveaway from Tracy Porter!!
xoxo
Karena
Art by Karena
Thank you so much. I have some hydrangeas in a mason jar right now. I will just leave them be until they dry!
somersetstyle.blogspot.com
My hydrangeas are just starting to bloom. Thank you so much for your great tip.
Thanks for the tip! I love hydrangeas!
I had never heard of drying hydrangeas this way. Thank you for sharing!
Blessings,
Cindy
Hi Vivienne, Great post – this actually reminds me I need to add another hydrangea bush to the garden this year. Thank you so much for linking to the Sunday Showcase Party. I featured this on Sunday! Hope you have a lovely week ~ Stephanie Lynn
Thank you for the tip.
I have been trying this for several days and it isn’t working. They just shrivel up after about 4 days. I am following directions exactly so I’m a bit disappointed!
Like Lori, mine shrivel up — with stems in the water — after just a couple of days. Any idea why???
I don’t know anybody with hydrangeas, so now I am going to have to go out and buy a bush because these are so pretty. I love cut flowers in the house, and these will be so pretty this winter.
Thanks for the tutorial! I just bought 2 bushes and can’t wait to try this! Tip *** Try adding food coloring to the water and the flower will take on that color, blue, red, etc. Fun to experiment! ***
I love love love this! I have 3 bushes and can’t wait to try this! Thanks so much! 🙂
If you want the color to stay truer, and the hydrangeas to be a bit more resilient, you can do the same thing but using glycerine instead of water. The flowers take it up, and it helps to preserve them.
But I like the water trick. I’m going to have to try it!
I had no idea it was so easy! thanks for sharing this 🙂
http://junkernewbie.blogspot.com/
This is awesome! My blue hydrangeas are blooming right now and I have been wanting to know how to dry them.
Oh this is excellent. I’m hoping to have hydrangeas at our wedding, and it’s looking like it will cost a fortune to buy fresh ones.
So trying this out starting this weekend.
THANK YOU.
thanks for sharing.
I am off to the garden!!!!!
Thanks!
I did this last year with hydrangeas from the garden. The flowers are very large and vary in colors on the same bush. I then used them all to stuff in between the branches of my christmas tree. It was gorgeous.
Always wanted to have dried hydrangeas to make wreathes for the doors: Christmas, Spring, Summer, Fall and so on. Now that I have the method to dry flowers and the bush right outside my window, I can go right ahead make my wreathes. Thank you for posting this
Hi Vivienne, I wanted to let you know that when i searched on the internet about how to dry hydrangeas , your very awesome website came up!! I am in the process of doing this right now!!! because i loved this so easy idea, i wanted you to also know that i have linked your “drying hydrangeas to a page on my e-commerce store.at this bitly: http://bit.ly/1Ot0yIs
Thank you so much for this!! awesome!!
sherrie
Great! Thank you and good luck!
I love the whole idea of drying my own hydrangeas, but mine were purchased as a potted plant at publix. will they still dry well?
once dried, can they still be dyed using Rit coloring or will they be too brittle and the flowers will crumble?
I had a bush of the HYdrangeas and when they bloomed I
I cut them and put them in water and they rooted. This is a good to get another Bush started.
I’ve been drying hydrAingas like this fo years. Theew are a few that dont dry, but the majority do, and they beautiful.
It looks beautiful. Amazing tutorial. Thanks for sharing this post.