The V Spot

Rants, observations, and home decorating... from a woman with no time for a blog.


  • Email
  • Facebook
  • Instagram
  • Pinterest
  • Twitter
  • Home
    • Privacy Policy
  • All Blog Posts
  • Crafts
    • All projects
    • By Project
      • Accessories
      • Artwork
      • Before & After
      • Cheap & Easy
      • decor
      • Floral Design & Centerpieces
      • Furniture
      • garden & outdoors
      • Glass
      • no-sew
      • Upcycle – Recycle
      • Wreaths
    • By Season
      • Spring
      • Summer
      • Fall
      • Winter
    • By Materials
      • corks
      • epsom salt
      • fabric
      • Mod Podge
      • Paper
      • Spray Paint
      • Sticks
    • Round-Ups
  • Holidays
    • Halloween
      • Pumpkins
    • Thanksgiving
    • Christmas
    • Valentine’s Day
    • St. Patrick’s Day
    • Easter
    • Cinco de Mayo
    • Mother’s Day
    • 4th of July
  • Food & Drink
    • All recipes
    • Breakfast
    • Appetizers
    • Side Dish
    • Main Dish
    • Desserts
    • Drinks & Wines
    • Tables & Decor
  • Real Life
    • Family
      • Grant
      • parenting
    • Tales To Tell
    • friends
    • Keepin’ It real
    • Tips & Tricks
      • cleaning
      • Health & Beauty
      • Let me help you
      • organization
    • Just Funny
      • No Mom wants to hear…
      • Exchange of the Day
      • Snarky
      • wacky strangers
      • Big Time Fail

Fakers.

October 15, 2009 18 Comments

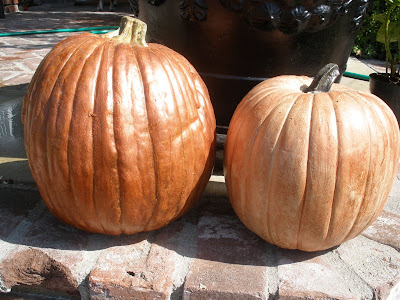
You know those fake orange pumpkins you can buy at craft stores? The ones that look like fake pumpkins? You know, the fake ones pretending to be real.

Everyone knows they’re fake. If they’re already fake looking, you may as well make them look like they’re supposed to be that way.

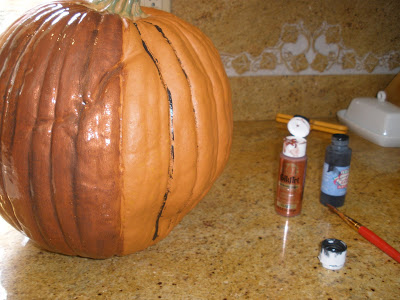
I take my fake pumpkin and paint black lines in the creases. Before it can dry, I apply metallic copper paint in between the black lines. Working with one or two “stripes” of copper paint at a time, get your paint brush wet and go over the area, letting the water blend the two colors a bit. (Do not use a foam brush for this project.)

Continue the process until the entire pumpkin is completely covered.

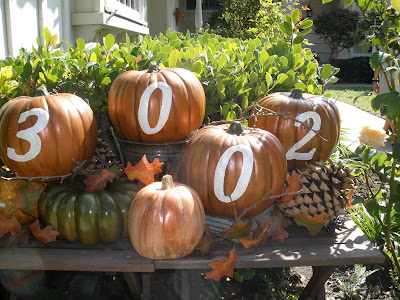
I spray an indoor-outdoor clear sealant on the pumpkins once they’re dry.

You can leave them at that, or paint/stencil a word (blessings, thankful), your address, etc.

Now it’s out in the open that they’re fake pumpkins. No more pretending to be something they’re not…

Filed Under: Holidays, project du jour, tutorial

Comments

  1. Kelli says

    October 15, 2009 at 7:51 PM

    I like your fake pumpkins!

    Reply
  2. Stacey says

    October 15, 2009 at 8:23 PM

    Those look great! I would of never known they were fake.

    Reply
  3. Emily says

    October 15, 2009 at 11:30 PM

    You definitely managed to make the fake pumpkins look really cool!

    Reply
  4. jenjen says

    October 15, 2009 at 11:45 PM

    What a great idea V! I love them. And I love that you put your address on them. So great!

    XOXO
    Jen

    Reply
  5. MiMi says

    October 16, 2009 at 12:58 AM

    Very cool! I bet they’re glad to be “outta the closet” too. ; )

    Reply
  6. Shawn says

    October 16, 2009 at 2:24 AM

    That’s it! I may not be able to have fake boobies but I sure as hell can get myself some decent looking fake pumpkins! I already have all the stuff to make mine look better, now I just need to find the time to do it!

    Thanks for the tip!

    ~S

    Reply
  7. Blessings from the Reeds says

    October 16, 2009 at 2:47 AM

    Oh I LOVE this! Thanks for the scoop. Very pretty:)

    Reply
  8. mama-face says

    October 16, 2009 at 4:11 AM

    so so cute. 😉

    Reply
  9. shortmama says

    October 16, 2009 at 5:20 AM

    So glad you put them in their place!

    Reply
  10. Housewife Savant says

    October 16, 2009 at 10:54 AM

    Ooo, that’s cool V.

    I searched everywhere for WHITE pumpkins this year.

    I was told by a woman with a sky-high beehive hairdo that white pumpkins are So Last Year.

    I found some at Target, but they are bad, fake white.

    I tried a paint re-do and failed, but you’ve inspired me to ignore more schoolwork, I mean; try again.

    I LOVE your craftiness.

    Reply
  11. Sandy says

    October 16, 2009 at 12:28 PM

    Very cool! The pumpkins look so real!

    Reply
  12. jennykate77 says

    October 16, 2009 at 2:40 PM

    I’m glad you cleared that up…I would have thought they were real…such posers! They look fantastic and I love your idea of stenciling your street number or a word on them! Too cute!!

    Hope you’re having a great week!♥

    Reply
  13. Xazmin says

    October 18, 2009 at 3:37 AM

    They’re beautiful Vivienne! I’ve missed you!

    Reply
  14. Connie Weiss says

    October 18, 2009 at 2:54 PM

    Great idea! I love your craft ideas.

    Reply
  15. Becky says

    October 19, 2009 at 1:35 AM

    That is so stinkin cute!

    I love the way you display your address!

    Reply
  16. Just A Mom (Call me JAM for short) says

    October 19, 2009 at 7:03 PM

    What a great idea. I haven’t a creative bone in my body. So I have to get this kind of stuff from somewhere!

    Reply
  17. Angie S says

    October 21, 2009 at 8:47 PM

    Awesome!

    Reply
  18. rhydinhood says

    October 30, 2009 at 5:48 AM

    OMGawd….How awesome are those
    ?!?

    Reply

Leave a Reply to Becky Cancel reply

Your email address will not be published. Required fields are marked *

you might also like:

Make an easy scrap paper Christmas tree.
punk pumpkin, black, leather, studs, studded, safety pins, Halloween
Make a leather studded punk Pumpkin for Halloween. (“Mom…? Why did you make an S&M pumpkin…?”)

How do you like your eggs? (A faux Robin’s egg tutorial.)
How to make a Haunted Tree. (With things you already have, of course.)

twigs, sticks, branches, black pot, pumpkin, Halloween, porch, decorations
Black twig and pumpkin Halloween porch decor.
Cheapy, Creepy, Halloween Party Invitations

cream, elegant, pumpkin, green, bling, ribbon, thanksgiving, paint
Turning plain pumpkins into elegant pumpkins for Thanksgiving.
Easy tips on how to dry hydrangeas.
Drying Hydrangeas. It’s so easy.

A quick and easy DIY mat and frame project. (No tools. You just need tape!)
How to make your own DIY jar candles (using recycled jars and candle wax)

Recent Posts

  • Spooky porch decor and a Halloween Chair.
  • DIY Plaid Wine Glasses
  • Easy Sand-N-Sea Flower Pots
  • How to use an indoor chandelier outside.
  • Quesadillas made with slow cooker Carnitas. (Pork in a crock pot… nothing is easier.)
  • No Sew Project: How to recover your outdoor cushions using fabric and a glue gun.
  • Upcycle project: plain flower pot into decorative ceramic planter.
  • An easy Valentine’s Day globe.
  • Simple, winter themed decor. (Using what you already have, of course.)
  • Easy Goat Cheese Appetizer Recipe

Amazon Associates Disclosure

Vivienne Wagner is a participant in the Amazon Services LLC Associates Program, an affiliate advertising program designed to provide a means for sites to earn advertising fees by advertising and linking to amazon.com.

Popular Posts

  • Cleaning Stove Burners & Grates using Ammonia (The best...
    Comments (631) | Jul 07, 2011
  • Easy Dessert Recipe: Oreo Cheesecake Bites
    Comments (65) | Mar 04, 2014
  • How to store fresh produce – From A to Zucchini.
    Comments (115) | Jan 25, 2012
  • No Sew Project: How to recover your outdoor cushions using f...
    Comments (107) | Mar 03, 2018
  • DIY wine bottle crafts.
    Comments (10) | Aug 22, 2013
Privacy

Copyright © 2026 The V Spot · Website by Houndstooth Media Group