The V Spot

Rants, observations, and home decorating... from a woman with no time for a blog.


  • Email
  • Facebook
  • Instagram
  • Pinterest
  • Twitter
  • Home
    • Privacy Policy
  • All Blog Posts
  • Crafts
    • All projects
    • By Project
      • Accessories
      • Artwork
      • Before & After
      • Cheap & Easy
      • decor
      • Floral Design & Centerpieces
      • Furniture
      • garden & outdoors
      • Glass
      • no-sew
      • Upcycle – Recycle
      • Wreaths
    • By Season
      • Spring
      • Summer
      • Fall
      • Winter
    • By Materials
      • corks
      • epsom salt
      • fabric
      • Mod Podge
      • Paper
      • Spray Paint
      • Sticks
    • Round-Ups
  • Holidays
    • Halloween
      • Pumpkins
    • Thanksgiving
    • Christmas
    • Valentine’s Day
    • St. Patrick’s Day
    • Easter
    • Cinco de Mayo
    • Mother’s Day
    • 4th of July
  • Food & Drink
    • All recipes
    • Breakfast
    • Appetizers
    • Side Dish
    • Main Dish
    • Desserts
    • Drinks & Wines
    • Tables & Decor
  • Real Life
    • Family
      • Grant
      • parenting
    • Tales To Tell
    • friends
    • Keepin’ It real
    • Tips & Tricks
      • cleaning
      • Health & Beauty
      • Let me help you
      • organization
    • Just Funny
      • No Mom wants to hear…
      • Exchange of the Day
      • Snarky
      • wacky strangers
      • Big Time Fail

Make cute Halloween party invitations for pennies (& without any real supplies or effort…)

October 3, 2011 18 Comments

I’m so excited that we’re having our Halloween Party again this year!  Last year’s was a blast and I am already starting preparations.  I sent out a save the date in the beginning of September, but now it’s time to send out the actual invitations.

I am not an evite kind of girl. (Not that there’s anything wrong with that, I just enjoy making the real deal.)  Click here to see similar ones that I made last year.

Here are two simple ways to make invitations… without expensive stamps, inks, cutters or other supplies.

What you’ll need:

  • two different colors of letter sized card-stock
  • regular transparent tape
  • double-sided tape
  • scissors
  • ribbon or tulle
  • an ink pad or marker

First, I created  a simple Word document.  Orient your page to landscape, go to format and create 3 columns.  Type up your party details and select a cute font.  I inserted a cool skull that I got from The Graphics Fairy.  Copy and paste two times so that your invitation fits 3 times on the page.

I had already cut the invitations apart before I decided to do a blog post, so no pictures.  I’m sure you get it though.   My printer is on the fritz, so I saved my Word document as a PDF file and emailed it to my local FedEx-Kinkos.  I placed an order for them to run 15 copies of this on plain white card-stock.  The total was $5 and it gives me 45 invitations.  I was able to pick them up at the store and use their paper cutter to quickly cut them into thirds.

I took an old (and mostly dried up) ink pad and inked the edges of the paper.  Because the ink pad was a bit dry, I took a black marker and “re-inked” the pad.  Worked well enough for what I was going for, which was a dirty, smear-y look for the edges.

My next step was  to take a dark card-stock and make a tri-fold in it.  Easy. Don’t worry about precision or cutting. As long as it fits in a standard envelope, you’re good to go.

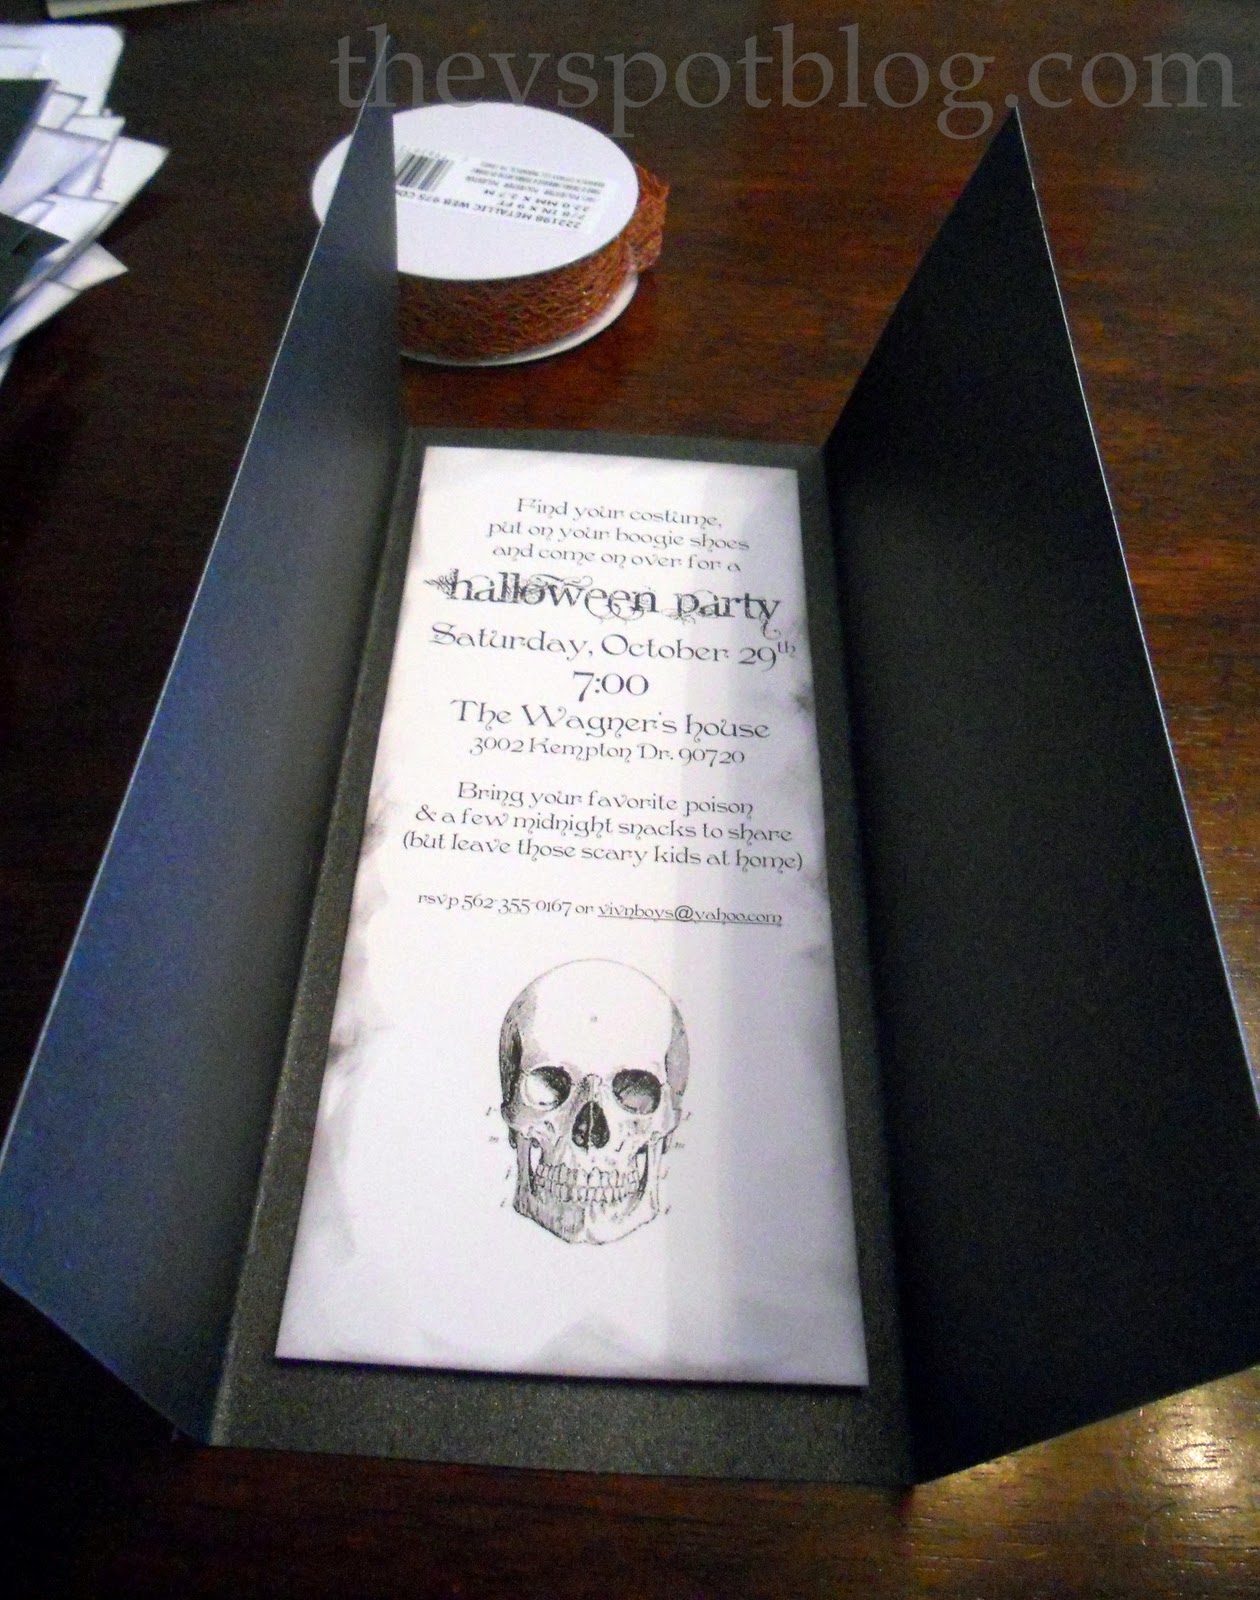
It looked a little too plain in there, so I took some fabulous copper colored, cobweb looking ribbon and taped that to the back of the card.

In order to economize, I cut the ribbon in half length-wise for the sides.

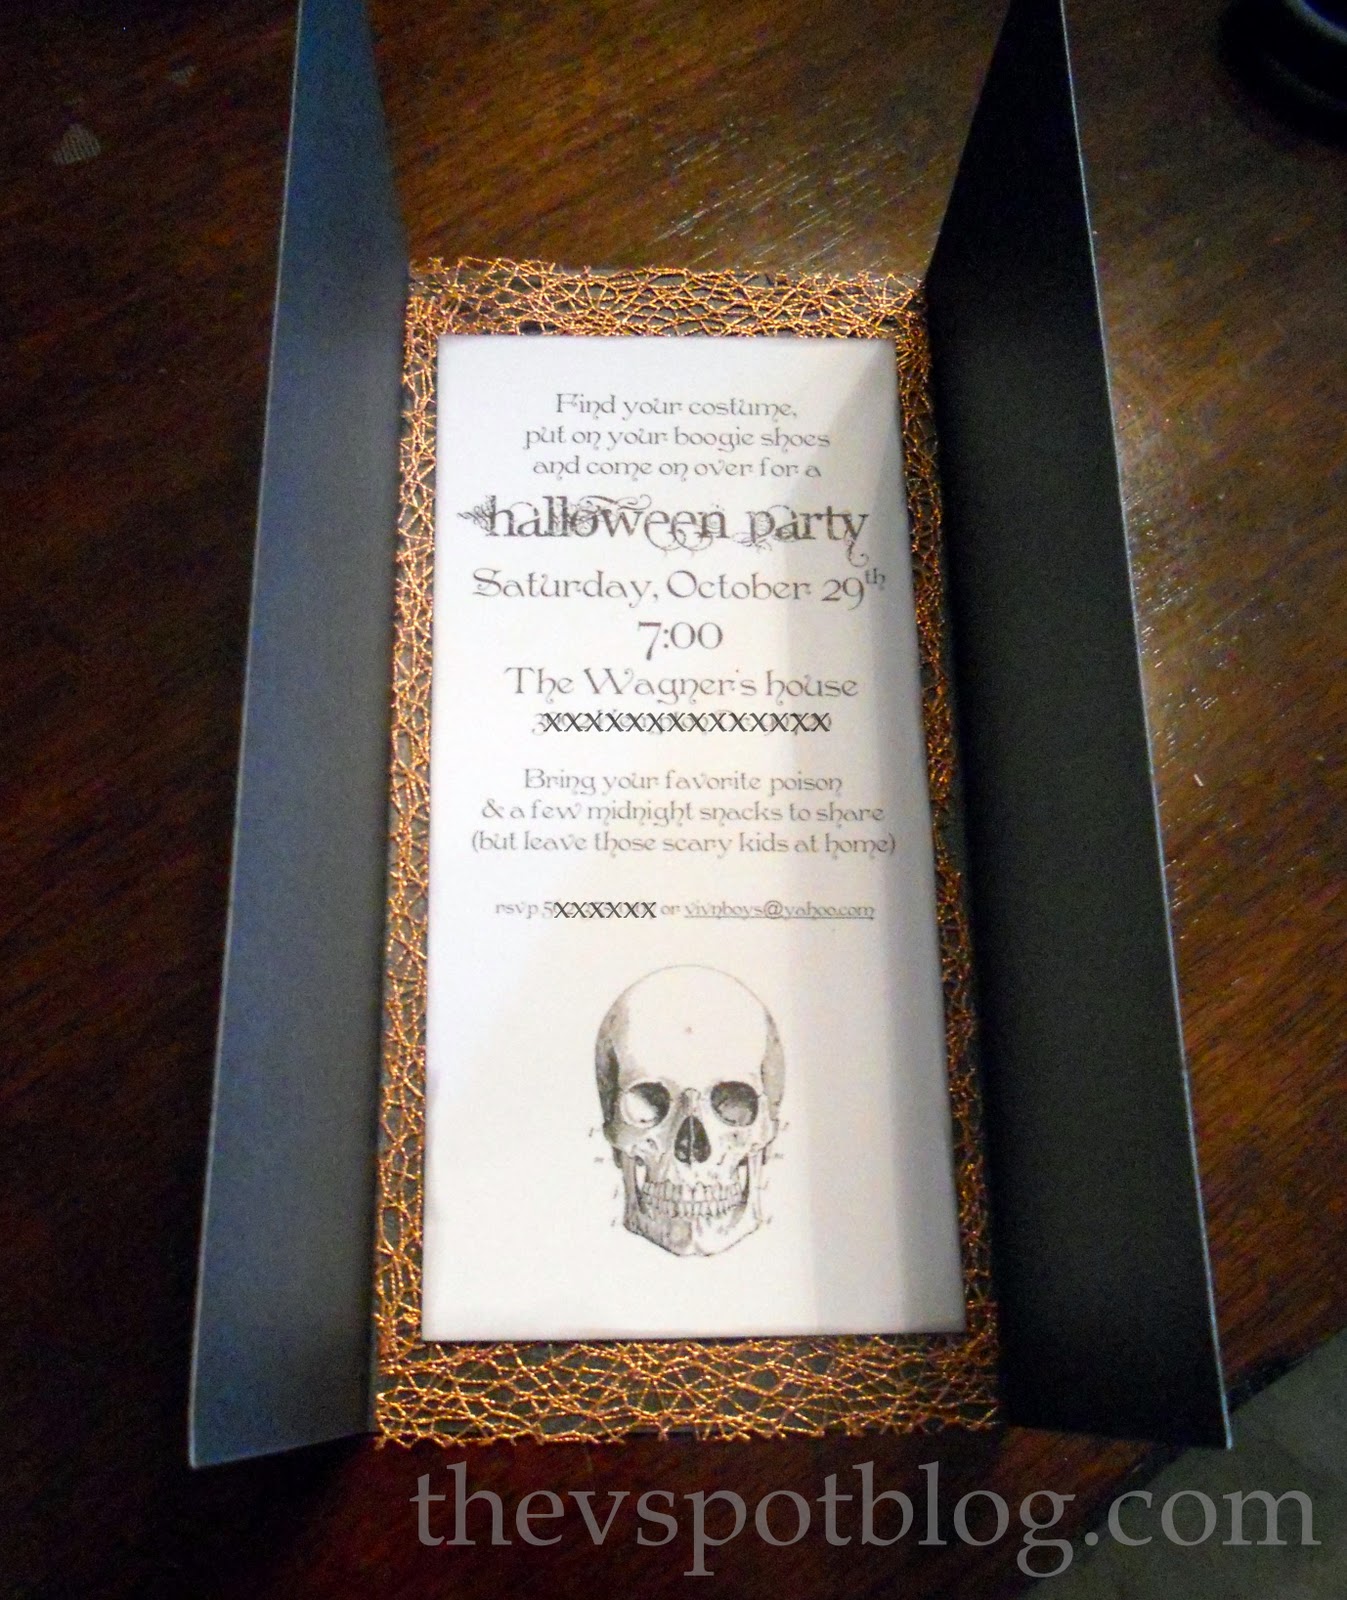
Better! It needed a little something.

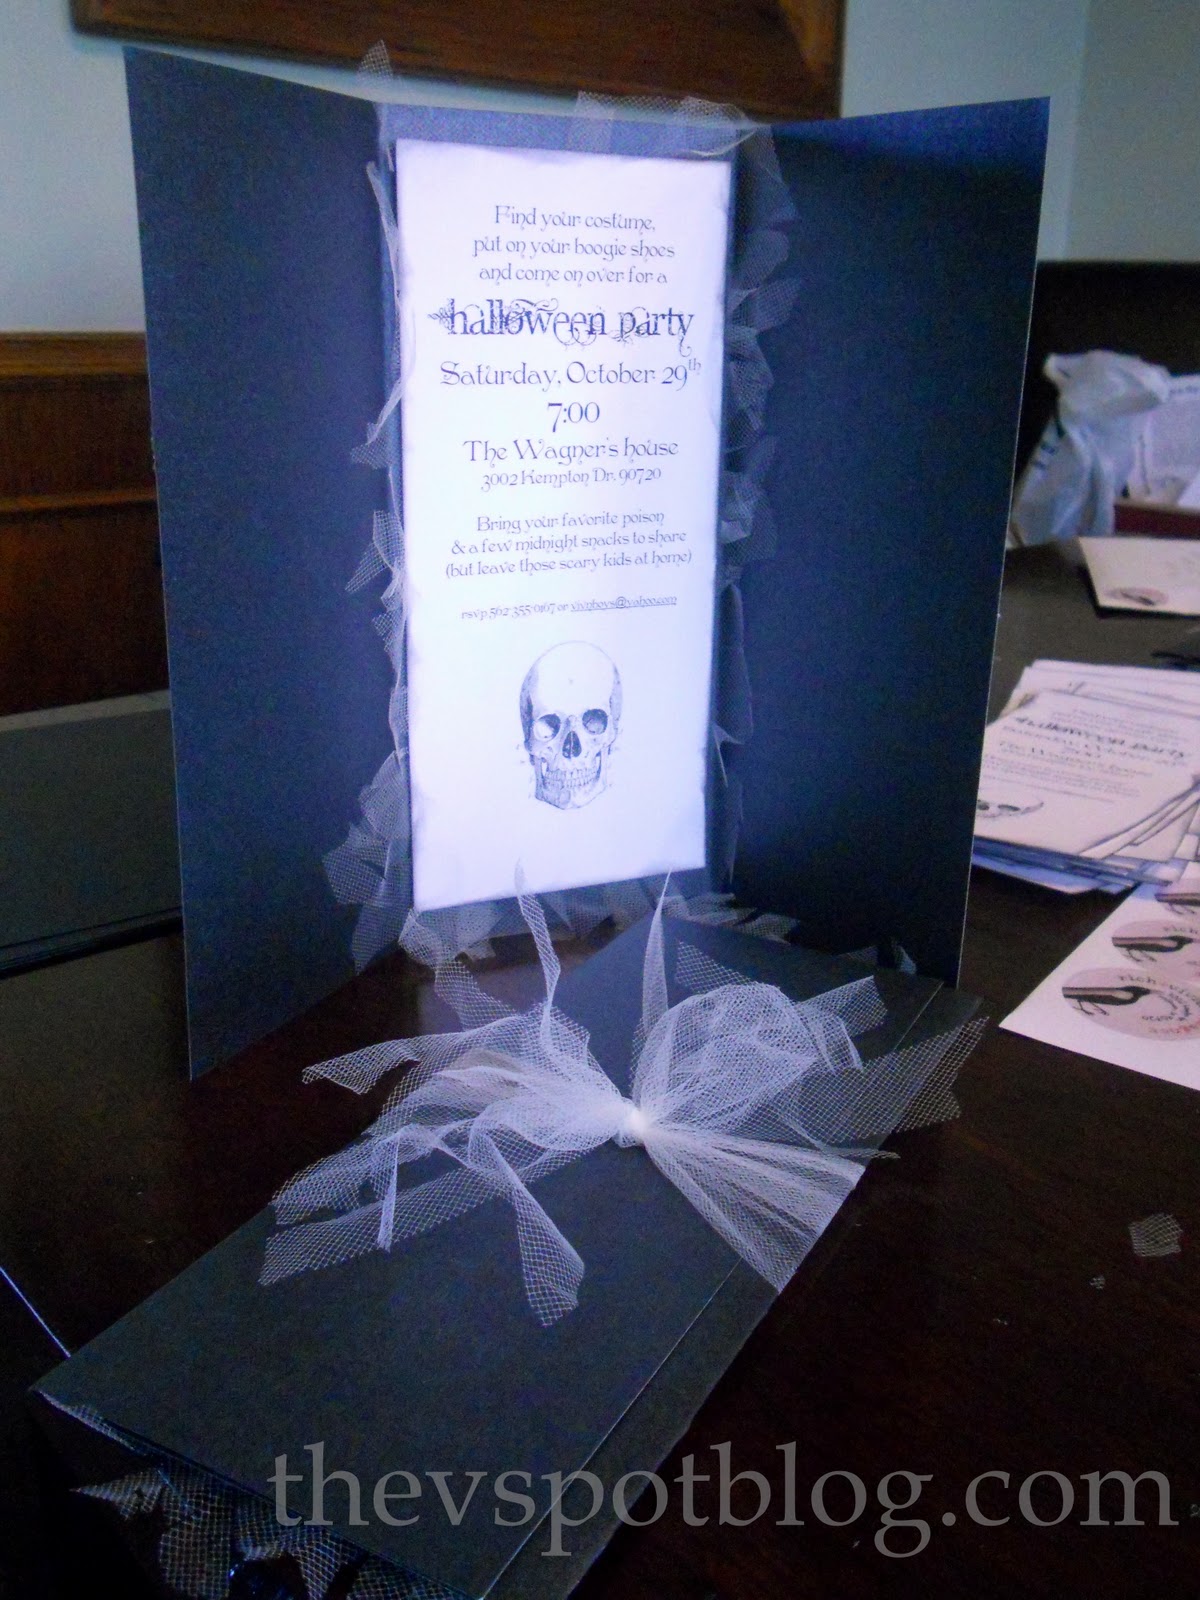
Then you know what happened…?  I ran out of the cute copper ribbon and the store didn’t have any more.  What’s a girl to do when she’s making Halloween invitations and runs out of something…? If she’s me, she looks in her wedding/spring type party supplies.  She finds white tulle.  hmm.

I actually ended up liking how the white tulle looked more than I liked my original idea.  So I did two versions.

I taped strips of the tulle to the back of the card just like the ribbon, but then I took scissors and sliced it up and frayed it.

I love how they turned out!

These cute address labels are from Bohtieque Design.

Love them!

So there you have it, these invitations are super easy to make and they are super inexpensive as well.  They work out to about 43 cents a piece.  Not too shabby!

(Just like last year, I don’t know what I’m going to dress up as… I welcome any suggestions you may have!)

Filed Under: Autumn, cheap and easy, Crafts, Fall, Halloween, Paper, paper crafts, party, tutorial, UseWhatchaGot

Comments

  1. Kristin says

    October 3, 2011 at 6:42 PM

    These are great! Really cool address label! Love the handmade feel and the materials are not crazy expensive. Love a good Gypsy as costume suggestion.

    Reply
  2. Pudel-design says

    October 3, 2011 at 6:44 PM

    LOOOVE them, looks really cool!
    Thank you for sharing!
    Lovely greetings…

    http://pudel-design.blogspot.com/2011/09/thank-you-and-giveaway.html

    Reply
  3. Connie says

    October 3, 2011 at 7:00 PM

    Very cool Viv!

    I love making invitations!

    Reply
  4. At The Picket Fence says

    October 3, 2011 at 8:41 PM

    Those are fantastic Viv! Love the black edges and I totally want to try that myself! 🙂
    Vanessa

    Reply
  5. bk says

    October 3, 2011 at 10:24 PM

    Costume Suggestion:
    Snow White

    Reply
  6. Nina Patricia @ The Adventures of Nina Patricia says

    October 3, 2011 at 11:38 PM

    I’m in love with this invites, they are fabulous. I’m all for the real deal.
    How about a flapper?

    Reply
  7. MiMi says

    October 4, 2011 at 12:02 AM

    Those look GREAT!!!

    Reply
  8. Myya says

    October 4, 2011 at 2:43 AM

    Those are awesome! When my girls are older & I have more me time I am SOOOO going to start throwing adult parties!!! SO FUN!!!

    Reply
  9. Kim @ Too Much Time says

    October 4, 2011 at 4:00 AM

    So cute! Now, why did you go an x out your address? Can’t I come too?

    Reply
  10. Impulsive Addict says

    October 4, 2011 at 5:33 AM

    I would like to come to your Halloween party.

    I would also request that you make me some cool invitations to Emma Kate’s 2nd bday party! You are uber talented! Is uber a word? It’s underlined in red. DANG IT. And I’m still drinking. Going home tomorrow. BOO.

    We miss your face! xoxo

    Reply
  11. Shawn says

    October 4, 2011 at 5:36 AM

    When should I be expecting my invitation?

    Great job, as always!

    Reply
  12. Kelli says

    October 4, 2011 at 3:43 PM

    I really love the thought and detail you put into things. This invitation is great!

    Reply
  13. Katie says

    October 4, 2011 at 7:47 PM

    Ummm these are awesome. Every year we host a party and every year I want to make my own invites but run out of time. 🙁 Maybe next year!

    Reply
  14. lesley says

    October 7, 2011 at 12:31 PM

    how cool! I love all of the little details you added to them.

    Thanks for sharing the tutorial!

    lesley

    freakingcraft.blogspot.com

    Reply
  15. Becca @ R We There Yet Mom? says

    October 13, 2011 at 12:46 PM

    Those would have cost a fortune if you had them made for you!! They look awesome – so what are you going as this year? We were invited to an adult party and are thinking of going as Clive & Daphne (Phil & Claire’s alter egos) from Modern Family – lame huh???

    ~Becca

    Reply
  16. Gigi Baby says

    October 14, 2011 at 1:24 AM

    Those invites are awesome and something I can totally do and not screw up lol! As for costume ideas so a mix and match of different ideas! Like my besties and I are going at Monster High Pink Ladies! Maybe you and handsome hubby could be vampire sandy and danny lol but bad sandy 2 lol just an idea

    Loves and likes ya <3
    Gigi

    Reply
  17. Make handmade says

    October 21, 2011 at 4:28 AM

    Great tutorial and pattern! thanks for sharing.

    Reply

Trackbacks

  1. Easy Halloween party invitations. » The V Spot says:
    July 29, 2014 at 9:50 PM

    […] they definitely are not as detailed as last year’s, they got the job done.  Click HERE to see my easy invitations from […]

    Reply

Leave a Reply Cancel reply

Your email address will not be published. Required fields are marked *

you might also like:

Upcycle: easy DIY faux hammered metal planters (with spider web topiaries.)
Going Batty: Making over a bare wall for Halloween.

Turn Dollar Store beverage napkins into easy Halloween hurricanes.
Cheapy, Creepy, Halloween Party Invitations

Make an easy scrap paper Christmas tree.
Easy Damask Pumpkin using trashed craft supplies.

Easy chain covered pumpkins for Halloween.
Using garlic in your Halloween decor – keep your pantry stocked AND keep vampires away.

punk pumpkin, black, leather, studs, studded, safety pins, Halloween
Make a leather studded punk Pumpkin for Halloween. (“Mom…? Why did you make an S&M pumpkin…?”)
How to make a Haunted Tree. (With things you already have, of course.)

Recent Posts

  • Spooky porch decor and a Halloween Chair.
  • DIY Plaid Wine Glasses
  • Easy Sand-N-Sea Flower Pots
  • How to use an indoor chandelier outside.
  • Quesadillas made with slow cooker Carnitas. (Pork in a crock pot… nothing is easier.)
  • No Sew Project: How to recover your outdoor cushions using fabric and a glue gun.
  • Upcycle project: plain flower pot into decorative ceramic planter.
  • An easy Valentine’s Day globe.
  • Simple, winter themed decor. (Using what you already have, of course.)
  • Easy Goat Cheese Appetizer Recipe

Amazon Associates Disclosure

Vivienne Wagner is a participant in the Amazon Services LLC Associates Program, an affiliate advertising program designed to provide a means for sites to earn advertising fees by advertising and linking to amazon.com.

Popular Posts

  • Cleaning Stove Burners & Grates using Ammonia (The best...
    Comments (632) | Jul 07, 2011
  • Easy Dessert Recipe: Oreo Cheesecake Bites
    Comments (64) | Mar 04, 2014
  • How to store fresh produce – From A to Zucchini.
    Comments (111) | Jan 25, 2012
  • No Sew Project: How to recover your outdoor cushions using f...
    Comments (117) | Mar 03, 2018
  • DIY wine bottle crafts.
    Comments (10) | Aug 22, 2013
Privacy

Copyright © 2023 The V Spot · Website by Houndstooth Media Group