

Yes. You can spray paint paper. You want to cover up any logos or designs. You just need to do it in several light coats and let it dry in between coats. Spray the inside of the bag and the handles too.
(You can skip the part where you forget about them, leave them in the yard overnight, let the morning sprinklers get them wet and then bake them in a 150 degree oven to dry them out. That step is totally unnecessary for most people.)
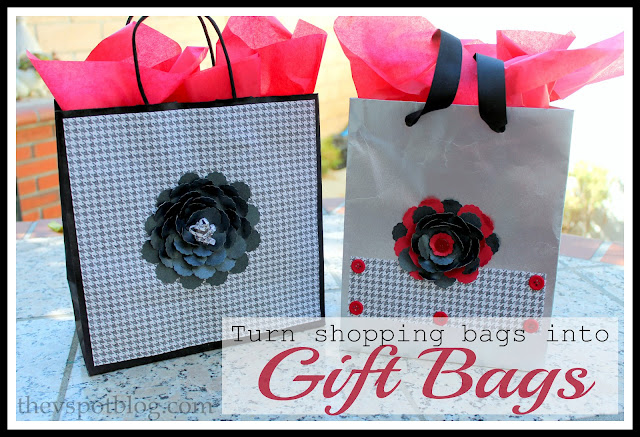
Now for the fun part. Decorating the bags.
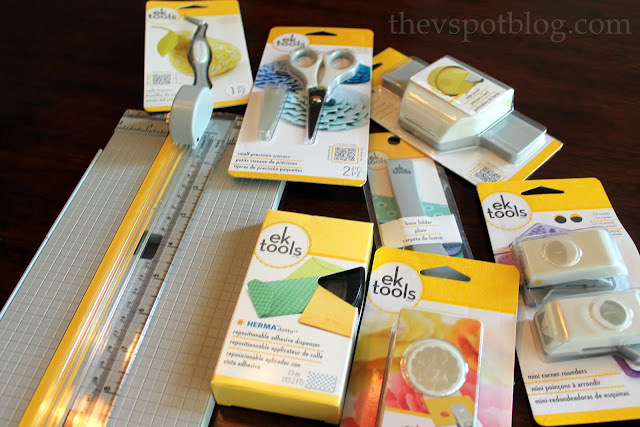
I was very excited that EKSuccess Tools sent a paper cutter. For years I have been making my cuts with a straight edge and an exacto knife. This was soooo much better!

I figured out the size I needed and then quickly cut my scrapbook paper to the right size. EKSuccess Tools also sent a great double sided adhesive dispenser and a boning tool, so adhering the paper to the bag was easy.
Once I got the houndstooth paper onto the bag, it was time to make the paper flower.
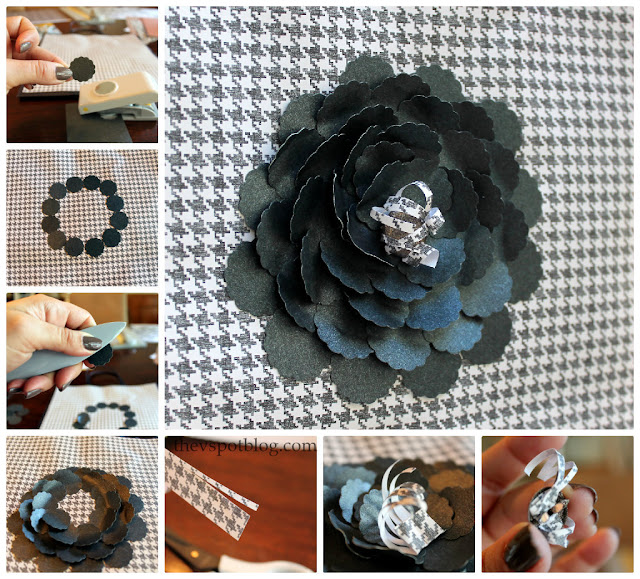
I took the fabulous little petal shaped paper punch (that Grant said looks like a Ritz cracker shape) and punched out several dozen little “petals” (or crackers) from card-stock. Using the double sided adhesive, I stuck them down in a circle in the middle of the bag.
Next, I wrapped the petals around the boning tool, creating a little bend in each one. Add them to the original circle, overlapping until you get to the center.
EKSuccess Tools also have fabulous little precision scissors that allowed me to cut teeny, tiny little fringes in some of the houndstooth paper and then curl it. I adhered that to a glittered brad and then broke out the hot glue gun to adhere the center of the flower.
I repeated a similar process with the other bag, but just a slightly similar design and the addition of some buttons.

I needed to change the handles for this bag and just used grosgrain ribbon.
 |
| Tip of the Day: All craft projects are better if you make them near fresh produce. |
I am very happy with how these little bags turned out. It’s always great to be able to take an item and upcycle it or reuse it somehow.

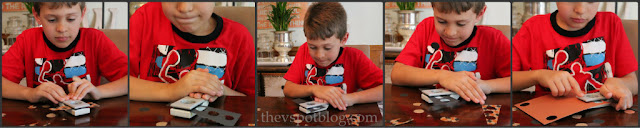
This was fun for my helper as well. Grant loved helping me use the punch to cut out the petals.
This was a fun project. Be sure to check out EKSuccess Tools on Facebook too!

Great idea.
True story… I suck at wrapping gifts. I have my niece one of the note books I posted about last week as a birthday gift. The only unwrapping that child got to do was when she peeled her hands away from her eyes to reveal the gift on the counter in front of her.
Aunt fail!
Have = Gave…. There go my alcoholic thumbs again!
CUUUUUTE!!!
CUUUUUTE!!!
So cute I said it twice. DER.
I have been saving starbucks bags and now I have a reason (excuse) for why I’ve kept them! They are good sturdy bags too! Hello Christmas gift bags!! Great idea toots!
Your bags look so stylish! And I appreciate the optional step you included about wetting and then baking the bags too. 😉
I save my handle bags all year long and voila, Christmas bags. Your gift bags turned out great!
This comment has been removed by a blog administrator.
Great idea, and so cute!
-Erin @ DIY on the Cheap
These turned out great! I have a pile of bags waiting to be made pretty (maybe by Christmas? :))
So pretty, Vivienne. I love me some recycle paper crafts!!
Thank you! I hoard these bags all the time thinking I can do something with them and now I can. 😀
Thank you!! I don’t feel like buying gift bags this year but I totally can’t give gifts in Starbucks bags (even though I figuratively have a million in my house thanks to my sister working there), so now I’m going to cover them in wrapping paper and voila! Google and you have saved my lazy butt this year!
That is great to hear Nikki! Thanks! 🙂