As I mentioned yesterday, the economy is messing with my Mother’s Day Brunch… which is a big deal around here. I change up the theme and color scheme from year to year, and this time, I am going with turquoise and apple green, with pops of tangerine.
I knew I wanted to make tissue paper pom-poms because my flower budget was tiny to begin with. One needs quite a bit of tissue paper to do this. Colored tissue paper was coming in at $2 for 10 sheets. (It takes at least 10 sheets to make a pom-pom.) Unacceptable!
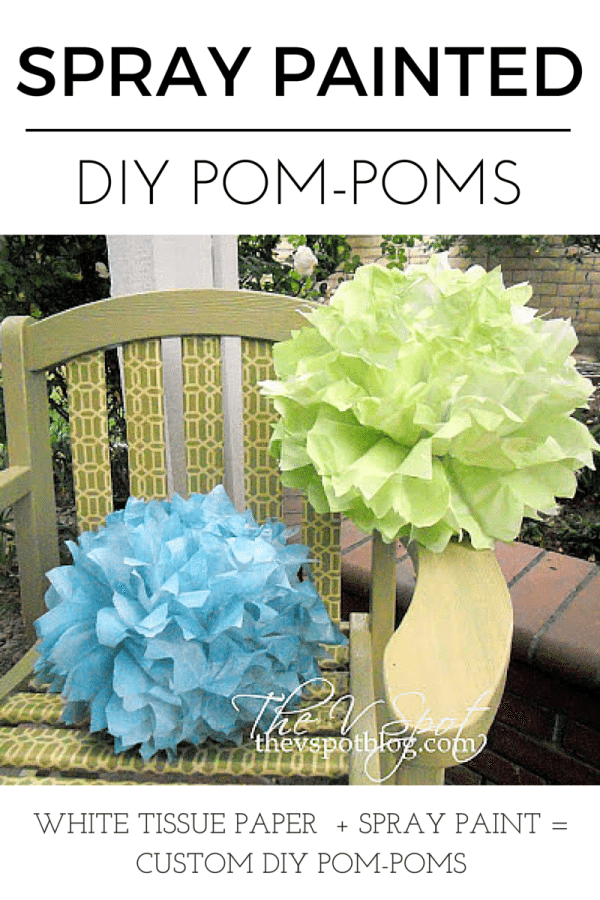
I’ve always said that you can spray paint anything if it will hold still long enough… This is also true of tissue paper. I had plenty of plain white tissue paper that I stocked up on during Christmas clearance sales.
- Make the pom-poms according to Martha’s tutorial.
- Place pom-poms on a flat surface in an open area and sprayed several light coats of paint. You don’t even have to hang them to do this. Set them down, spray. Turn them over and spray again. Just make sure to do it in short, light bursts of paint.
Not only do they accept the paint beautifully, it actually makes them a little bit stiff, so they keep their shape better. Hang them up, fluff any part that got smushed, enjoy.

Um…I never would have thought to do this but I am so excited to try it. Awesome.
Hey thats cool, I never would of thought, I figured it would mess the paper up.
Love the colors
That is one of those “you have to see to believe things”. Beautiful. I am so impressed with your Mother’s Day brunches and all the other thing you are doing. SO creative. You need a show on HGTV.
I also have to say that it is so refreshing to read your remarks about your handsome hubby and kids. Seems like we spend too much time talking about the “less than perfect” stuff and not enough time being grateful. (Me included.)
Thanks for sharing.
Brilliant 😀
Love it! What a great idea. I’m going to have to give this one a whirl.
Love it…Fabulous idea!!!!
Wow! They look great. I wouldn’t have known that you could paint it. Now I do! 🙂
Have a Happy Mother’s Day!
Pam
You are so creative! Love it! Happy Mother’s Day to you! I am sure your brunch will be absolutely perfect. Enjoy 🙂
I’m laughing because THIS picture…the one FEATURING pom poms…really shows the color of that chair. LOL
I love pom poms…I had no clue it took that many sheets to do one though. And WHO would have though of spraypainting tissue paper???
Only you, my friend. Looks fabulous too. I think I like it better than if it was colored tissue to begin with.
Ok, so that is just flippin genius. You really can spray paint anything!
They look beautiful. Happy Mother’s Day to you!
I think they look better like that. You can vary the shading!
Great job!
Those are gorgeous! I love the colors you picked out.
Who knew?!?
I can’t wait to try this! Spray paint has no limits. Thanks for sharing!
Best,
Lauren
I’ve been wanting to freshen up my office and those are the colors I want to use! They are such happy and bright colors!
Have a wonderful Mothers Day!
Uh ~ cool! I’ll have to try that! p.s I have a fab tissue paper pom tute ~ much faster than Martha 😛
Oh they are so beautiful! And I love how they accept the color!!
Very cool!
Hugs
SueAnn
LOVE this idea!!!
Learn something new everyday! I never would have guessed you could spray paint tissue paper. That’s amazing!
I LOVE the color scheme you chose! I totally need to think of something to steal it for!
Loved the flowers, and so cool how the spray-paint turned out!
I can’t wait to hear about the brunch!
That is really good to know… Love how they turned out!
Okay, now are ya gonna give away your secret on how to make the cute poms? I saw some for like $15 each at Party city and almost bought one just to see how to make it so I could do them for my daughter’s birthday party.. so cute!! Love the colors!!
Who would have thought? Thanks for pioneering 😀
That’s amazing!!!
And they are so pretty painted in those colors!
Ashley
http://www.simplydesigning.blogspot.com
Cute decorations will have to remember these
You are the Queen of Spray Paint. They should put your face on some advertisements. STAT.
LOVE the tissue poms. They are one of my absolute FAV things to decorate with. They just scream “PARTY”.
That is really, really clever. You should do a post just on the unusual things that you would never think to spray paint.
BRILLIANT! I love this because some colors of tissue paper are hard to find. Thanks for the great idea & I can’t wait to see the rest of your luncheon.
Warmly, Michelle
Who knew? What a great idea. Thanks for sharing at my Swing into Spring party.
Thanks so much for linking up at Craft and Tell Tuesdays! I never would have thought to spray paint tissue paper! I am a HUGE fan of spray paint…anything to avoid pulling out the paint supplies in the garage… : )
http://www.cherishedbliss.com
I never would have guessed this….and I am someone who will pretty much spray paint anything. Thanks for the fantastic tip!
Genius! I made some tissue poms for a baby shower last month and spent some extra to get the colors I wanted. Having a couples shower this weekend and wanted to make some red and white ones. I will go to the dollar store and get white and paint it red! Thanks!
Jen
So pretty, what a great idea! 🙂
Wow! I had no clue in the world you could spray paint on tissue paper. That is good to know. The flowers look very springy and fun!
Stopping by from Eisy Morgan Inspire hop.
Love it! I totally want to do this! So … my question is now, how do you make the pom-poms?
Mary
http://makingfamilylifefun.blogspot.com
Great project. I’ve made these for many occasions and always get the best responce! ( please be sure to link back to WW)
NO WAY! I would NEVER have thought you could spray paint tissue paper!! But it makes sense that light coats would eventually build and stiffen the paper as well as color it! Thanks for posting this!
This is brilliant- I have lots of old spray paint and tons of tissue paper- I am all over this! Come and link it to Workshop Wednesday. It would be a great addition to the party!
Those look great. I didn’t know you could spray paint tissue paper. Nice to know. Thanks for joining the party.
Cute idea! Come and join my linky party: http://fabricbowsandmore.blogspot.com/
This is such a great idea! Thanks for linking! 🙂
Girl after my own heart. I just made a bunch for my son and was upset at the cost. I was wondering if I could paint them but thought there was no way! Love it. I will feature these tomorrow on my blog.
what a great idea!
THANK-YOU! I am in the midst of planning my oldest son’s graduation from high school and cannot find black tissue paper anywhere!(School colors= black & orange) I have spray painted the mason jars, frames for the photo booth, branches for the ‘stick chandelier’ going in the center of the outdoor canopy, and several other things, but my heart has been set on the large poms as well. I contemplated spray painting them,(slight spray paint obsession)but was worried I’d end up making a big ol’ mess with very little time left for error. Once again, you have come through with a touch of genius. Amazing blog, amazing ideas, and some very entertaining reading. Love it.
i love this idea…i’ve been looking for a tute for these for ages…so thank you!
alison
stuff and nonsense
Love it! Love finding anything else in the world I can spraypaint!! 🙂 Have to share on my FB!
That’s fantastic! I love those!
That’s really neat! I had no clue you could use spray paint on the tissue paper… so many ideas!
I saw your link on Delightful Order!
Kristi @ A Nest in the Making
Yes, you can spray paint everything! 🙂
Thanks for linking this up to our Wicked Awesome Wednesday blog party.
Love it!!!
I would love for you to come link up your post at my “Encouragement is Contagious!” linky party! And… please link up some of your other favorites from blogs you love! Then, those bloggers will also get lots of unexpected, encouraging comments!
Blessings!
Melanie
Good to know, love the color!
Amazing! I would have thought they would shred but that is incredible and so good to know! Thanks for sharing this with us! 🙂
Vanessa
These look AMAZING! What a brilliant idea to spray paint them! 🙂 I would love for you to link up to me new Summer Lovin’ Saturday Party at http://www.homemakerinheels.com
I am also a new follower! 🙂 Have a great weekend! 🙂
Crysta
Homemaker in Heels
They look fantastic! What a great idea! X
Vivienne you are beyond creative and talented girlfriend! Seriously. I would have thought tissue paper would just kinda melt when spray painted. Way to take a chance and have it pay off! I will definitely keep these in mind for future parties! Thank you for sharing the idea with us at Inspiration Friday!
Heather
Hi V…
Ohhh my…your paper pom-pom’s turned out sooo pretty, my friend! I love the colors…bet your Mother’s Day brunch was incredible! Girl, I would have never thought to spray tissue paper pom-poms…how clever and resourceful! I’ll be keeping this idea for future use! Thanks for sharing it with us!
How are you doing, my friend? I hope that my note is finding you and your sweet family all doing well!
Warmest wishes,
Chari
Genius Viv, genius.
Love these Viv!!! They are darling~ sharing this on FB today- thanks for sharing at FNF 🙂
Huh, I would of never thunk to do this 🙂 Turned out great!! Thanks for linking up to Your Whims Wednesday 🙂
Awesome tip, Viv! You’d never know those are spray painted poms…except, of course, after reading this. They are beautiful!
Thanks for joining my Weekend Bloggy Reading party. 🙂
Wow, what a cool idea! I seriously never would have thought to spray paint tissue paper. Brilliant idea!
Visiting from Show & Tell Friday. TFS!
What a cool idea! Love that it makes them a little stiffer too. Thanks for linking up!
i would never have thought of that,. great project! hopped over from shabby chic!
thestyleprojects.blogspot.com
I have actually been wondering this. Cuz I have a ton of white that I got from the dollar store but wanted some color. Thank you so much for sharing. I found you through under the table and dreaming linky party. I also pined this in my pinterest files. Come and say hi I love visitors
tyandwhitneyulrich.blogspot.com
Ok! What? This is life changing info here! Love this, and they do get all smushed
Thanks,
Lina
Fancy Frugal Life
So SO COOL! Thanks for sharing at Make Something Mondays!
~ Sarah
spray paint! why didn’t I think of that! 🙂 great idea!!!
Awesome, crafty, original technique! I love tissue pom-poms, but they do tend to flop a bit and they’re so fragile. I love the fact that the spray paint does double duty as accent and preserver. Brilliant Viv!
That is awesome!! i LOVE spray paint! so fun!
Brilliant! I do hate spending all that cash on colored tissue and it is never quite the right color anyway. FABULOUS!
so pretty, great idea! so creative~love the power of paint.
LOVE those colors! They turned out beautiful!
Smart idea!
Smart idea!
Smart idea!
I love it! I featured your cute spray painted pom pom balls on hoo’s got talent! Thanks for linking up to the party!
Such a fun way to spruce up any party!
thanks!
I never would have thought to spray paint tissue paper-I would assume that the paint would have made it soggy! This is good information to know. . .
Totally love this idea- these poms are just darling!
Okay, so who has the best selection of spray paint? I LOVE SPRAY PAINT! But I’m about to start working on my daughter’s Madhatter room and I need a hot pink, turq, and lime green. Maybe purple. 😉
Love this idea!
great thrifty tip!! we are featuring you!!
Amy
Would love for you to stop by to visit me… http://bestpartofbelieveis.blogspot.com/ I am your newest follower!! Hope you follow back!!
~ Nikki
Don’t forget to grab my linky-tag! 😀
What an ingenious idea! I would have never thought of using spray paint on pom-poms…I should have though, because I seem to be spray painting everything minus my kid. hahaha.
I am featuring you tomorrow so stop by and say hi!
xoxo
Halz
this is awesome! I too am a believer that you can spray paint anything! good job on your tissue flower balls!
I had NO idea!!! Very cool!!! How do you hang your poms? I’m planning to hang them from the ceiling for our wedding reception…
very pretty was not aware that could be done thanks for sharing come see what I shared at http://shopannies.blogspot.com
Oh my goodness, I cannot believe these are painted. They look fantastic.. great job!!
Your pom poms caught my eye on the link party at Remodelaholic because I am starting to make some for a baby shower I am giving my daughter. So true about the costs of tissue paper, but the white you can get cheap. Great idea! I am also experimenting with napkins, they work really well for smaller to medium sized pom poms.
what a super cute idea! following you from I heart nap time 😉
–Michelle
This is a completely brilliant idea!
Featured this as part of my BFF Wrap Up!
Who knew??? I’m going to try it! Thanks for sharing on Pinkalicious Thursday!
Oh…let me tell you that you just MADE MY WEDDING!!! I’ve been wanting these as isle decoration (my venue doesn’t allow fake flower petals and the real thing in excess is too expensive)…my problem is that our green is nowhere to be found (all the greens out there are too bright (citrus) or too dark (evergreen)) so this is WONDERFUL!!!! Now, I’ve got to go find some spraypaint to match! Thank you so much!!!
Cute! Please stop by and join our link party: http://fabricbowsandmore.blogspot.com/
What a fantastic idea!! I love crafts, but never thought about doing this before!
Love your blog and am now a follower.
Stumbled for Stumble Thursday.
Angela from MoveOverBetty.com
Wow! I never would have thought of this! So cool!
Stumbling through from Stumble Through Thursday! Would love if you’d return the visit and the stumble at http://formulamom.com
Wow…this is AMAZING! Thanks for the tip…I love it!
Stumbled you…my post is:
http://keenlykristin.com/2011/06/summer-of-kristin-a-sad-day-in-wildwood/
Thanks!
Kristin 🙂
Didn’t know you could spray paint tissue paper…well done for being innovative!